Table of Contents
Advertisement
Quick Links
Advertisement
Table of Contents

Subscribe to Our Youtube Channel
Related Manuals for Ryobi R36XPWS10


Summary of Contents for Ryobi R36XPWS10
- Page 1 FRONT PAGE FRONT PAGE R36XPWS10...
-
Page 2: Intended Use
■ Ensure that the safety devices are in good IMPORTANT! working condition. Make sure that all safety It is essential that you read the instructions devices are operating properly before each in this manual before assembling, operating, use. and maintaining the product. ■... -
Page 3: Battery Pack Safety Warnings
■ Exercise caution to avoid slipping or falling. ■ Under abusive conditions, liquid may be ejected from the battery pack; avoid contact. ■ Keep firm footing and balance. Do not If contact accidentally occurs, flush with overreach. Overreaching can result in loss water. -
Page 4: Transporting Lithium Batteries
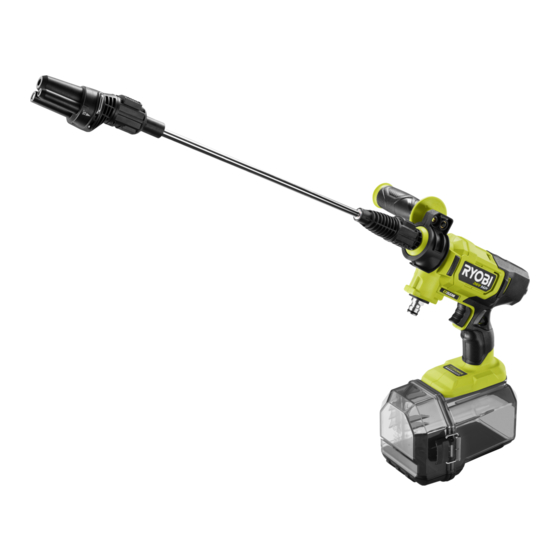
SAFETY DEVICES ■ For transportation in a vehicle, secure the product against movement or falling to ■ Lock-out button prevent injury to persons or damage to the – The lock-out button locks the switch product. trigger prevents unintentional WARNING! Store the product indoors only. opening of the high-pressure jet. - Page 5 R36XPWS10 Release button Auxiliary handle collar Auxiliary handle Mode control selector Low mode Medium mode High mode Bucket clip Switch trigger Lock-out button Handle grip Battery compartment Latch 2L bottle adapter Water inlet Quick connector Siphon hose Floater Filter Metal wand...
- Page 6 Wear full eye and ear protection, Insert the power washer assembly into Connect the threaded end of the metal substantial footwear, and long trousers the auxiliary handle collar. Rotate the wand to the power washer assembly. at all times while operating the product. auxiliary handle clockwise to secure.
- Page 7 Insert the end of the 3-in-1 nozzle into Never use the power washer without connecting the 3-in-1 nozzle and metal the connector end of the metal wand wand. and push until it clicks into place. When using tap water, remove the filter NOTE: The water source can either be Flip up the latch and unlock the latch and floater, then connect the hose to...
- Page 8 Using the 3-in-1 Using the mode p.11 nozzle control selector MODE Storing the product p.12...
- Page 9 USING THE 3-IN-1 NOZZLE 1. Press the lock-out button to lock the product. 2. Turn the 3-in-1 nozzle clockwise or counterclockwise to select the spray pattern. NOTE: Connect the auxiliary handle into the auxiliary handle collar either from the left or right.
- Page 10 NOTE: Use the rinse setting for watering applications. NOTE: Use the turbo setting for cleaning or washing stubborn dirt or surfaces. WARNING: Do not squeeze the switch trigger while changing nozzle spray patterns. Operation...
- Page 11 MODE MODE USING MODE CONTROL SELECTOR MODE NOTE: The left-most light indicates low mode and will light up when the mode control selector is pressed once. NOTE : The middle light indicates medium mode and will light up when the mode control selector is pressed twice.
- Page 12 STORING THE PRODUCT 1. Flip up the latch and unlock the latch clip to open the battery compartment. 2. Press the battery pack and slide it outward to remove. 3. Close the battery compartment and press the latch down. 4. Pull down the quick connector, and disconnect the siphon hose from the water inlet.
- Page 13 6. Clean the product with a brush. 7. Turn water inlet adaptor counterclockwise to loosen and access the filter. 8. Use water to clean the filter. Install the o-ring back into the product and turn the water inlet adapter clockwise to secure it in place.
- Page 14 10. Turn the auxiliary handle counterclockwise to loosen the auxiliary handle collar. Remove the auxiliary handle. 11. Store the product in a cool, dry, and well- ventilated place that is inaccessible to children and well away from sources of ignition. Storage...
-
Page 15: Product Specifications
Nozzle kit REZ7 Cordless power washer WARNING! The declared vibration total values and the declared noise emission values Model R36XPWS10 given in this instruction manual have been Rated voltage 36 V d.c. measured in accordance with a standardised Weight 2.5 kg test and may be used to compare one tool with another. - Page 16 Techtronic Industries Australia Pty Ltd 31 Gilby Road, Mount Waverley, VIC 3149 Melbourne, Australia Techtronic Industries N.Z. Limited Unit C, 70 Business Parade South, Highbrook, Auckland 2013, New Zealand RYOBI is a trade mark of Ryobi Limited, and is used under license. 961480297-01...
Need help?
Do you have a question about the R36XPWS10 and is the answer not in the manual?
Questions and answers