Advertisement
Available languages
Available languages
Advertisement
Chapters

Related Manuals for MEDCAPTAIN VS-10S


Summary of Contents for MEDCAPTAIN VS-10S
- Page 1 VS-10S/VS-10M/VS-10H Video Laryngoscope Operation Manual Before using the VS-10S/VS-10M/VS-10H video laryngoscope, please read this Manual carefully and follow the safety precautions and operating instructions contained herein. MEDCAPTAIN MEDICAL TECHNOLOGY CO., LTD.
- Page 2 Statement MEDCAPTAIN reserves the final interpretation right to this Manual. To provide accurate and efficient product services, MEDCAPTAIN shall have the right to change the contents of this Manual without prior notice under the premise of complying with medical device regulations. The latest version accumulates all changes made in earlier versions.
- Page 3 After-Sales Service Thanks for purchasing our video laryngoscope. MEDCAPTAIN provides limited warranty for the product. That is, we provide free after-sales services for the product within the warranty period. The specific warranty period is stipulated in the sales contract. For details, please contact your local distributor.
- Page 4 Preface Illustrations All the illustrations provided in this operation manual are for your reference only. The settings or data on the illustrations may differ from the actual settings or data of the product. Conventions Italics: Indicates the quoted content. ...
-
Page 5: Table Of Contents
Contents 1 OVERVIEW................1 2 SAFETY ................... 3 3 PRODUCT SPECIFICATIONS ..........7 4 PRODUCT DESCRIPTION ........... 10 5 OPERATING INSTRUCTIONS ..........17 6 SETTINGS ................23 7 COMMON FAULTS ............... 25 8 CLEANING AND DISINFECTION ........26 9 MAINTENANCE ..............30 APPENDIX A ................ -
Page 6: Overview
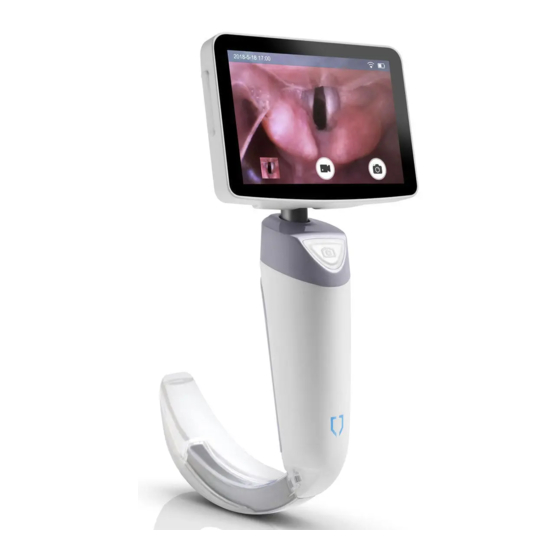
Overview 1 Overview 1.1 Intended Use The VS-10 series video laryngoscope is intended for medical personnel to lift up a patient’s epiglottis to expose the glottis for accurate tracheal intubation, thereby implementing anesthesia or first aid. It can also be used for intraoral examination and treatment. - Page 7 Overview With the design of an independent physical photo taking/video recording button as well as a photo taking button and a video recording button on the display interface, the video laryngoscope allows a user to press the physical button or tap the photo taking/video recording button on the interface to take a photo/record a video.
-
Page 8: Safety
Safety 2 Safety 2.1 Warnings and Cautions In this Manual, the precautions are classified by importance into warnings and cautions as defined below: WARNING: The precautions related to safety and effectiveness. Failure to follow them may cause personal injuries. CAUTION: The precautions related to guidance and suggestions. - Page 9 Safety In case of any exception of the patient or device, please take appropriate measures to ensure patient safety. If a device exception is found during the use, please take the device out from the oral cavity of the patient. ...
- Page 10 Safety This product requires maintenance by authorized personnel. The authorized personnel can ask for such materials as the service manual and list of spare parts from the manufacturer. CAUTION: The applied part of the video laryngoscope is the laryngoscope blade. ...
- Page 11 Safety Description Description Symbol Symbol DISPOSAL: Do not dispose CE Marking: conforms of this product as unsorted essential municipal waste. Separate requirements collection of such waste for Medical Device special treatment Directive 93/42/EEC. necessary. Refer operation Non-ionizing manual. electromagnetic radiation Humidity limitation Stacking limit by number This way up...
-
Page 12: Product Specifications
Product Specifications 3 Product Specifications Name Video Laryngoscope Model/ VS-10S/VS-10M/VS-10H Specification Dimensions 191(H) x 92 (W) x 112 (D) mm Weight About 0.25kg (including the battery) Input voltage: AC 100-240V 50/60Hz. Power Adapter Input power: 25VA. DC output voltage: 5V 2A. - Page 13 Product Specifications Color Restoration Not smaller than level 4 Capability Depth of Field 10-80mm Field Angle Not smaller than 60° Viewing Angle 0° ± 10° Illumination Intensity Not smaller than 600lx Light Source Color Not smaller than 5000K Temperature Circular Arc Radius of Circular arc radius: 75mm;...
- Page 14 Product Specifications Date of Manufacture See the product label. IEC 60601-1:2012 Medical Electrical Equipment, Part 1: General Requirements for basic safety and essential performance IEC 60601-2-18:2009 Medical electrical equipment -Part 2-18: Particular requirements for the basic safety and essential performance endoscopic...
-
Page 15: Product Description
Product Description 4 Product Description 4.1 Structural Composition The video laryngoscope mainly consists of the display assembly, handle assembly (including battery), camera assembly, and power adapter. The accessories include the HDMI connection cable and USB data cable. 4.2 Operating Principles The video laryngoscope obtains image information using the camera at the end of the handle insertion part. - Page 16 Product Description 1 - Power button 2 - Charge indicator 3 - HDMI interface 4 - USB (Type C) interface 5-Touch display screen 6 - Screen shell 7 - LED light source 8 - Camera 9-Handle insertion part 10 - Snap joint 11 - Three-way spindle 12-Photo taking/video recording button 13 -Handle cap...
- Page 17 Product Description Power button: In power-off state, press and hold this button to power on the device. In power-on state, press and hold this button for over 1.5s to power off the device. Charge indicator: Used to indicate the battery status. It has two colors: yellow and green.
- Page 18 Product Description Snap joint: Used for locking the laryngoscope blade. Screen shell: Used to fasten and support the display assembly. Three-way spindle: Used to connect the display assembly and handle assembly and to enable vertical and horizontal rotation of the display. ...
- Page 19 Product Description Status area: Displays the date, time, HDMI icon, USB icon, WiFi icon, and battery icon. Image display area: Displays the scene seen by the camera. Operation area: The buttons in the operation area are touch buttons. Table 4-1 Icon description Icon Description...
- Page 20 Product Description Icon Description Icon Description remaining battery remaining battery capacity about capacity is about 40%~60%. 60%~80%. remaining battery remaining battery capacity about capacity is about 5%~20%. 20%~40%. remaining battery Video recording button. Tap capacity is smaller than this button start recording.
- Page 21 The VS-10S/VS-10M/VS-10H video laryngoscope must be used in combination with the disposable laryngoscope blade manufactured by MEDCAPTAIN LIFE SCIENCE CO., LTD.
-
Page 22: Operating Instructions
Operating Instructions 5 Operating Instructions 5.1 Installing a Laryngoscope Blade This device must be used together with a laryngoscope blade to facilitate smooth intubation. 1. Open 1/3 of the laryngoscope blade’s packaging bag. Hold the connector of the laryngoscope blade, and pull 1/3 of the laryngoscope blade out of the bag. 2. - Page 23 Operating Instructions 5.3 Check Before Use 5.3.1 Checking the Appearance Before use, check that the surfaces of the video laryngoscope and laryngoscope blade are smooth without any sharp edge, burr, or protrusion. If any sharp edge, burr, or protrusion is found, replace the laryngoscope blade or use another video laryngoscope to avoid harm to the patient.
- Page 24 Operating Instructions 5.3.4 Checking the Camera Before use, check whether the LED light source can be illuminated, whether a clear, correct and live image can be displayed on the screen, whether a photo/video can be taken/recorded, whether the photo taken and the video recorded can be stored in the multimedia library, and whether the photo and video stored are clear.
- Page 25 Operating Instructions 5.4 Date and Time Setting Before using the video laryngoscope for the first time, set the date and time to ensure correct naming of the photo and video. 1. On the main observation interface, slide from top to bottom of the screen to access the general setting interface.
- Page 26 Operating Instructions 3. After the glottis is clearly exposed, insert the tracheal tube (with an intubation guide wire inside) into the patient’s oral cavity along the right side of the laryngoscope blade. Once the distal end of the tracheal tube reaches the visual field in front of the laryngoscope blade, the distance between the distal end of the tracheal tube and the glottis will be clearly displayed on the display screen.
- Page 27 Operating Instructions 5.6 Photo Taking After intubation, the real-time scene seen by the camera can be captured by using the photo taking function, and the photo taken can be stored in the multimedia library. Two photo taking methods are available: ...
-
Page 28: Settings
Settings 6 Settings 6.1 Multimedia Library The multimedia library stores photos and videos and allows users to view, play back, and delete the photos and videos stored. On the main observation interface, tap the photo/video thumbnail to access the multimedia library interface. - Page 29 Settings On the multimedia library interface, tap the return icon or press the photo taking/video recording button to return to the main observation interface. 6.2 General Settings Users are allowed to set the screen brightness, WiFi, and date and time. ...
-
Page 30: Common Faults
Common Faults 7 Common Faults Fault Symptom Possible Cause Solution device Battery 1. Charge the device by using the power cannot empty. adapter. powered on. Battery 2. After the battery is fully charged, faulty. press and hold the power button to power on the device. -
Page 31: Cleaning And Disinfection
Cleaning and Disinfection 8 Cleaning and Disinfection It is highly recommended that the materials and methods listed in this chapter be used for cleaning and disinfection of the device. If other materials or methods are used, the device may be damaged or its service life may be shortened. CAUTION: ... - Page 32 Cleaning and Disinfection 5. Prepare several pieces of soft medical gauze, a detergent container, and a disinfectant container. 8.2 Cleaning 1. Completely immerse a piece of soft medical gauze in the recommended detergent solution, wring out the gauze, and then use the gauze to wipe the device surface.
- Page 33 Cleaning and Disinfection Be careful not to scratch the LED light and camera during the cleaning. In addition, do not use a hard object to scrub the transparent baffle in front of the camera. Otherwise, scratches may be caused, which will affect the image display.
- Page 34 Cleaning and Disinfection WARNING: Use the disinfectant according to its operation manual. Do not autoclave the device. Be careful not to scratch yourself when disinfecting the metal handle insertion part. Be careful not to scratch the LED light and camera during the disinfection. 8.4 Air Drying and Transportation 1.
-
Page 35: Maintenance
Maintenance 9 Maintenance 9.1 Regular Maintenance 9.1.1 Maintenance Plan To ensure safe use and lengthen the service life of the video laryngoscope, please conduct regular maintenance and check. Table 9-1 lists the maintenance plan. Table 9-1 Maintenance plan Maintenance Frequency Operator Maintenance Item... - Page 36 9.2 Battery Maintenance 9.2.1 Battery Overview The VS-10S/VS-10M/VS-10H video laryngoscope is equipped with a built-in battery, which is charged through the power adapter. Before use, fully charge the battery of the video laryngoscope to ensure continuous operation of the video laryngoscope.
- Page 37 Maintenance 9.2.2 Using the Battery Before using the device for the first time or before using the device after the device is not used for a long time, charge the built-in battery. Power off the device and connect it to an external power supply for at least 4 hours until the battery is fully charged.
- Page 38 Maintenance 9.2.3 Battery Check To ensure the battery performance, you must perform regular maintenance for the battery. The method is as follows: 1. Ensure that the device is not being used for a patient, and power off the device. 2. Connect the device to the AC power supply through the power adapter to recharge the battery for over 4 hours.
- Page 39 Maintenance CAUTION: Battery ageing is an inherent characteristic of the battery. To ensure the operation safety of the video laryngoscope, please contact the distributor for battery replacement after the built-in battery has been used for 2 years. Please check and replace the battery at regular intervals. ...
- Page 40 Maintenance 9.4 Transportation The video laryngoscope is allowed to be transported using a common vehicle, but it must be protected from the drastic impact, vibration, and rain and snow splash during the transportation. In addition, the video laryngoscope must be transported in accordance with the requirements specified in the order contract.
- Page 41 The VS-10S/VS-10M/VS-10H video laryngoscope complies with EMC standard IEC 60601-1-2:2014. Users must install and use the VS-10S/VS-10M/VS-10H video laryngoscope based on the EMC information provided in the accompanying document. Portable and mobile RF (Radio-Frequency) communication devices may affect the performance of the VS-10S/VS-10M/VS-10H video laryngoscope.
- Page 42 Appendix A degraded due to EM DISTURBANCES, the VS-10S/VS-10M/VS-10H video laryngoscope may cause patient hazard. To assure that the VS-10S/VS-10M/VS-10H video laryngoscope remains safe with regard to electromagnetic disturbances throughout the expected service life: Conduct periodic maintenance based recommended maintenance/service interval and method provided in the operation manual.
- Page 43 Transmitting power <20dBm Guidance and manufacturer’s declaration - electromagnetic emissions The VS-10S/VS-10M/VS-10H video laryngoscope is intended for use in the electromagnetic environment specified below. The customer or the user of the VS-10S/VS-10M/VS-10H video laryngoscope should assure that it is used in such an environment.
- Page 44 Guidance and manufacturer’s declaration - electromagnetic immunity The VS-10S/VS-10M/VS-10H video laryngoscope is intended for use in the electromagnetic environment specified below. The customer or the user of the VS-10S/VS-10M/VS-10H video laryngoscope should assure that it is used in such an environment. IMMUNITY...
- Page 45 Appendix A discharge ± 2 kV,± 4 kV,± 8 ± 2 kV,± 4 concrete or ceramic tile. (ESD) kV,± 8 kV, If floors are covered ± 15 kV air ± 15 kV air with synthetic material, 61000-4-2 the relative humidity should be at least 30 %.
- Page 46 225 º , 270 º and 225 º , 270 º and hospital environment. If 61000-4-11 315 º ; 315 º ; user cycle cycle VS-10S/VS-10M/VS-10 H video laryngoscope 70% 25/30 cycles 25/30 requires continued Single phase: at 0 º cycles operation during power...
- Page 47 Guidance and manufacturer’s declaration - electromagnetic immunity The VS-10S/VS-10M/VS-10H video laryngoscope is intended for use in the electromagnetic environment specified below. The customer or the user of the VS-10S/VS-10M/VS-10H video laryngoscope should assure that it is used in such an environment. Immunity...
- Page 48 Appendix A MHz; 9V/m:704-787MH 9V/m:704-787M 28V/m:800-960M 80M~800MHz 28V/m:800-960 MHz; 28V/m:1700-1990 800M~2.7GHz 28V/m:1700-199 MHz; where 0MHz; 28V/m:2400-2570 maximum output power 28V/m:2400-257 MHz; rating of the transmitter 0MHz; 9V/m:5100-5800 in watts (W) according 9V/m:5100-5800 MHz; transmitter MHz; manufacturer and d is recommended separation distance in meters (m)
- Page 49 RF transmitters, an electromagnetic site survey should be considered. If the measured field strength in the location in which the VS-10S/VS-10M/VS-10H video laryngoscope is used exceeds the applicable RF compliance level above, the VS-10S/VS-10M/VS-10H video laryngoscope should be observed to verify normal operation.
- Page 50 The VS-10S/VS-10M/VS-10H video laryngoscope is intended for use in an electromagnetic environment in which radiated RF disturbances are controlled. The customer or the user of the VS-10S/VS-10M/VS-10H video laryngoscope can help prevent electromagnetic interference by maintaining a minimum distance between...
- Page 51 Appendix A separation distance din meters (m) can be determined using the equation applicable to the frequency of the transmitter, where P is the maximum output power rating of the transmitter in watts (W) according to the transmitter manufacturer. NOTE 1 At 80 MHz and 800 MHz, the separation distance for the higher frequency range applies.
- Page 52 REPUBLIC OF CHINA EU- Representative name: Shanghai International Holding Corp. GmbH (Europe) EU- Representative address: Eiffestrasse 80, 20537 Hamburg, Germany Fax: +86-755-26001651 Postal code: 518055 Website: http://www.medcaptain.com E-mail: MC.service@medcaptain.com © Copyright 2019 MEDCAPTAIN MEDICAL TECHNOLOGY CO., LTD. All rights reserved.
- Page 53 VS-10S/VS-10M/VS-10H Video-Laryngoskop Bedienungsanleitung Bevor Sie das Video-Laryngoskop VS-10S/VS-10M/VS-10H verwenden, lesen Sie bitte dieses Handbuch sorgfä ltig durch und befolgen Sie die darin enthaltenen Sicherheitsvorkehrungen und Bedienungsanleitungen. MEDCAPTAIN MEDICAL TECHNOLOGY CO., LTD.
- Page 54 MEDCAPTAIN sein chinesischer Name, sind eingetragene Marken im Besitz von MEDCAPTAIN. Erklä rung MEDCAPTAIN behä lt sich das Recht auf die endgü ltige Auslegung dieses Handbuchs vor. genaue effiziente Produktdienstleistungen anzubieten, MEDCAPTAIN das Recht, den Inhalt dieses Handbuchs ohne vorherige Ankü...
- Page 55 Geistiges Eigentum und Erklä rung alle Ersatzkomponenten und Zubehö rteile von MEDCAPTAIN zur Verfü gung gestellt werden. alle Aufzeichnungen des Wartungsdienstes aufbewahrt werden. Informationen zur Version V1.0 Version der Bedienungsanleitung: Erste Verö ffentlichung Softwareversion: V1 Herausgegeben Juni 2020...
- Page 56 Kundendienst Vielen Dank fü r den Kauf unseres Video-Laryngoskops. MEDCAPTAIN bietet eine eingeschrä nkte Garantie fü r das Produkt. Das heiß t, wir bieten Ihnen innerhalb der Garantiezeit einen kostenlosen Kundendienst fü r das Produkt. Die jeweilige Garantiezeit ist im Kaufvertrag festgelegt. Fü r Einzelheiten wenden Sie sich bitte an Ihren lokalen Vertriebspartner.
- Page 57 Kundendienst Adresse des Kundendienstes: 12th Floor, Baiwang Research Building, No.5158 Shahe West Road, Xili, Nanshan, 518055 Shenzhen, Guangdong, PEOPLE'S REPUBLIC OF CHINA Fax: +86-755-26001651 Website: http://www.medcaptain.com E-Mail: MC.service@medcaptain.com...
- Page 58 Vorwort Illustrationen Alle in dieser Bedienungsanleitung enthaltenen Abbildungen dienen nur zu Ihrer Information. Die Einstellungen oder Daten auf den Abbildungen kö nnen von den tatsä chlichen Einstellungen oder Daten des Produkts abweichen. Konventionen Kursivschrift: Gibt den zitierten Inhalt an. ...
- Page 59 Inhalte 1 ÜBERSICHT ................1 2 SICHERHEIT ................3 3 PRODUKTSPEZIFIKATIONEN ..........8 4 PRODUKTBESCHREIBUNG ..........11 5 BEDIENUNGSANLEITUNG ........... 19 6 EINSTELLUNGEN ..............27 7 HÄUFIGE FEHLER ..............31 8 REINIGUNG UND DESINFEKTION ........33 9 WARTUNG ................38 ANHANG ELEKTROMAGNETISCHE VERTRÄGLICHKEIT (EMV) ............
-
Page 60: Übersicht
Übersicht 1 Übersicht 1.1 Bestimmungsgemä ß er Gebrauch Das Video-Laryngoskop der Serie VS-10 ist fü r medizinisches Personal gedacht, das die Epiglottis eines Patienten anheben soll, um die Glottis fü r eine prä zise Trachealintubation freizulegen und so eine Anä sthesie oder Erste Hilfe durchzufü... - Page 61 Übersicht Das Video-Laryngoskop verfü gt ü ber eine unabhä ngige physische Foto-/Videoaufzeichnungstaste sowie ü ber eine Foto- eine Videoaufzeichnungstaste auf der Benutzeroberflä che auf dem Display. Der Benutzer kann physische Taste drü cken oder Foto-/Videoaufzeichnungstaste auf dem Display tippen, um ein Foto oder ein Video aufzunehmen.
-
Page 62: Sicherheit
Sicherheit 2 Sicherheit 2.1 Warnungen und Vorsichtsmaß nahmen In diesem Handbuch werden die Vorsichtsmaß nahmen nach ihrer Bedeutung in Warnhinweise und Vorsichtsmaß nahmen wie unten definiert eingeteilt: WARNUNG: Die Vorsichtsmaß nahmen beziehen sich auf Sicherheit und Effektivitä t. Ihre Nichtbeachtung kann zu Personenschä den fü hren. VORSICHT: Die Vorsichtsmaß... - Page 63 Sicherheit Fü hren Sie dieses Gerä t wä hrend der klinischen Anwendung nicht fü r lä ngere Zeit in die Trachea des Patienten ein. Die Verwendung Video-Laryngoskops sollte regelmä ß ig medizinischem Fachpersonal ü berwacht werden. Im Falle einer Ausnahmesituation des Patienten oder des Gerä ts ergreifen Sie bitte geeignete Maß...
- Page 64 Sicherheit Versuchen Sie nicht, die Software des Video-Laryngoskops zu aktualisieren. Um die Software zu aktualisieren, wenden Sie sich bitte an Ihren lokalen Vertriebspartner, um Hilfe zu erhalten. Das Software-Upgrade muss von geschultem Fachpersonal durchgefü hrt werden. Andernfalls kann am Video-Laryngoskop eine Stö...
- Page 65 Sicherheit 2.2 Symbolbeschreibung Tabelle 2-1 Liste der Symbole Beschreibung Beschreibung Symbol Symbol VORSICHT Allgemeines Warnzeichen Wechselstrom Gleichstrom Anwendungsteil Staubdicht und gegen starke IP66 Wasserstrahlen geschü tzt. Hersteller Herstellungsdatum Bevollmä chtigter Vertreter Seriennummer Europä ischen Gemeinschaft ENTSORGUNG: Entsorgen CE-Kennzeichnung: Sie dieses Produkt nicht als Entspricht unsortierten Hausmü...
- Page 66 Sicherheit Beschreibung Beschreibung Symbol Symbol Nicht-ionisierende Siehe elektromagnetische Bedienungsanleitung. Strahlung Begrenzung Begrenzung der Stapelung Luftfeuchtigkeit nach Anzahl Zerbrechlich, mit Vorsicht Oben behandeln Trocken lagern Vor Sonnenlicht schü tzen Begrenzung atmosphä rischen Temperaturgrenze Drucks Gerä teklasse II HDMI-Schnittstelle HDMI 7/ 56...
-
Page 67: Produktspezifikationen
Produktspezifikationen 3 Produktspezifikationen Name Video-Laryngoskop Modell/Spezifikation VS-10S/VS-10M/VS-10H Abmessungen 191 (H) x 92 (B) x 112 (T) mm Gewicht Etwa 0,25 kg (einschließ lich der Batterie) Eingangsspannung: AC 100-240V 50/60Hz. Netzteil Eingangsleistung: 25 VA. Ausgangsgleichspannung: 5V 2A. Eingebaute Batterie: 3,6 V 3400mAh. - Page 68 Produktspezifikationen Bildschirms Maximaler horizontaler Drehwinkel: 270° ± 10° Rä umliche Auflö sung Nicht weniger als 6,5 lp/mm Fä higkeit zur Nicht kleiner als Stufe 4 Farbwiederherstellung Tiefenschä rfe 10-80 mm Feldwinkel Nicht kleiner als 60° Sichtwinkel 0° ± 10° Beleuchtungsstä rke Nicht weniger als 600lx Farbtemperatur der Nicht weniger als 5000 K...
- Page 69 Produktspezifikationen 2. Typ BF Anwendungsteil; 3. IP66; 4. Nicht steril; 5. Keine Kategorie AP/APG-Ausrü stung; 6. Betriebsart: kontinuierlich; Lebensdauer 5 Jahre Herstellungsdatum Siehe Produktetikett. IEC 60601-1:2012 Medizinische elektrische Gerä te, Teil 1: Allgemeine Anforderungen fü r grundlegende Sicherheit grundlegende Leistung ...
-
Page 70: Produktbeschreibung
Produktbeschreibung 4 Produktbeschreibung 4.1 Struktureller Aufbau Das Video-Laryngoskop besteht hauptsä chlich aus der Anzeigeeinheit, dem Handgriff (einschließ lich Batterie), der Kameraeinheit und dem Netzteil. Zum Zubehö r gehö ren das HDMI-Verbindungskabel und das USB-Datenkabel. 4.2 Betriebsgrundsä tze Das Video-Laryngoskop erhä lt die Bildinformationen mit Hilfe der Kamera am Ende des Griffeinfü... - Page 71 Produktbeschreibung 1 - Ein/Aus-Schalter 2 - Ladestandssanzeige 3 - HDMI-Schnittstelle 4 - USB-Schnittstelle (Typ C) 5 - Touchscreen-Bildschirm 6 - Bildschirmgehä use 7 - LED-Lichtquelle 8 - Kamera 9 - Handgriff-Einfü hrungsteil 10 - Schnappverbindung 11 - Dreiwege-Spindel 12 - Fotoaufnahme/Videoaufnahme-Taste 13 - Handgriff-Kappe 14 - Handgriff 15 - Batterieabdeckung...
- Page 72 Produktbeschreibung Ein/Aus-Schalter: Drü cken und halten Sie im ausgeschalteten Zustand diese Taste, um das Gerä t einzuschalten. Halten Sie im eingeschalteten Zustand diese Taste lä nger als 1,5 s gedrü ckt, um das Gerä t auszuschalten. Ladestandsanzeige: Wird zur Anzeige des Batteriestatus verwendet. Sie hat zwei Farben: gelb und grü...
- Page 73 Produktbeschreibung Kamera: Wird fü r Fotoaufnahmen und Videoaufnahmen verwendet. Handgriff-Einfü hrungsteil: Dient zum Anschließ en und Befestigen des Laryngoskopspatels. Schnappverbindung: Dient zur Befestigung des Laryngoskopspatels. Bildschirmgehä use: Wird Befestigung Unterstü tzung Anzeigeeinheit verwendet. Dreiwege-Spindel: Wird verwendet, um die Anzeigeeinheit und die Griffeinheit zu verbinden und die vertikale und horizontale Drehung der Anzeige zu ermö...
- Page 74 Produktbeschreibung 4.4 Bildschirm Die Hauptbenutzeroberflä che auf dem Anzeigebildschirm des Gerä ts besteht Anzeigebereichen: Statusbereich, Bildanzeigebereich Bedienungsbereich. Statusbereich: Zeigt das Datum, die Uhrzeit, das HDMI-Symbol, das USB-Symbol, das WLAN-Symbol und das Batteriesymbol an. Bildanzeigebereich: Zeigt die von der Kamera aufgenommene Szene an. ...
- Page 75 Produktbeschreibung Tabelle 4-1 Symbolbeschreibung Symbol Beschreibung Symbol Beschreibung USB-Kabel oder Das HDMI-Kabel ist an USB-Laufwerk ist an das das Gerä t angeschlossen. Gerä t angeschlossen. verbleibende WLAN-Signalstä rke. Batteriekapazitä t. Schaltflä che fü r Schaltflä che Videoaufzeichnung. Fotografieren. Tippen Sie Tippen diese auf diese Schaltflä...
- Page 76 Produktbeschreibung Symbol Beschreibung Symbol Beschreibung Foto-Symbol. Tippen Sie Video-Symbol. Tippen Sie auf dieses Symbol, um auf dieses Symbol, um alle alle Fotos auszublenden. Videos auszublenden. Bestä tigungs-Symbol. Zurü ck-Symbol. Tippen Tippen Sie auf dieses Sie auf dieses Symbol, um Symbol, zur vorherigen Oberflä...
- Page 77 Video-Laryngoskop beschä digt werden oder das Video-Laryngoskop kann die in dieser Bedienungsanleitung angegebenen Spezifikationen nicht erreichen. Das Video-Laryngoskop VS-10S/VS-10M/VS-10H muss in Kombination mit dem passenden Einweg-Laryngoskopspatel (mittels Ethylenoxid sterilisiert) von MEDCAPTAIN LIFE SCIENCE CO., LTD. verwendet werden.
-
Page 78: Bedienungsanleitung
Bedienungsanleitung 5 Bedienungsanleitung 5.1 Installieren eines Laryngoskopspatels Dieses Gerä t muss zusammen mit einem Laryngoskopspatel verwendet werden, um eine reibungslose Intubation zu ermö glichen. 1. Öffnen Sie 1/3 des Verpackungsbeutels des Laryngoskopspatels. Halten Sie das Verbindungsstü ck des Laryngoskopspatels und ziehen Sie 1/3 des Laryngoskopspatels aus dem Beutel. - Page 79 Bedienungsanleitung 2. Der Bildschirm des Video-Laryngoskops zeigt das Startmenü an. 3. Nach Systeminitialisierung wird Bildschirm Hauptbenutzeroberflä che angezeigt. 5.3 Vor der Verwendung prü fen 5.3.1 Überprü fung des Erscheinungsbildes Prü fen Verwendung, dass Oberflä chen Video-Laryngoskops und des Laryngoskopspatels glatt sind, ohne scharfe Kanten, Furchen oder Vorwö...
- Page 80 Bedienungsanleitung laden Sie den Akku bitte vor der Verwendung vollstä ndig auf oder verwenden Sie ein anderes Gerä t mit ausreichender Restkapazitä t. WARNUNG: Die Batterie kann beschä digt werden, wenn Sie sie fü r lä ngere Zeit nicht benutzen.
- Page 81 Bedienungsanleitung Trachealtubus die Glottis des Patienten problemlos erreichen kann. 1. Öffnen Sie 1/3 des Verpackungsbeutels des Luftrö hrenschlauchs und ziehen Sie 1/3 des Luftrö hrenschlauchs aus dem Beutel. 2. Den Intubationsfü hrungsdraht in den Trachealtubus einfü hren. 3. Biegen Sie den Trachealtubus entsprechend ab. 4.
- Page 82 Bedienungsanleitung VORSICHT: Wenn das Video-Laryngoskop lä ngere Zeit oder nach dem Auswechseln des Akkus nicht benutzt wurde, prü fen Sie, ob Datum und Uhrzeit korrekt sind. Wenn nicht, stellen Sie das Datum und die Uhrzeit erneut gemä ß den vorhergehenden Schritten ein.
- Page 83 Bedienungsanleitung erreicht, wird der Abstand zwischen dem distalen Ende des Trachealtubus und der Glottis auf dem Bildschirm deutlich angezeigt. Richten Sie das distale Ende des Trachealtubus an der Glottis aus und lassen Sie ihn leicht in den unteren Teil der Glottis eindringen. Bitten Sie den Assistenten, den Intubationsfü...
- Page 84 Bedienungsanleitung 5.6 Fotografieren Nach der Intubation kann die von der Kamera erfasste Echtzeit-Szene mit Hilfe der Fotoaufnahmefunktion erfasst und das aufgenommene Foto in der Multimedia-Bibliothek gespeichert werden. Es stehen zwei Fotografie-Methoden zur Verfü gung: Methode 1: Drü cken Sie die Taste fü r die Foto-/Videoaufnahme, um direkt ein Foto zu machen.
- Page 85 Bedienungsanleitung Methode 2: Tippen Sie auf der Hauptbenutzeroberflä che auf die Schaltflä che Videoaufzeichnung, um die Aufzeichnung zu starten. Danach kann das aufgezeichnete Video in der Multimedia-Bibliothek angesehen werden. 5.8 Ausschalten des Video-Laryngoskops Halten Sie die Einschalttaste lä nger als 1,5 s gedrü ckt, um das Gerä t auszuschalten.
-
Page 86: Einstellungen
Einstellungen 6 Einstellungen 6.1 Multimedia-Bibliothek Die Multimedia-Bibliothek speichert Fotos und Videos und ermö glicht es den Benutzern, die gespeicherten Fotos und Videos anzusehen, wiederzugeben und zu lö schen. Tippen Hauptbenutzeroberflä che Foto-/ Video-Miniaturansicht, Benutzeroberflä che Multimedia-Bibliothek zuzugreifen. Tippen Sie auf der Benutzeroberflä che der Multimedia-Bibliothek auf das Fotosymbol rechts, um alle Fotodateien auszublenden, und tippen Sie auf das Zurü... - Page 87 Einstellungen zurü ckzukehren und nach links/rechts streichen, um zur vorherigen/nä chsten Datei zu wechseln. Tippen Sie auf eine bestimmte Videodatei, um auf die Vorschauoberflä che dieses Videos zuzugreifen. Dann kö nnen Sie auf die Schaltflä che „Wiedergabe“ tippen, um das Video abzuspielen, auf die Schaltflä che „Löschen“, um das Video zu löschen, und auf die Schaltfläche „Zurück“, um zur Benutzeroberflä...
- Page 88 Einstellungen 6.3 HDMI (Nur zutreffend fü r VS-10M und VS-10H) Das Video-Laryngoskop kann an das HDMI-Kabel angeschlossen werden, um Videos zu ü bertragen. 6.4 Drahtloses Netzwerk (Nur zutreffend fü r VS-10H) Das Video-Laryngoskop kann zur Datenü bertragung ü ber WLAN mit dem Server verbunden werden.
- Page 89 Einstellungen VORSICHT: Der Anschluss des Video-Laryngoskops an ein IT-Netzwerk, das auch andere Gerä te umfasst, kö nnte zu bisher nicht identifizierten Risiken fü r Patienten, Bediener oder Dritte fü hren. Beispielsweise kö nnen Foto- oder Videodateien aufgrund einer Unterbrechung der Datenü bertragung nicht exportiert werden. ...
-
Page 90: Häufige Fehler
Hä ufige Fehler 7 Hä ufige Fehler Fehlersymptom Mö gliche Ursache Lö sung Das Gerä t lä sst 1. Die Batterie ist 1. Laden Sie das Gerä t mit Hilfe des sich nicht leer. Netzteils auf. einschalten. 2. Die Batterie ist 2. - Page 91 Hä ufige Fehler Fehlersymptom Mö gliche Ursache Lö sung 1. Die 1. Den Laryngoskopspatel gemä ß Laryngoskopspa Installationsmethode Abschnitt 5.1 erneut einsetzen. tel kann nicht ist falsch. 2. Prü fen Sie, ob die Sperrfunktion installiert der Schnappverbindung normal ist. werden. Schnappverbindung Wenn Sperrfunktion...
-
Page 92: Reinigung Und Desinfektion
Reinigung und Desinfektion 8 Reinigung und Desinfektion Es wird dringend empfohlen, die in diesem Kapitel aufgefü hrten Materialien und Methoden zur Reinigung und Desinfektion des Gerä ts zu verwenden. Wenn andere Materialien oder Methoden verwendet werden, kann das Gerä t beschä digt oder seine Lebensdauer verkü... - Page 93 Reinigung und Desinfektion 4. Es ist nicht erlaubt, dieses Gerä t zur Reinigung und Desinfektion zu zerlegen. Um dieses Gerä t zur weiteren Reinigung und Desinfektion zu zerlegen, wenden Sie sich bitte an den lokalen Vertriebspartner. 5. Bereiten Sie mehrere Stü cke weicher medizinischer Gaze, einen Behä lter fü r Reinigungsmittel und einen Behä...
- Page 94 Reinigung und Desinfektion WARNUNG: Verwenden Sie keine halogenierten Lö sungsmittel, Lö sungsmittel auf Erdö lbasis, Glasreiniger, Aceton oder andere reizende Reinigungsmittel. Achten Sie darauf, dass Sie sich beim Reinigen des Griffeinfü hrungsteils aus Metall nicht verletzen. Achten Sie darauf, die LED-Leuchte und die Kamera wä hrend der Reinigung nicht zu zerkratzen.
- Page 95 Reinigung und Desinfektion der Gaze die Oberflä che des Gerä ts ab, um die restliche Desinfektionslö sung zu entfernen. In der folgenden Tabelle sind die fü r das Gerä t empfohlenen Desinfektionsmittel und die erforderliche Kontaktzeit fü r die Desinfektion aufgefü hrt. Tabelle 8-2 Empfohlene Desinfektionslö...
- Page 96 Reinigung und Desinfektion 8.4 Lufttrocknung und Transport 1. Stellen Sie das Gerä t nach der Reinigung und Desinfektion zur Lufttrocknung in eine schattige, kü hle und belü ftete Umgebung. 2. Wenn Sie das Gerä t nicht bald nach der Lufttrocknung verwenden, legen Sie das Gerä...
-
Page 97: Wartung
Wartung 9 Wartung 9.1 Regelmä ß ige Wartung 9.1.1 Wartungsplan Um einen sicheren Gebrauch zu gewä hrleisten und die Lebensdauer des Video-Laryngoskops zu verlä ngern, fü hren Sie bitte eine regelmä ß ige Wartung und Überprü fung durch. Tabelle 9-1 listet den Wartungsplan auf. Tabelle 9-1 Wartungsplan Wartungsvorgang Frequenz... - Page 98 Wartung Tastenbedienung: Vergewissern Sie sich, dass die Tasten reibungslos gedrü ckt werden kö nnen und ordnungsgemä ß funktionieren. Überprü fen Sie, dass alle Dichtungsteile und die Installation des Video-Laryngoskops ordnungsgemä ß sind und keine Risse an den Materialien vorhanden sind.
- Page 99 9.2 Wartung der Batterie 9.2.1 Batterie-Übersicht Das Video-Laryngoskop VS-10S/VS-10M/VS-10H ist mit einer eingebauten Batterie ausgestattet, die ü ber das Netzteil aufgeladen wird. Laden Sie vor der Verwendung den Akku des Video-Laryngoskops vollstä ndig auf, um einen kontinuierlichen Betrieb des Video-Laryngoskops zu gewä hrleisten. Es wird nicht empfohlen, das Video-Laryngoskop wä...
- Page 100 Wartung Prü fen Sie vor der Verwendung des Gerä ts die Batterie, um sicherzustellen, dass genü gend Energie zur Verfü gung steht. Laden Sie die Batterie bei Bedarf nach. Der Stecker des Netzteils wird zur Trennung von der Stromversorgung verwendet.
- Page 101 Wartung VORSICHT: Die ungefä hre verbleibende Batteriekapazitä t der eingebauten Batterie wird durch das Batteriesymbol angezeigt. Wenn die Batterie in Betrieb ist, wird die verbleibende Batteriekapazitä t durch die Anzahl der Leuchtbalken im Batteriesymbol angezeigt. Das Gerä t wird 3 Minuten, bevor die Batterieleistung erschö pft ist, automatisch ausgeschaltet.
- Page 102 Wartung Wenn der Betrieb 0,8 bis 1,2 Stunden dauert, ist die Batterie fast am Ende ihrer Lebensdauer. Wenn der Vorgang weniger als 0,8 Stunden dauert, hat die Batterie das Ende ihrer Lebensdauer erreicht. In diesem Fall muss die Batterie ersetzt werden.
- Page 103 Wartung Bewahren Sie das Video-Laryngoskop weit entfernt von ü bermä ß igen Vibrationen, Staub und korrosiven Gasen auf. Schü tzen Sie das Video-Laryngoskop vor direktem Sonnenlicht und ultravioletten Strahlen, um Farbverblassung zu vermeiden. Lehnen Sie das Video-Laryngoskops wä hrend der Lagerung und des Transports nicht an, um Stö...
-
Page 104: Verträglichkeit (Emv)
Das Video-Laryngoskops VS-10S/VS-10M/VS-10H entspricht EMV-Norm IEC 60601-1-2:2014. Benutzer mü ssen das Video-Laryngoskop VS-10S/VS-10M/VS-10H auf der Grundlage der im Begleitdokument angegebenen EMV-Informationen installieren und verwenden. Tragbare und mobile (Funkfrequenz-)Kommunikationsgerä te kö nnen die Leistung des Video-Laryngoskops VS-10S/VS-10M/VS-10H beeinträ chtigen. - Page 105 Anhang A oder verschlechtert wird, kann VS-10S/VS-10M/VS-10H Video-Laryngoskop eine Gefahr fü r den Patienten darstellen. Um zu gewä hrleisten, dass das Video-Laryngoskop VS-10S/VS-10M/VS-10H wä hrend gesamten erwartenden Lebensdauer hinsichtlich elektromagnetischer Stö rungen sicher bleibt: Fü hren Sie die periodische Wartung auf der Grundlage des empfohlenen Wartungs-/Serviceintervalls und der im Betriebshandbuch angegebenen Methode durch.
- Page 106 Leistung dieser Gerä te kommen. Hochfrequenz-Parameter: Gegenstand Beschreibung Arbeitsbereich 2,4 GHz - 2,4835 GHz Sendeleistung <20 dBm Leitfaden und Herstellererklä rung - elektromagnetische Emissionen Das Video-Laryngoskop VS-10S/VS-10M/VS-10H ist fü r den Einsatz in der unten angegebenen elektromagnetischen Umgebung vorgesehen. 47/ 56...
- Page 107 Gebä ude fü r IEC 61000-3-3 hä usliche Zwecke versorgt. Leitfaden und Herstellererklä rung – Elektromagnetische Immunitä t Das Video-Laryngoskop VS-10S/VS-10M/VS-10H ist fü r den Einsatz in der unten angegebenen elektromagnetischen Umgebung vorgesehen. Der Anwender des 48/ 56...
- Page 108 Anhang A VS-10S/VS-10M/VS-10H Video-Laryngoskops sollte sicherstellen, dass es in einer solchen Umgebung eingesetzt wird. STÖRFESTI IEC60601-Teststuf Konformitä tsgr Elektromagnetische Umgebung – Leitfaden GKEITS-Prü fung Elektrostatik ± 8 kV Kontakt ± 8 kV Kontakt Die Fuß bö den sollten Entladung ± 2 kV, ± 4 kV, ± 8 ±...
- Page 109 0 % 1 Zyklus entsprechen. Wenn der Anwender 70 % 25/30 Zyklen 25/30 Video-Laryngoskops Einphasig: bei 0º Zyklen VS-10S/VS-10M/VS-10 0 % 300 Zyklen Einphasig: bei H bei Unterbrechungen 0º des Stromnetzes einen 0 % 300 Zyklen kontinuierlichen Betrieb benö tigt,...
- Page 110 ANMERKUNG UT ist die Netzwechselspannung vor der Anwendung der Teststufe. Leitfaden und Herstellererklä rung – Elektromagnetische Immunitä t Das Video-Laryngoskop VS-10S/VS-10M/VS-10H ist fü r den Einsatz in der unten angegebenen elektromagnetischen Umgebung vorgesehen. Der Anwender des VS-10S/VS-10M/VS-10H Video-Laryngoskops sollte sicherstellen, dass es in einer solchen Umgebung eingesetzt wird.
- Page 111 (RF) Veff nicht nä her IEC61000-4- 6 Veff in den ISM-Bä ndern irgendeinem Teil des ISM-Bereichen Zwischen 0,15 VS-10S/VS-10M/VS-1 zwischen 0,15 MHz und 80 MHz; 80% AM bei 1 Video-Laryngoskops, MHz; einschließ lich 80% AM bei 1 Kabel, verwendet...
- Page 112 Anhang A 28V/m: 28V/m: Ausgangsnennleistung 2400-2570MHz; 2400-2570MHz; des Senders in Watt V/m: V/m: (W) nach Angaben des 5100-5800MHz; 5100-5800MHz; Senderherstellers und d empfohlene Trennungsabstand Metern (m) ist. Feldstä rken stationä ren Hochfrequenzsendern, durch eine elektromagnetische Standortü berwachung bestimmt werden, sollten jedem Frequenzbereich unter...
- Page 113 Hochfrequenzsendern sollte eine elektromagnetische Standortbestimmung in Betracht gezogen werden. Wenn die gemessene Feldstä rke an der Stelle, an der das VS-10S/VS-10M/VS-10H Video-Laryngoskop verwendet wird, den oben genannten Hochfrequenz-Nachgiebigkeitsgrad ü bersteigt, sollte das VS-10S/VS-10M/VS-10H Video-Laryngoskop beobachtet werden, um den normalen Betrieb zu ü berprü fen.
- Page 114 Trennungsabstä nde zwischen tragbaren mobilen Hochfrequenz-Kommunikationsgerä ten Video-Laryngoskop VS-10S/VS-10M/VS-10H Das Video-Laryngoskop VS-10S/VS-10M/VS-10H ist fü r den Einsatz in einer elektromagnetischen Umgebung vorgesehen, in der gestrahlte Hochfrequenz-Stö rungen kontrolliert werden. Anwender Video-Laryngoskops VS-10S/VS-10M/VS-10H kann dazu beitragen, elektromagnetische Stö rungen zu vermeiden, indem er einen Mindestabstand zwischen tragbaren und mobilen Hochfrequenz-Kommunikationsgerä...
- Page 115 Anhang A 0,38 0,38 0,38 0,73 Fü r Sender, deren maximale Ausgangsleistung oben nicht aufgefü hrt ist, kann der empfohlene Trennungsabstand in Meter (m) mit Hilfe der fü r die Frequenz des Senders geltenden Gleichung bestimmt werden, wobei P die maximale Ausgangsleistung des Senders in Watt (W) nach Angaben des Senderherstellers ist.
- Page 116 Songbai Road, Xili, Nanshan, 518055 Shenzhen, Guangdong, PEOPLE'S REPUBLIC OF CHINA Shanghai International Holding Corp. GmbH (Europe) Eiffestrasse 80, 20537 Hamburg, Deutschland Fax: +86-755-26001651 Postleitzahl: 518055 Website: http://www.medcaptain.com E-Mail: MC.service@medcaptain.com © Copyright 2020 MEDCAPTAIN MEDICAL TECHNOLOGY CO., LTD. Alle Rechte vorbehalten.
- Page 117 VS-10S/VS-10M/VS-10H Vidé o laryngoscope Mode d’emploi Avant d’utiliser le vidéo laryngoscope VS-10S/VS-10M/VS-10H, veuillez lire ce manuel avec attention, et respecter les mesures de sé curité et les instructions d’utilisation qu’il contient. MEDCAPTAIN MEDICAL TECHNOLOGY CO., LTD.
- Page 118 Proprié té intellectuelle et dé claration MEDCAPTAIN MEDICAL TECHNOLOGY CO., LTD. (ci-aprè s dé nommé « MEDCAPTAIN » ) dé tient les droits de proprié té intellectuelle de ce manuel. © Copyright 2020 MEDCAPTAIN MEDICAL TECHNOLOGY CO., LTD. Tous droits ré servé s.
- Page 119 Proprié té intellectuelle et dé claration Informations relatives aux versions V1.0 Version du mode d’emploi : premiè re parution Version logicielle : V1 Date de publication : 06.2020...
- Page 120 MEDCAPTAIN ; ou d’autres dommages/défaillances non provoqués par le produit. Une fois la pé riode de garantie passé e, MEDCAPTAIN continuera de fournir des services de maintenance payants tout au long de la duré e de vie du produit.
- Page 121 Service aprè s-vente Site Web : http://www.medcaptain.com E-mail : MC.service@medcaptain.com...
- Page 122 Pré face Illustrations Toutes les illustrations présentées dans le présent mode d’emploi le sont à titre de ré fé rence uniquement. Les paramè tres ou donné es sur les illustrations peuvent diffé rer des paramè tres ou donné es ré els du produit. Conventions ...
- Page 123 Table des matiè res INTRODUCTION ......... 1 SECURITE ............. 3 SPECIFICATIONS DU PRODUIT ....8 DESCRIPTION DU PRODUIT ....11 INSTRUCTIONS D’UTILISATION.... 19 PARAMETRES ..........26 DEFAILLANCES COURANTES ....29 NETTOYAGE ET DESINFECTION... 31 MAINTENANCE ........... 36 ANNEXE A ..............42...
-
Page 124: Introduction
Introduction 1 Introduction 1.1 Utilisation pré vue Le vidé o laryngoscope de la sé rie VS-10 permet au personnel mé dical de soulever l’épiglotte d’un patient afin d’exposer la glotte pour une intubation trachéale précise, afin de réaliser une anesthésie ou d’apporter les premiers soins. Le vidéo laryngoscope peut également être utilisé... - Page 125 Introduction Le vidé o laryngoscope comporte é galement diffé rents boutons : un bouton physique indépendant permettant de prendre des photos/d’enregistrer des vidéos, et, sur l’interface de l’écran, un bouton de prise de photo et un bouton d’enregistrement vidéo. Il est donc possible d’appuyer sur le bouton physique ou de sélectionner le bouton de prise de photo ou d’enregistrement vidéo sur l’interface pour prendre une photo/enregistrer une vidéo.
-
Page 126: Securite
Sé curité 2 Sé curité 2.1 Avertissements et mises en garde Dans le pré sent manuel, les mesures de sé curité sont classé es par ordre d’importance en avertissements et mises en garde, comme définis ci-aprè s : AVERTISSEMENT : Mesures de pré... - Page 127 Sé curité Dans le cadre d’une utilisation clinique, n’insérez pas ce dispositif dans la traché e du patient pendant une longue duré e. L’utilisation du vidéo laryngoscope devrait faire l’objet d’une surveillance ré guliè re par un personnel mé dical professionnel. ...
- Page 128 Sé curité par des professionnels dû ment formé s. À dé faut, une erreur du vidé o laryngoscope risque d’être générée. Après la mise à jour du logiciel, le fonctionnement du vidé o laryngoscope doit ê tre é talonné par des professionnels dû...
- Page 129 Sé curité Tableau 2-1 Liste des symboles Description Description Symbole Symbole Panneau d’avertissement MISE EN GARDE gé né ral Courant alternatif Courant continu Étanche à la poussiè re et Piè ce compatible de IP66 protè ge contre les giclements type BF d’eau.
- Page 130 Sé curité Description Description Symbole Symbole d’empilement Limite taux Limite d’humidité indiqué e par numé ro Fragile - Manipuler avec Haut pré caution Conserver à l’abri de la Conserver au sec lumiè re Limite de pression Tempé rature limite atmosphé rique Équipement Interface HDMI HDMI...
-
Page 131: Specifications Du Produit
Spé cifications du produit 3 Spé cifications du produit Vidé o laryngoscope Modè le/ VS-10S/VS-10M/VS-10H Spé cification Dimensions 191 (H) x 92 (L) x 112 (P) mm Poids Environ 0,25 kg (batterie incluse) Tension d’entrée : 100-240 V CA 50/60 Hz. - Page 132 Spé cifications du produit Ré solution spatiale Au moins é gal à 6,5 lp/mm Capacité de restauration Au moins é quivalente au niveau 4 des couleurs Profondeur de champ 10-80 mm N’est pas inférieur à 60° Angle de champ Angle de vue 0°...
- Page 133 Spé cifications du produit 4. Non sté rilisé ; 5. Équipement n’appartenant pas à la catégorie AP/APG ; 6. Mode de fonctionnement : continu ; Duré e de vie 5 ans Voir l’étiquette du produit. Date de fabrication IEC 60601-1:2012 Appareils é lectromé dicaux - Partie 1 : exigences gé...
-
Page 134: Description Du Produit
Description du produit 4 Description du produit 4.1 Composition structurelle Le vidé o laryngoscope est constitué principalement des é lé ments suivants : l’écran, le manche (incluant la batterie), la caméra et l’adaptateur. Les accessoires incluent le câ ble de connexion HDMI et le câ ble de donné es USB. 4.2 Principes de fonctionnement Le vidé... - Page 135 Description du produit 1 – Bouton de mise en marche 2 – Indicateur de charge 3 - Interface HDMI 4 - Interface USB (type C) 5 - Écran d’affichage tactile 6 - Coque de l’écran 7 - Source lumineuse LED 8 - Camé...
- Page 136 Description du produit Bouton de mise en marche : lorsque le dispositif est hors tension, appuyez sur ce bouton et maintenez-le enfoncé pour allumer l’appareil. Lorsque le dispositif est sous tension, appuyez sur ce bouton et maintenez-le enfoncé pendant plus de 1,5 s pour éteindre l’appareil. ...
- Page 137 Description du produit camé ra. Camé ra : utilisée pour la prise de photos et l’enregistrement de vidéos. Partie adaptable du manche : utilisé e pour insé rer et fixer la lame du laryngoscope. Fixation clipsable : utilisé e pour verrouiller la lame du laryngoscope. ...
- Page 138 Description du produit 4.4 Écran d’affichage La principale interface de visualisation de l’écran d’affichage du dispositif est constituée de trois zones d’affichage : la zone de statut, la zone d’affichage des images et la zone des opé rations. Zone de statut : affiche la date, l’heure, l’icône HDMI, l’icône USB, l’icône WiFi et l’icône de la batterie.
- Page 139 Description du produit Tableau 4-1 Description des icô nes Icô ne Description Icô ne Description Le câ ble USB ou le lecteur Le câ ble HDMI est dé jà USB est dé jà branché au branché au dispositif. dispositif. La capacité restante de la Force du signal WiFi.
- Page 140 Description du produit Icô ne Description Icô ne Description Luminosité l’écran. Icô ne ACCUEIL. Appuyez sur cette icô ne Faites glisser la barre de pour revenir à dé filement à la suite de principale interface de cette icô ne afin de ré gler la luminosité...
- Page 141 Le vidé o laryngoscope VS-10S/VS-10M/VS-10H doit ê tre utilisé en combinaison avec la lame de laryngoscope à usage unique, fabriqué e par MEDCAPTAIN LIFE SCIENCE CO., LTD.
-
Page 142: Instructions D'utilisation
Instructions d’utilisation 5 Instructions d’utilisation 5.1 Installation d’une lame de laryngoscope Ce dispositif doit ê tre utilisé avec une lame de laryngoscope afin de faciliter une intubation en douceur. 1. Ouvrez 1/3 de l’emballage de la lame du laryngoscope. Saisissez le connecteur de la lame du laryngoscope et tirez 1/3 de la lame du laryngoscope hors de son emballage. - Page 143 Instructions d’utilisation 3. Après l’initialisation du système, l’écran d’affichage affiche la principale interface de visualisation. 5.3 Contrô les avant utilisation 5.3.1 Contrôle de l’aspect Avant utilisation du dispositif, vé rifiez que les surfaces du vidé o laryngoscope et de la lame du laryngoscope sont lisses, sans aucune aspé rité , saillie ou angle vif.
- Page 144 Instructions d’utilisation AVERTISSEMENT : La batterie peut être endommagée si vous ne l’utilisez pas pendant longtemps. La batterie devrait ê tre utilisé e au moins une fois tous les trois mois. Enfin, il convient de charger la batterie avant que celle-ci ne soit é puisé e. 5.3.4 Vé...
- Page 145 Instructions d’utilisation Le tube traché al est un produit sté rile. Avant utilisation du tube traché al, vérifiez son emballage. Si l’emballage est endommagé, n’utilisez pas le tube traché al. Pour les autres mesures de sé curité relatives à l’utilisation du tube trachéal, reportez-vous au mode d’emploi du tube trachéal.
- Page 146 Instructions d’utilisation du patient, le long de la langue. Accompagnez la lame du laryngoscope, qui doit se courber le long de la structure de la cavité buccale du patient et descendez doucement le long de la surface de la langue afin de pé né trer dans le pharynx.
- Page 147 Instructions d’utilisation laryngoscope de la cavité buccale de la main gauche. Puis, gonflez (modé ré ment) le ballonnet et placez le patient sous respirateur afin de contrô ler sa respiration. 5. Aprè s avoir retiré le vidé o laryngoscope et la lame du laryngoscope, tenez le manche du vidéo laryngoscope d’une main, exercez une pression sur la fixation clipsable de l’autre main et dissociez la lame du laryngoscope du vidé...
- Page 148 Instructions d’utilisation 5.7 Enregistrement de vidé os Après l’intubation, la scène d’une période donnée observée par la caméra peut être enregistrée via la fonction d’enregistrement de vidéos et les vidéos enregistré es peuvent ê tre stocké es dans la bibliothè que multimé dia. Deux méthodes d’enregistrement de vidéos sont disponibles : ...
-
Page 149: Parametres
Paramè tres 6 Paramè tres 6.1 Bibliothè que multimé dia La bibliothè que multimé dia stocke photos et vidé os et permet aux utilisateurs de visualiser, repasser et supprimer les photos et vidé os stocké es. Sur la principale interface de visualisation, appuyez sur la vignette photo/vidé o pour accéder à... - Page 150 Paramè tres le fichier de cette vidé o. Vous pouvez alors appuyer sur le bouton de lecture afin de lire la vidé o, appuyer sur le bouton « Supprimer » pour effacer cette vidéo et appuyer sur le bouton de retour pour revenir à l’interface de la bibliothè...
- Page 151 Paramè tres vidéos sur d’autres terminaux. 6.4 Ré seau sans fil (applicable uniquement au VS-10H) Le vidé o laryngoscope peut ê tre connecté au serveur par le WiFi pour la transmission des donné es. 6.5 Paramè tres systè me Les paramè tres systè me permettent à un utilisateur de définir le nom d’un dispositif, la langue, le délai d’arrêt automatique et le format de l’heure, ainsi que la luminosité...
-
Page 152: Defaillances Courantes
Dé faillances courantes 7 Dé faillances courantes Symptô me de Cause possible Solution la dé faillance Le dispositif ne 1. La batterie est 1. Chargez le dispositif en utilisant l’adaptateur. peut pas ê tre é puisé e. sous 2. La batterie est 2. - Page 153 Dé faillances courantes peut pas ê tre incorrecte. 2. Assurez-vous que le verrouillage de installé e. fixation fixation clipsable fonctionne clipsable normalement. 3. Si le verrouillage n’est pas normal, endommagé e. contactez le service aprè s-vente ou le distributeur local. 30/ 54...
-
Page 154: Nettoyage Et Desinfection
Nettoyage et dé sinfection 8 Nettoyage et dé sinfection Il est fortement recommandé d’utiliser les matériaux et méthodes listés dans ce chapitre pour procé der au nettoyage et à la dé sinfection du dispositif. Si d’autres matériaux ou méthodes sont utilisés, le dispositif peut être endommagé ou sa duré... - Page 155 Nettoyage et dé sinfection 4. Vous n’êtes pas autorisé à désassembler ce dispositif pour procéder à son nettoyage et à sa désinfection. Pour désassembler ce dispositif en vue d’un nettoyage et d’une désinfection plus poussés, veuillez contacter le distributeur local. 5.
- Page 156 Nettoyage et dé sinfection AVERTISSEMENT : N’utilisez pas de solvant halogé né , de solvant à base de pé trole, de nettoyant pour verre, d’acétone ou d’autres détergents irritants. Veillez à ne pas vous é rafler lorsque vous nettoyez la partie adaptable mé...
- Page 157 Nettoyage et dé sinfection 5. Aprè s la désinfection, plongez une compresse médicale dans de l’eau propre, tordez la compresse, puis utilisez-la pour essuyer la surface du dispositif et retirer tout ré sidu de solution dé sinfectante. Le tableau suivant ré pertorie les dé sinfectants recommandé s pour le dispositif, ainsi que le temps de contact requis pour la dé...
- Page 158 Nettoyage et dé sinfection 2. Si vous ne prévoyez pas d’utiliser le dispositif une fois celui-ci sé ché , placez-le dans son emballage d’origine pour le ranger ou le transporter. AVERTISSEMENT : Vous ne devez pas sé cher le dispositif avec un dispositif de sé chage ou des produits similaires.
-
Page 159: Maintenance
Maintenance 9 Maintenance 9.1 Maintenance ré guliè re 9.1.1 Plan de maintenance Pour assurer une utilisation sû re du vidé o laryngoscope et rallonger sa duré e de vie, veuillez effectuer ré guliè rement des opé rations de maintenance et de contrô... - Page 160 à la mé thode stipulé e dans la norme IEC 60601-1. 9.2 Maintenance de la batterie 9.2.1 Pré sentation de la batterie Le vidé o laryngoscope VS-10S/VS-10M/VS-10H est équipé d’une batterie intégrée, qui est chargée via l’adaptateur. Avant utilisation, chargez complètement 37/ 54...
- Page 161 Maintenance la batterie du vidé o laryngoscope afin de garantir un fonctionnement continu du dispositif. Une fois la batterie inté gré e chargé e, utilisez-la afin d’alimenter le vidéo laryngoscope. AVERTISSEMENT : Une utilisation inappropriée de la batterie risque d’en raccourcir la durée de vie.
- Page 162 Maintenance 3. Débranchez l’adaptateur de l’alimentation électrique CA externe afin que la batterie alimente le dispositif, mettez le dispositif sous tension et patientez jusqu’à épuisement de la batterie. 4. Branchez le dispositif à une alimentation é lectrique CA externe pour charger la batterie pendant 4 heures minimum sans interruption.
- Page 163 Maintenance 4. Mettez le dispositif sous tension afin qu’il fonctionne avec la luminosité d’écran et la luminosité de source lumineuse définies sur des niveaux par défaut. Notez l’heure de début. 5. Faites fonctionner le dispositif en continu jusqu’à ce qu’il s’arrête lorsque la batterie est épuisée.
- Page 164 Maintenance en cours d’utilisation. 9.3 Stockage Évitez tout déversement d’eau. Ne stockez pas le vidé o laryngoscope dans un endroit chaud et humide. Stockez-le à distance des vibrations excessives, des poussiè res et des gaz corrosifs. Stockez le vidéo laryngoscope à l’abri de la lumière directe du soleil et des rayons ultraviolets afin d’éviter toute altération des couleurs.
-
Page 165: Annexe A
Annexe A Annexe ACompatibilité é lectromagné tique (CEM) MISE EN GARDE : Le vidé o laryngoscope VS-10S/VS-10M/VS-10H est conforme à la norme CEM IEC 60601-1-2:2014. Les utilisateurs doivent installer utiliser vidé o laryngoscope VS-10S/VS-10M/VS-10H tenant compte informations CEM fournies dans le document joint. - Page 166 VS-10S/VS-10M/VS-10H peut entraî ner un risque pour le patient. Pour garantir que le vidé o laryngoscope VS-10S/VS-10M/VS-10H reste sû r en ce qui concerne les perturbations é lectromagné tiques au cours de la duré e de vie attendue : ...
- Page 167 ê tre utilisé s à 30 cm minimum toute partie vidé o laryngoscope VS-10S/VS-10M/VS-10H, y compris des câ bles spé cifié s par le fabricant. Si cette distance n’est pas respectée, les performances de cet 44/ 54...
- Page 168 < 20 dBm Conseils et dé clarations du fabricant – Émissions é lectromagné tiques Le vidé o laryngoscope VS-10S/VS-10M/VS-10H est destiné à ê tre utilisé dans l’environnement électromagnétique spécifié ci-aprè s. Le client ou l’utilisateur du vidéo laryngoscope VS-10S/VS-10M/VS-10H doit s’assurer qu’il est utilisé...
- Page 169 IEC 61000-3-3 Conseils et dé clarations du fabricant – Immunité é lectromagné tique Le vidé o laryngoscope VS-10S/VS-10M/VS-10H est destiné à ê tre utilisé dans l’environnement électromagnétique spécifié ci-après. Le client ou l’utilisateur du vidé o laryngoscope VS-10S/VS-10M/VS-10H doit s’assurer qu’il est utilisé dans ce type d’environnement.
- Page 170 Annexe A d’alimentation é lectriques Câ ble 100 KHz d’alimentation CA rapides Câ ble é lectrique devrait ê tre d’alimentation celle d’un (EFT) ± 2 kV 100 KHz IEC 61000-4 Câ ble environnement d’alimentation CC commercial (> 3 m) hospitalier classique. ±...
- Page 171 0 % 1 cycle commercial 70 % 25/30 cycles hospitalier classique. Si l’utilisateur du vidéo Monophasé à 0º 70 % 0 % 300 cycles 25/30 cycles laryngoscope VS-10S/V Monophasé à 0º S-10M/VS-10H besoin d’utiliser 0 % 300 cycles dispositif continu lors d’interruptions de l’alimentation...
- Page 172 REMARQUE : UT est la tension secteur CA avant l’application du niveau d’essai. Conseils et dé clarations du fabricant – Immunité é lectromagné tique Le vidé o laryngoscope VS-10S/VS-10M/VS-10H est destiné à ê tre utilisé dans l’environnement électromagnétique spécifié ci-après. Le client ou l’utilisateur du vidé...
- Page 173 Annexe A 1 kHz 27 V/m : applicable à fréquence de l’émetteur. 27 V/m : 380-390 MHz ; 380-390 MHz ; 28 V/m : Distance de sé paration 28 V/m : 430-470 MHz ; recommandé e 430-470 MHz ; 9 V/m : ...
- Page 174 Annexe A é lectromagné tique site devraient ê tre infé rieures au niveau de conformité dans chaque bande de fré quences interfé rences peuvent survenir à proximité é quipements signalé s par le symbole suivant : REMARQUE 1 À 80 MHz et 800 MHz, la bande de fré quences plus é levé e s’applique.
- Page 175 Distances de sé paration recommandé es entre les é quipements de communication RF portables et mobiles et le vidé o laryngoscope VS-10S/VS-10M/VS-10H Le vidé o laryngoscope VS-10S/VS-10M/VS-10H est destiné à ê tre utilisé dans un environnement é lectromagné tique dans lequel les perturbations RF rayonné es sont contrôlées.
- Page 176 Annexe A mobiles (é metteurs) et le vidé o laryngoscope VS-10S/VS-10M/VS-10H, comme recommandé ci-dessous, conformé ment à la puissance de sortie maximale des é quipements de communication. Distance de séparation conformément à la fréquence d’émetteur m Puissance de sortie 150 kHz à 80 MHz 150 kHz à...
- Page 177 Annexe A REMARQUE 3 Un facteur supplé mentaire de 10/3 a é té incorporé dans les formules utilisé es lors du calcul de la distance de sé paration recommandé e pour les é metteurs se situant dans les bandes de fré quences entre 150 kHz et 80 MHz et dans la bande de fré...
- Page 178 UE - Nom du repré sentant : Shanghai International Holding Corp. GmbH (Europe) UE - Adresse du repré sentant : Eiffestrasse 80, 20537 Hambourg, Allemagne Fax : +86-755-26001651 Code postal : 518055 Site Web : http://www.medcaptain.com E-mail : MC.service@medcaptain.com © Copyright 2020 MEDCAPTAIN MEDICAL TECHNOLOGY CO., LTD. Tous droits ré servé s.
- Page 179 VS-10S/VS-10M/VS-10H Videolaringoscopio Manuale d’uso Prima di utilizzare il videolaringoscopio VS-10S/VS-10M/VS-10H, leggere attentamente il presente manuale e seguire le precauzioni di sicurezza e le istruzioni d’uso qui contenute. MEDCAPTAIN MEDICAL TECHNOLOGY CO., LTD.
- Page 180 Tutti i test, le installazioni, le sostituzioni, le modifiche e le riparazioni vengono eseguiti da tecnici autorizzati da MEDCAPTAIN. Tutti i componenti di ricambio e gli accessori sono forniti da MEDCAPTAIN. Tutti i registri sui servizi di manutenzione vengono conservati.
- Page 181 MEDCAPTAIN; altri danni/guasti non causati dal prodotto stesso. Dopo la scadenza del periodo di garanzia, MEDCAPTAIN continuerà a fornire un servizio di manutenzione a pagamento per tutta la durata del prodotto. In caso di problemi relativi all’utilizzo del prodotto, è possibile contattarci o rivolgersi al rivenditore locale.
- Page 182 Prefazione Illustrazioni Tutte le illustrazioni incluse nel presente Manuale d’uso sono fornite unicamente come riferimento. Le impostazioni o i dati riportati nelle illustrazioni possono differire dalle impostazioni o dai dati effettivi del prodotto. Convenzioni Corsivo: indica un contenuto citato. ...
- Page 183 Sommario PANORAMICA .............. 1 SICUREZZA ..............3 SPECIFICHE DEL PRODOTTO ......... 8 DESCRIZIONE DEL PRODOTTO ......11 ISTRUZIONI PER L’USO .......... 19 IMPOSTAZIONI ............26 GUASTI COMUNI ............30 PULIZIA E DISINFEZIONE ........32 MANUTENZIONE ............36 APPENDICE A ..............42...
-
Page 184: Panoramica
Panoramica 1 Panoramica 1.1 Uso previsto Il videolaringoscopio serie VS-10 è destinato all’utilizzo da parte del personale medico allo scopo di sollevare l’epiglottide del paziente ed esporre la glottide per consentire un’intubazione tracheale accurata, per anestesia o durante un intervento di primo soccorso. Può inoltre essere utilizzato per l’esame e il trattamento intraorali. - Page 185 Panoramica Grazie a un design che integra un pulsante fisico indipendente per l’acquisizione di foto/la registrazione di video e due pulsanti separati per l’acquisizione di foto e per la registrazione di video sull’interfaccia del display, il videolaringoscopio consente all’utente di acquisire una foto o registrare un video premendo il pulsante fisico oppure toccando il pulsante per l’acquisizione di foto o la registrazione di video sull’interfaccia.
-
Page 186: Sicurezza
Sicurezza 2 Sicurezza 2.1 Avvertenze e messaggi di attenzione Nel presente manuale, le precauzioni sono classificate per importanza nelle avvertenze e nei messaggi di attenzione definiti di seguito: le precauzioni relative alla sicurezza e all’efficacia. La AVVERTENZA: mancata osservanza potrebbe causare lesioni personali. ATTENZIONE: le precauzioni relative alle indicazioni e ai suggerimenti. - Page 187 Sicurezza In caso di eccezioni riguardanti il paziente o il dispositivo, adottare le misure appropriate per garantire la sicurezza del paziente. Se durante l’uso si rileva un’eccezione riguardante il dispositivo, estrarlo dalla cavità orale del paziente. Non utilizzare il videolaringoscopio insieme a strumenti terapeutici ad alta frequenza.
- Page 188 Sicurezza Gli interventi di manutenzione su questo prodotto devono essere eseguiti da personale autorizzato, che ha la facoltà di richiedere materiali quali il manuale di assistenza e l’elenco delle parti di ricambio del produttore. ATTENZIONE: La parte applicata del videolaringoscopio è la lama per laringoscopio. ...
- Page 189 Sicurezza Descrizione Descrizione Simbolo Simbolo Rappresentante autorizzato nella Numero di serie Comunità europea SMALTIMENTO: non smaltire questo prodotto Marchio CE: conforme come rifiuto urbano ai requisiti essenziali indifferenziato in quanto della Direttiva sui richiede una raccolta dispositivi medici differenziata per 93/42/CEE.
- Page 190 Sicurezza Descrizione Descrizione Simbolo Simbolo Limitazione della pressione atmosferica Limite di temperatura Apparecchiatura di Interfaccia HDMI HDMI Classe II 7/52...
-
Page 191: Specifiche Del Prodotto
Specifiche del prodotto 3 Specifiche del prodotto Videolaringoscopio Nome VS-10S/VS-10M/VS-10H Modello/ Specifiche 191 (A) × 92 (L) × 112 (P) mm Dimensioni Circa 0,25 kg (inclusa la batteria) Peso Tensione di ingresso: CA 100 – 240 V 50/60 Hz. Adattatore di Potenza in ingresso: 25VA. - Page 192 Specifiche del prodotto 10 – 80 mm Profondità di campo Non inferiore a 60° Angolo del campo 0° ± 10° Angolo di visualizzazione Non inferiore a 600 lx Intensità di illuminazione Non inferiore a 5000 K Temperatura di colore della sorgente luminosa Raggio dell’arco circolare: 75 mm;...
- Page 193 Specifiche del prodotto 5. Non rientra nella categoria delle apparecchiature AP/APG; 6. Modalità di funzionamento: continua. 5 anni Vita utile Vedere l’etichetta del prodotto. Data di fabbricazione IEC 60601-1:2012 Apparecchiature elettromedicali, Parte 1: Requisiti generali per la sicurezza di base e le prestazioni essenziali ...
-
Page 194: Descrizione Del Prodotto
Descrizione del prodotto 4 Descrizione del prodotto 4.1 Composizione strutturale Il videolaringoscopio è costituito principalmente dal gruppo display, dal gruppo impugnatura (inclusa la batteria), dal gruppo telecamera e dall’adattatore di alimentazione. Gli accessori includono il cavo di collegamento HDMI e il cavo dati USB. - Page 195 Descrizione del prodotto 1 – Pulsante di alimentazione 2 – Indicatore di carica 3 – Interfaccia HDMI 4 – Interfaccia USB (tipo C) 5 – Schermo touchscreen 6 – Struttura dello schermo 7 – Sorgente della luce LED 8 – Telecamera 9 –...
- Page 196 Descrizione del prodotto Pulsante di alimentazione: a partire dallo stato di spegnimento, tenere premuto questo pulsante per accendere il dispositivo. A partire dallo stato di accensione, tenere premuto questo pulsante per più di 1,5 secondi per spegnere il dispositivo. ...
- Page 197 Descrizione del prodotto Sorgente della luce LED: utilizzata per fornire una sorgente luminosa alla telecamera. Telecamera: utilizzata per l’acquisizione di foto e la registrazione di video. Parte di inserimento dell’impugnatura: utilizzata per il collegamento e il fissaggio della lama per il laringoscopio. ...
- Page 198 Descrizione del prodotto 4.4 Schermo L’interfaccia di osservazione principale sullo schermo del dispositivo è costituita da 3 aree di visualizzazione: l’area di stato, l’area di visualizzazione delle immagini e l’area operativa. Area di stato: visualizza la data, l’ora, l’icona HDMI, l’icona USB, l’icona Wi-Fi e l’icona della batteria.
- Page 199 Descrizione del prodotto Tabella 4-1 Descrizione delle icone Icona Descrizione Icona Descrizione Il cavo USB o l’unità USB Il cavo HDMI è già sono già collegati al collegato al dispositivo. dispositivo. La capacità residua della Potenza del segnale Wi-Fi. batteria. Pulsante per l’acquisizione Pulsante per la registrazione di foto.
- Page 200 Descrizione del prodotto Icona Descrizione Icona Descrizione Icona delle foto. Toccare Icona dei video. Toccare questa icona per questa icona per visualizzare visualizzare tutte le foto. tutti i video. Icona di conferma. Toccare Icona di ritorno. Toccare questa icona per salvare le questa icona per tornare all’interfaccia precedente.
- Page 201 Descrizione del prodotto Il videolaringoscopio VS-10S/VS-10M/VS-10H deve essere utilizzato insieme alla lama per laringoscopio monouso (sterilizzata con ossido di etilene) prodotta da MEDCAPTAIN LIFE SCIENCE CO., LTD. Il videolaringoscopio è destinato al collegamento con un adattatore di alimentazione specifico per il modello GTM46101-1005-USB prodotto da GlobTek, Inc.
-
Page 202: Istruzioni Per L'uso
Istruzioni per l’uso 5 Istruzioni per l’uso 5.1 Installazione di una lama per laringoscopio Questo dispositivo deve essere utilizzato insieme a una lama per laringoscopio per facilitare l’intubazione. 1. Aprire 1/3 della confezione di imballaggio della lama per laringoscopio. Estrarre 1/3 della lama per laringoscopio dalla confezione tenendo saldo il relativo connettore. - Page 203 Istruzioni per l’uso 5.3 Controlli prima dell’uso 5.3.1 Controllo dell’aspetto Prima dell’uso, assicurarsi che le superfici del videolaringoscopio e della lama per laringoscopio siano lisce e prive di bordi affilati, bave o sporgenze. In caso contrario, sostituire la lama per laringoscopio o utilizzare un altro videolaringoscopio per evitare lesioni al paziente.
- Page 204 Istruzioni per l’uso 5.3.4 Controllo della telecamera Prima di ogni utilizzo o dopo una modifica delle modalità /impostazioni di visualizzazione, verificare le seguenti prestazioni essenziali: 1. Assicurarsi che l’immagine osservata tramite il videolaringoscopio sia orientata correttamente. 2. Assicurarsi che non vi sia alcuna sfumatura di colore evidente nell’immagine osservata tramite il videolaringoscopio, che non sia tagliata e che la sorgente della luce LED sia sufficientemente luminosa.
- Page 205 Istruzioni per l’uso AVVERTENZA: Indossare guanti sterilizzati prima di toccare il tubo tracheale. Non toccare il tubo tracheale a mani nude. Il tubo tracheale fa parte del prodotto sterile. Controllare la confezione del tubo tracheale prima dell’uso. Se la confezione è danneggiata, non utilizzare il tubo. ...
- Page 206 Istruzioni per l’uso 5.5 Intubazione 1. Con il paziente in posizione supina, spingere il mento del paziente verso il basso affinché apra la bocca, utilizzare una mano per tenere il videolaringoscopio con una lama per laringoscopio già installata, inserire quest’ultima nella cavità orale del paziente lungo la lingua, piegarla lungo la struttura della cavità...
- Page 207 Istruzioni per l’uso 4. Dopo aver inserito il tubo tracheale a una profondità appropriata (la cuffia raggiunge il punto che si trova 1 cm sotto la glottide), immobilizzarlo con la mano destra ed estrarre il videolaringoscopio e la lama per laringoscopio dalla cavità...
- Page 208 Istruzioni per l’uso 5.7 Registrazione di video Dopo l’intubazione, la scena inquadrata in un determinato momento dalla telecamera può essere registrata utilizzando la funzione di registrazione di video; il video registrato può essere memorizzato nella libreria multimediale. Sono disponibili due metodi di registrazione di video: ...
-
Page 209: Impostazioni
Impostazioni 6 Impostazioni 6.1 Libreria multimediale La libreria multimediale memorizza foto e video e consente agli utenti di visualizzare, riprodurre ed eliminare le foto e i video memorizzati. Nell’interfaccia di osservazione principale, toccare la miniatura foto/video per accedere all’interfaccia della libreria multimediale. ... - Page 210 Impostazioni Nell’interfaccia della libreria multimediale, toccare l’icona di ritorno oppure premere il pulsante per l’acquisizione foto/la registrazione di video per tornare all’interfaccia di osservazione principale. 6.2 Impostazioni generali Gli utenti possono impostare la luminosità dello schermo, il Wi-Fi, la data e l’ora.
- Page 211 Impostazioni b) Il protocollo di comunicazione e la banda di frequenza di comunicazione utilizzati dal videolaringoscopio per accedere alla rete sono rispettivamente 802.11 b/g/n e 2,4 GHz c) La configurazione della rete IT richiesta che include il videolaringoscopio è una rete WLAN (Wireless Local Area Network) che supporta la trasmissione e la ricezione a nodo singolo.
- Page 212 Impostazioni 6.5 Impostazioni di sistema Le impostazioni di sistema consentono all’utente di impostare il nome del dispositivo, la lingua, l’ora di spegnimento automatico, il formato dell’ora e la luminosità della sorgente della luce LED. 29/52...
-
Page 213: Guasti Comuni
Guasti comuni 7 Guasti comuni Sintomo del Possibile causa Soluzione guasto Impossibile 1. La batteria è 1. Ricaricare il dispositivo utilizzando l’adattatore di alimentazione. accendere il scarica. dispositivo. 2. La batteria è 2. Una volta che la batteria è guasta. completamente carica, tenere premuto il pulsante di alimentazione per accendere il dispositivo. - Page 214 Guasti comuni Sintomo del Possibile causa Soluzione guasto La lama per 1. Il metodo di 1. Rimontare la lama per laringoscopio laringoscopio installazione seguendo le indicazioni riportate non può essere non è corretto. nella sezione 5.1. installata. 2. La giunzione a 2.
-
Page 215: Pulizia E Disinfezione
Pulizia e disinfezione 8 Pulizia e disinfezione Si consiglia vivamente di utilizzare i materiali e i metodi elencati nel presente capitolo per la pulizia e la disinfezione del dispositivo. Se si utilizzano altri materiali o metodi, il dispositivo potrebbe danneggiarsi o la sua vita utile potrebbe ridursi. - Page 216 Pulizia e disinfezione 8.2 Pulizia 1. Immergere completamente un pezzo di garza medicale morbida nella soluzione detergente raccomandata, strizzarlo e quindi utilizzarlo per strofinare la superficie del dispositivo. 2. Strofinare tutte le superfici del dispositivo in sequenza finché tutte le sostanze contaminanti non vengono rimosse dalla superficie del dispositivo.
- Page 217 Pulizia e disinfezione Durante la pulizia fare attenzione a non graffiare la luce LED e la telecamera. Inoltre, non utilizzare oggetti duri per strofinare il pannello frontale trasparente della telecamera. In caso contrario, potrebbero crearsi dei graffi che comprometterebbero la visualizzazione delle immagini. 8.3 Disinfezione 1.
- Page 218 Pulizia e disinfezione AVVERTENZA: Utilizzare il disinfettante secondo le istruzioni del relativo manuale d’uso. Non sterilizzare il dispositivo in autoclave. Durante la disinfezione della parte di inserimento dell’impugnatura metallica fare attenzione a non graffiarsi. Durante la disinfezione fare attenzione a non graffiare la luce LED e la telecamera.
-
Page 219: Manutenzione
Manutenzione 9 Manutenzione 9.1 Manutenzione regolare 9.1.1 Piano di manutenzione Per garantire un utilizzo sicuro e prolungare la vita utile del videolaringoscopio, eseguire procedure di manutenzione e controlli periodici. La Tabella 9-1 elenca il piano di manutenzione. Tabella 9-1 Piano di manutenzione Procedura di Frequenza Operatore... - Page 220 Manutenzione Controllare che le parti sigillanti non presentino anomalie, che l’installazione del videolaringoscopio sia stata eseguita correttamente e che nessun materiale presenti incrinature. 9.1.3 Controllo del cavo di alimentazione Controllare l’aspetto del cavo di alimentazione. Se si rilevano danni sulla superficie o contatti allentati tra la spina e la presa, contattare il rivenditore per una tempestiva sostituzione.
- Page 221 9.2 Manutenzione della batteria 9.2.1 Panoramica della batteria Il videolaringoscopio VS-10S/VS-10M/VS-10H è dotato di una batteria integrata, che viene ricaricata tramite l’adattatore di alimentazione. Prima dell’uso, ricaricare completamente la batteria del videolaringoscopio per garantirne il funzionamento continuo. Si consiglia di non utilizzare il videolaringoscopio mentre è...
- Page 222 Manutenzione Ottimizzazione della batteria 1. Assicurarsi che il dispositivo non sia in uso su un paziente e spegnerlo. 2. Collegare il dispositivo all’alimentatore CA esterno tramite l’adattatore di alimentazione e ricaricare la batteria per oltre 4 ore senza interruzioni. 3.
- Page 223 Manutenzione 3. Scollegare il dispositivo dall’alimentatore CA quando l’indicatore diventa verde. 4. Accendere il dispositivo affinché funzioni con la luminosità dello schermo e della sorgente luminosa impostata sui livelli predefiniti. Registrare l’ora di avvio. 5. Lasciare il dispositivo in funzione continua finché non si arresta a causa della batteria scarica.
- Page 224 Manutenzione 9.3 Stoccaggio Evitare fuoriuscite di acqua. Non conservare il videolaringoscopio in un luogo caldo e umido. Conservare il videolaringoscopio lontano da vibrazioni eccessive, polvere e gas corrosivi. Conservare il videolaringoscopio lontano dalla luce diretta del sole e dei raggi ultravioletti per evitare segni di scolorimento.
-
Page 225: Appendice A
Per la dichiarazione relativa a CLASSE e gruppo di emissioni e livello di immunità , vedere l’Appendice. Il videolaringoscopio VS-10S/VS-10M/VS-10H è idoneo per le strutture sanitarie professionali, ad esempio per gli ospedali, ad eccezione delle apparecchiature chirurgiche ad alta frequenza (HF) attive nelle vicinanze e della camera schermata contro la RF di un SISTEMA ME per l’imaging a risonanza magnetica,... - Page 226 Appendice A ELETTROMAGNETICHE (EM), il videolaringoscopio VS-10S/VS-10M/VS-10H potrebbe rappresentare un pericolo per il paziente. Per garantire che il videolaringoscopio VS-10S/VS-10M/VS-10H rimanga sicuro per quanto riguarda le perturbazioni elettromagnetiche per tutta la vita utile prevista, attenersi alle indicazioni seguenti: Eseguire la manutenzione periodica in base alla frequenza di manutenzione/assistenza raccomandata e al metodo illustrato nel manuale d’uso.
- Page 227 30 cm (12 pollici) da qualsiasi parte del videolaringoscopio VS-10S/VS-10M/VS-10H, inclusi i cavi specificati dal produttore. In caso contrario, si potrebbe verificare un degrado delle prestazioni di questa apparecchiatura.
- Page 228 Linee guida e dichiarazione di conformità del produttore – Emissioni elettromagnetiche Il videolaringoscopio VS-10S/VS-10M/VS-10H è destinato all’uso nell’ambiente elettromagnetico specificato di seguito. Il cliente o l’utente del videolaringoscopio VS-10S/VS-10M/VS-10H deve garantire che venga utilizzato in tale ambiente. Ambiente elettromagnetico – Linee guida Test delle emissioni Conformità...
- Page 229 Linee guida e dichiarazione di conformità del produttore – Immunità elettromagnetica Il videolaringoscopio VS-10S/VS-10M/VS-10H è destinato all’uso nell’ambiente elettromagnetico specificato di seguito. Il cliente o l’utente del videolaringoscopio VS-10S/VS-10M/VS-10H deve garantire che venga utilizzato in tale ambiente. Test di Livello di test IEC Livello di Ambiente elettromagnetico –...
- Page 230 Se l’utente 61000-4-11 0% 1 ciclo 0% 1 ciclo del videolaringoscopio 70% 25/30 cicli 70% 25/30 cicli VS-10S/VS-10M/VS-10 Monofase: a 0º Monofase: a 0º H richiede un 0% 300 cicli 0% 300 cicli funzionamento continuo durante le interruzioni dell’alimentazione di rete,...
- Page 231 Linee guida e dichiarazione di conformità del produttore – Immunità elettromagnetica Il videolaringoscopio VS-10S/VS-10M/VS-10H è destinato all’uso nell’ambiente elettromagnetico specificato di seguito. Il cliente o l’utente del videolaringoscopio VS-10S/VS-10M/VS-10H deve garantire che venga utilizzato in tale ambiente. Ambiente Test di...
- Page 232 Appendice A H, inclusi i cavi. 27 V/m: 27 V/m: 380 – 390 MHz; 380 – 390 MHz; Distanza di separazione raccomandata 28 V/m: 28 V/m: 430 –470 MHz; 430 –470 MHz; 9V/m: 9V/m: 704 -787MHz; 704 -787MHz; 80 M ~ 800 MHz 28 V/m: 28 V/m:...
- Page 233 RF fissi, è necessario prendere in considerazione un’indagine elettromagnetica del sito. Se l’intensità di campo misurata nella posizione in cui viene utilizzato il videolaringoscopio VS-10S/VS-10M/VS-10H supera il livello di conformità RF applicabile riportato sopra, è necessario osservare il videolaringoscopio VS-10S/VS-10M/VS-10H per verificarne il normale funzionamento.
- Page 234 Distanze di separazione raccomandate tra le apparecchiature di comunicazione RF portatili e mobili e il videolaringoscopio VS-10S/VS-10M/VS-10H Il videolaringoscopio VS-10S/VS-10M/VS-10H è destinato all’uso in un ambiente elettromagnetico in cui le perturbazioni di RF irradiate sono controllate. Il cliente o l’utente del videolaringoscopio VS-10S/VS-10M/VS-10H può contribuire a prevenire...
- Page 235 Appendice A Per i trasmettitori la cui potenza nominale massima in uscita non è elencata sopra, la distanza di separazione raccomandata in metri (m) può essere determinata utilizzando l’equazione applicabile alla frequenza del trasmettitore, dove P è la potenza nominale massima in uscita del trasmettitore in watt (W) secondo il produttore del trasmettitore.
- Page 236 UE – Nome del rappresentante: Shanghai International Holding Corp. GmbH (Europa) UE – Indirizzo del rappresentante: Eiffestrasse 80, 20537 Amburgo, Germania Fax: +86-755-26001651 Codice postale: 518055 Sito Web: http://www.medcaptain.com E-mail: MC.service@medcaptain.com © Copyright 2020 MEDCAPTAIN MEDICAL TECHNOLOGY CO., LTD. Tutti i diritti riservati.
Need help?
Do you have a question about the VS-10S and is the answer not in the manual?
Questions and answers