Table of Contents
Advertisement
Quick Links
Advertisement
Table of Contents

Related Manuals for VMS 3DX


Summary of Contents for VMS 3DX
- Page 1 VMS 3DX GPS Navigator User Guide...
-
Page 2: Table Of Contents
CONTENTS RASTER MAPS PHYSICAL & NAVIGATION BUTTONS............2 Browsing the Map list................22-23 NAVIGATION SETTINGS Selecting on or off road modes...............3 Accessing and modifying the settings............24 Your street navigation and off-road navigation all in one........4 Quick help tips....................4 TECHNICAL SUPPORT................25 MAIN MENU Main Menu Options..................5 VIEW MAP SCREEN On screen controls..................6-7... -
Page 3: Physical & Navigation Buttons
PHYSICAL & NAVIGATION BUTTONS... -
Page 4: Navigation
NAVIGATION VMS 3D MAP Explorer Navigation To start the Map Explorer navigation applications, turn on your GPS and press the "3D Maps" icon. Carefully read the terms and conditions (T&Cs) of the navigation software as shown below and proceed with the navigation software by accepting the T&Cs. -
Page 5: Your Street Navigation And Off-Road Navigation All In One
Your street and off-road navigation software in one! The VMS 3DX is preloaded with the latest VMS 3D Map Explorer which offers the latest state-of-art 3D mapping off-road navigation and it is also programmed to cater for your street navigation needs. -
Page 6: Main Menu
needs. MAIN MENU Main Menu Options Search Key in the name of place, destination or POI to go to or view on the map. Displays the map screen with the last open map and position. Tracklogs & Routes Track where you have been. Start/stop or view your saved tracklogs. -
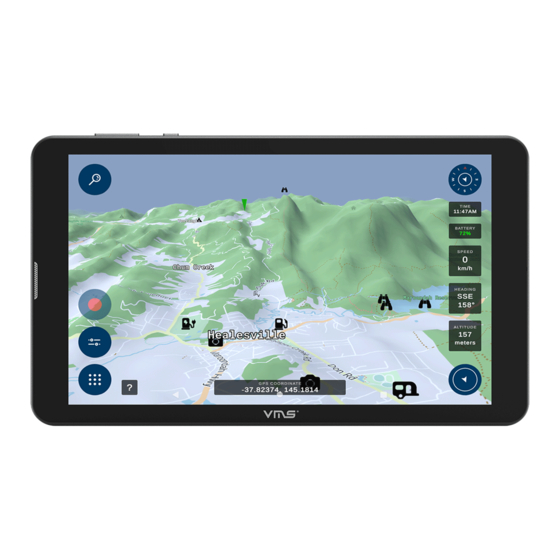
Page 7: View Map Screen
VIEW MAP SCREEN On screen controls adsac... - Page 8 Battery Current GPS coordinates Give you the current battery percentage of the device. Once GPS has acquired a fix on your location, you will be able to see the exact GPS coordinates here. Time Show the user current time according to their respective timezone Lock GPS position Use this button to recalibrate your map to your current location.
-
Page 9: Routes
ROUTES What is a route? A route is a series of waypoints linked together to provide accurate navigation information along the way. Each waypoint on the route is a “via” point. When each point is reached, the next waypoint in the route is automatically called on and navigation continues. - Page 10 Continue to add as many waypoints as you desire to plot your route. If previous waypoints were inserted incorrectly, press the back/reverse button to delete them. When the route has been completed. Press the red “Done” button on the Creating Route Toolbox to save with an unique route or a route description. All the saved routes will be stored in the Routes list and can be edited in the future.
-
Page 11: Viewing And Navigating Along A Route
Viewing and Navigating to a route If you plan to navigate along the route you have just created, please return to the main menu, then select “Tracklogs & Routes” and choose a route on the list. When a route is selected, the route will be displayed on the map with its relevant information. -
Page 12: Modifying A Route
Adding a route point to an existing navigation route When a navigation route has been calculated, you can add in an additional Map point to extend your navigation route by creating a new Map point by holding down on a particular area on the map. Once a waypoint appears on the point you held down on, select the waypoint and then press the red ‘Route’... - Page 13 Once you press the pen icon, an option box shows up on the left of your screen as depicted in the picture. You can do as follows: ● Route to the new added point ● Remove the latest map point ●...
-
Page 14: What Is A Waypoint
WAYPOINT What is a waypoint? Waypoints are used to mark points of interest such as locations or landmarks for later reference. The Waypoint can be stored in memory and loaded for later use. Examples of using waypoints could be marking a camp site, vehicles location, a hazard or even your favourite fishing spot. -
Page 15: Saving The Waypoint
Saving the map point as a waypoint Press the “save waypoint” button to save the map point as a waypoint. Once you press the save button then you can either edit the name, co-ordinates, description and color of the waypoint in the update toolbox on the left. You can also choose to show or hide the waypoint on the map by pressing the “VIsible”... -
Page 16: Adding A Waypoint By Coordinates
Adding a waypoint by coordinates To add a waypoint by coordinates, press the Waypoints button from the main menu. You will be brought to the Waypoints page. Press the “Create new waypoint” button if you want to add a waypoint using the coordinates of the location. - Page 17 You can choose from 4 different coordinate formats that you can enter a waypoint from the dropbox menu. Coordinate formats are: ● Degrees ● Degrees Minutes ● Degrees Minutes Seconds ● UTM Once, all the coordinates are entered into the required fields. Press the red “Add new Waypoint”...
-
Page 18: Search
SEARCH Search for a POI or a location by its address or coordinates If you know the name of the place of interest, you can use this function to search for your destination by typing the place in. To begin, select ‘Search’ from the main menu or press the search key on top left of your map screen. - Page 19 When the destination has been selected, you are presented with an information page that contains details about the destination and facilities available there in case of CAMPS11 and Caravan park 6 POIs) along with various options such as ● Save the result as a waypoint ●...
-
Page 20: Tracklogs
TRACKLOGS What is a tracklog? A tracklog, also known as a bread crumb trail is simply a record of your previous GPS positions displayed as a “trail” on the map. Creating a tracklog All the tracklogs features can be accessed via the main menu by selecting the ”Tracklog”... - Page 21 When your tracklogs are active and being recorded, you will see a recording marker flashing on and off on the left hand side of the Map View screen as indicated on the left. Your tracklog will be marked out on the map as you move along. If you wish to stop the current track logging action, press the recording button and the Tracklog toolbox will be brought up for you from the left hand side of the screen.
-
Page 22: Accessing And Modifying A Tracklog
Accessing and modifying a tracklog To access a previously recorded tracklog on the map, select the desired tracklog on the map, select the desired tracklog from the list in the Tracklog menu. The tracklog menu will bring up a list of all the tracklogs you have created in the past and active tracking as well, from here you can select the track log of interest which you wish to view on the map or modify it’s details. -
Page 23: Raster Maps
RASTER MAPS Manage and use raster maps To view and manage all the available raster maps being stored on the microSD card, press the ‘Raster maps’ button from the main menu. You will also be prompted automatically to enter a raster map activation code when new maps are detected by the system when you re-launch the application. - Page 24 Once you have entered the raster map activation code* you will see that all the raster maps you have activated are ready to go. *Upon purchasing the raster maps for the 3DX (besides the iTopo raster maps which are free with every purchase), activation codes will be provided for your specific device.
-
Page 25: Settings
SETTINGS Accessing and modifying the settings Change can access and change the settings/preferences of the 3D map application by selecting “Settings” from the main menu. From within the settings menu, select the settings you wish to change. 1. Change the screen brightness and 3D Height exaggeration on the Map view screen 2. -
Page 26: Technical Support
TECHNICAL SUPPORT Website : https://www.vms4x4.com/ FAQ : https://www.vms4x4.com/pages/3dx-support-faqs For technical support / enquiries contact us Phone: 03 9017 5589 Email: support@vms4x4.com...
Need help?
Do you have a question about the 3DX and is the answer not in the manual?
Questions and answers