
Subscribe to Our Youtube Channel
Related Manuals for Orbitalum REB 6


Summary of Contents for Orbitalum REB 6
- Page 1 Operating instructions Pipe End Preparation Machines REB 6, REB 14, REB 20 Code 790 093 762 │ Machine-no.: Translation of original operating instructions ________________________________...
- Page 2 All rights reserved, in particular the rights of duplication and distribution as well as translation. Duplication and reproduction in any form (print, photocopy, microfilm or electronic) require the written permission of Orbitalum Tools GmbH.
-
Page 3: Table Of Contents
1.3 Working with safety in mind 1.4 Waste disposal / environmental protection 1.5 Further safety regulations 2 Design of the product 2.1 REB 6 (D), REB 14 (D), REB 20 (D) 2.2 REB 6 (E), REB 14 (E) 2.3 Accessories 2.3.1 Tool Holder (WH) 2.3.2 ... - Page 4 Table of contents Operating instructions REB 6, REB 14, REB 20 holder (WH) 7.5.1 Separate working steps (only 1 tool in operation) 7.5.2 Combination of beveling and facing tool holder (two tools in operation at the same time) 7.5.3 Mounting the tool holder 7.6 ...
-
Page 5: About These Instructions
Operating instructions REB 6, REB 14, REB 20 0 About these instructions About these instructions To allow quick understanding of these instructions and safe handling of the machine, all the warning messages, notes and symbols used in these instructions are presented here along with their meaning. -
Page 6: Further Symbols And Displays
0 About these instructions Operating instructions REB 6, REB 14, REB 20 Further symbols and displays Symbol Meaning Notes: Contain particularly important information for Important comprehension. Note Instruction: You must take notice of this symbol. Request for action in a sequence of actions: You have to do something here. -
Page 7: Notes On Safety
Operating instructions REB 6, REB 14, REB 20 1 Notes on safety Notes on safety The Pipe End Preparation Machine (in the following referred to as REB) is a state-of-the-art machine. Using it for purposes other than those described in this manual may cause injury to the user or to others. -
Page 8: Working With Safety In Mind
1 Notes on safety Operating instructions REB 6, REB 14, REB 20 Working with safety in mind "Make your contribution to safety in the workplace." Report any unusual behavior of the machine to the person in charge immediately. ... -
Page 9: Waste Disposal / Environmental Protection
Operating instructions REB 6, REB 14, REB 20 1 Notes on safety Waste disposal / environmental protection Dispose of chips and used gear lubricant oil according to the regulations. Discarded electric tools and accessories contain a large share of valuable raw and synthetic materials which can be recycled. -
Page 10: Design Of The Product
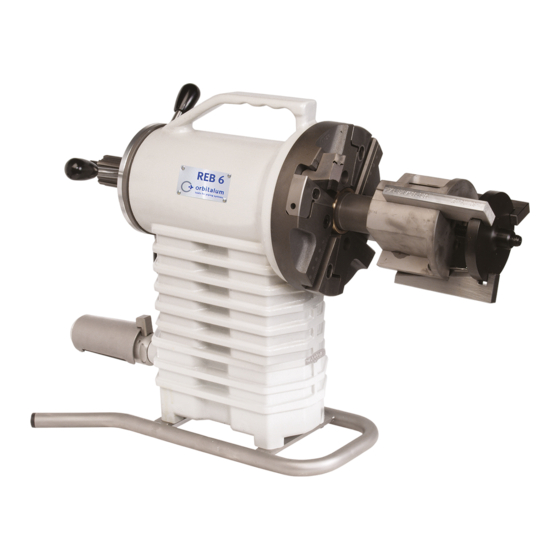
2 Design of the product Operating instructions REB 6, REB 14, REB 20 Design of the product REB 6 (D), REB 14 (D), REB 20 (D) 1 Tool arbor wedge 8 Nameplate 2 Tool arbor 9 ON/OFF switch 3 Wedges... -
Page 11: Reb 6 (E), Reb 14 (E)
Operating instructions REB 6, REB 14, REB 20 2 Design of the product REB 6 (E), REB 14 (E) 1 Tool arbor wedge 7 Stand 2 Tool arbor 8 Nameplate 3 Wedges 12 Housing cover 4 Clamping washer 13 Forward-feed supply... -
Page 12: Accessories
2 Design of the product Operating instructions REB 6, REB 14, REB 20 Accessories Get further information from our current product catalogue. 2.3.1 Tool Holder (WH) Tool holder for multifunctional tools (MFW) for facing pipe ends and for beveling different welding forms at the inner and outer diameter of the pipe. -
Page 13: Optional Clamping Wedges
Operating instructions REB 6, REB 14, REB 20 2 Design of the product 2.3.4 Optional clamping wedges For pipe ID 3.150 – 4.094 inch (80 – 104 mm). Version Pipe inner diameter ID Code [mm] [inch] for REB 6 155 – 166 6.102 –... -
Page 14: Features And Scope Of Application
3 Features and scope of application Operating instructions REB 6, REB 14, REB 20 Features and scope of application Features The Pipe End Preparation Machine REB is designed for preparing (beveling, facing) pipe ends made of metallic materials. The REB is characterized by the following: ... -
Page 15: Scope Of Application
Operating instructions REB 6, REB 14, REB 20 3 Features and scope of application Scope of application 3.2.1 Applications (minimum and maximum pipe dimensions*) Inner-Ø ID Wall thickness s Outer-Ø OD [mm] [inch] [mm] [inch] [mm] [inch] 1.93 0.12 2.20 REB 6 min. -
Page 16: Technical Specifications
4 Technical specifications Operating instructions REB 6, REB 14, REB 20 Technical specifications Rating REB 6 (D) REB 6 (E) REB 14 (D) REB 14 (E) REB 20 (D) Dimensions 560x260x400 640x260x420 625x375x490 700x375x510 700x510x570 [mm] Weight 27.0 28.0 45.0 46.0... -
Page 17: Commissioning
1 Clamping chuck (REB 6 and REB 14) or 2 Clamping chucks (REB 20) 5 Clamping sets, each with 3 clamping wedges (on REB 6) or 6 Clamping sets, each with 3 clamping wedges (REB 14 and REB 20) ... -
Page 18: Transport And Assembly
6 Transport and assembly Operating instructions REB 6, REB 14, REB 20 Transport and assembly Transport REB (E): Danger of death caused by electric shock and restart of the machine! During transportation, the ON/OFF switch could be actuated inadvertently so that the machine is started. - Page 19 Operating instructions REB 6, REB 14, REB 20 6 Transport and assembly Danger of injury! Long length of pipe could cause the machine to overturn. Support of the free end is required when processing long and heavy pipes. WARNING...
-
Page 20: Operation
Operating instructions REB 6, REB 14, REB 20 Operation Choose the wedges and the clamping chuck The clamping range of the REB 6 and REB 14 given on each wedge, in mm Note and inches, refers to the pipe inner diameter. - Page 21 Operating instructions REB 6, REB 14, REB 20 7 Operation 7.1.2 Clamping range REB 14 Clamping range pipe ID Wedges without clamping chuck and with clamping chuck and with small clamping washer with large clamping washer [mm] [inch] Column 1...
- Page 22 7 Operation Operating instructions REB 6, REB 14, REB 20 Transmission table Clamping range pipe ID Clamping range pipe ID Wedges REB 20 REB 14 with small clamping chuck with large clamping chuck (790 094 242) and (790 094 244) and...
-
Page 23: Mounting The Wedges To The Mandrel
Important 2. Screw on the clamping washer (1). REB 6: Code 790 093 152. REB 14: Code 790 094 152. REB 20: Code 790 094 246 (small); Code 790 094 248 (large). 3. Insert the three wedges (6) and screw in the guiding screws (3) completely. -
Page 24: Clamping Range Reb
2. Fasten the clamping chuck with the three screws (2). 3. Screw the clamping washer (4) onto the spindle. REB 6: Code 790 093 154. REB 14: Code 790 094 154. REB 20: Code 790 094 246 (small) Code 790 094 248 (large). -
Page 25: Centring The Mandrel In The Pipe
Operating instructions REB 6, REB 14, REB 20 7 Operation Centring the mandrel in the pipe 1. Use the feed supply to bring the machine into the zero position, so that the thread runout from the mandrel (3) is flush with the facing disc (1) of the feed supply. -
Page 26: Mounting The Multifunctional Tools (Mfw) And The Tool
Mounting the multifunctional tools (MFW) and the tool holder (WH) Up to 4 tool holders can be clamped to the tool arbor of the REB 6 and REB 14 Note (at REB 20 up to 3 tool holders). Thus, several types of machining (facing, 1st bevel, 2nd bevel, interior-diameter turning) are possible at the same time. -
Page 27: Mounting The Tool Holder
Operating instructions REB 6, REB 14, REB 20 7 Operation Bevel holder 37.5° (code 790 093 216) for REB 6 and REB 14. Pipe ID Pipe OD Facing tool holder Machine type [mm] [mm] [mm] Code H [mm] 54 ≤ ID ≤ 76 82 <... -
Page 28: Adjusting The Rotational Speed
7 Operation Operating instructions REB 6, REB 14, REB 20 Adjusting the rotational speed 1. Connect the REB (requirements for REB (D) see chapter 5.2, p. 13, for REB (E) see chapter 5.3, p. 13). ATTENTION Tool damage A pipe which is not sawn-off square can damage the tool if the distance between the cutting edge and the pipe end is too short. -
Page 29: Determining Rpm
Operating instructions REB 6, REB 14, REB 20 7 Operation 7.6.2 Determining rpm 1. Measure the number of revolutions of the tool retainer in one minute (= rpm (n)). 2. Determine the revolutions per minute (rpm) using the following formula: ·... -
Page 30: Preparing The Tube
Always wear safety goggles when working. DANGER Don't remove chips without wearing hand protection. Only use the cooling cutting material KSS-TOP as recommended by Orbitalum Note Tools for chip removal. Machining with lubrication extends the service life of the multifunctional tools and larger feed rates are possible. -
Page 31: Preparing Elbows
Operating instructions REB 6, REB 14, REB 20 7 Operation Preparing elbows Preparing of elbows is only possible with the REB 6 and the special elbow Note clamping system (accessories, see chapter 2.3.3, p. 8). The preparation and adjustments for processing elbows are identically to chapter 7.5, p. - Page 32 7 Operation Operating instructions REB 6, REB 14, REB 20 3. Depending on the elbow inner diameter, select 1 set (à 3 pieces) of the dimension-pins from the table below. Clamping range elbow ID Code of [mm] [inch] dimension-pins 146 - 157 5.75 - 6.18...
- Page 33 Operating instructions REB 6, REB 14, REB 20 7 Operation 6. If the elbow is correctly positioned, tighten with the threaded spindle (4) by ring spanner (SW 18). The elbow is now fixed. 7. Remove the straightening tool. The processing of the elbow can now be started.
-
Page 34: Maintenance
8 Maintenance Operating instructions REB 6, REB 14, REB 20 Maintenance REB (D): Parts under pressure can cause injuries when loosened! Before performing any maintenance work: Let the machine run out with the DANGER compressed air supply switched off. -
Page 35: What To Do If
Operating instructions REB 6, REB 14, REB 20 9 What to do if ...? What to do if ...? General trouble shooting In the following table you will find possible causes of faults and the appropriate remedies. Problem Possible cause... -
Page 36: Servicing/After-Sales Service
For ordering spare parts, see the separate spare parts list. For trouble shooting, please contact your competent branch office directly. Please state the following details: Machine type: REB 6, REB 14, REB 20 (compressed air or electric) Machine number: (see identification plate) orbitalum tools gmbh (06.10) -
Page 37: 10 Eu Declaration Of Conformity
Operating instructions REB 6, REB 14, REB 20 10 EU declaration of conformity 10 EU declaration of conformity 10.1 REB 6, REB 14, REB 20 (Pneumatic) EG-Konformitätserklärung Orbitalum Tools GmbH Josef-Schüttler-Straße 17 Declaration of conformity 78224 Singen, Deutschland Dichiarazione di conformità... -
Page 38: Reb 6, Reb 14 (Electric)
10 EU declaration of conformity Operating instructions REB 6, REB 14, REB 20 10.2 REB 6, REB 14 (Electric) EG-Konformitätserklärung Orbitalum Tools GmbH Josef-Schüttler-Straße 17 Declaration of conformity 78224 Singen, Deutschland Dichiarazione di conformità Tel.: +49 (0) 77 31 792-0 Déclaration de conformité... - Page 40 Tel. +49 (0) 77 31 / 792-0 Fax +49 (0) 77 31 / 792-524 tools@orbitalum.com www.orbitalum.com An ITW Company Plant: Division Orbitalum Josef-Schüttler-Straße 17 78224 Singen Germany 790 093 762_02/04 (06.10) © Orbitalum Tools GmbH D-78224 Singen 2010 Printed in Germany...
Need help?
Do you have a question about the REB 6 and is the answer not in the manual?
Questions and answers