Advertisement
For use with RYOBI FVM51, TVM01, RRT100, and RRT200
Rotary Tools.
WARNING!
To reduce the risk of injury, user must read and understand the
operator's manual for their rotary tool and this instruction sheet.
Always wear eye protection with side shields marked to comply with
ANSI Z87.1. Ensure compatibility and fit before using this acces-
sory. Do not use this accessory if a part is damaged or missing. If
you are not comfortable performing any of the functions described
in these instructions, take your unit to an authorized service center.
WARNING:
Never install, remove, or adjust any attachment head while rotary
tool is running. Failure to stop the motor can cause serious personal
injury. Never operate rotary tool without an attachment head or the
collar installed.
WARNING:
Follow all guidelines and warnings in your chainsaw owner's manual
for saw chain maintenance, removal, and reinstallation instructions.
Damage to saw chain or improper removal and reinstallation may
lead to serious injury.
NOTE: Follow all guidelines and warnings in your rotary tool opera-
tor's manual.
Use the sharpening guide to control the position of the bit when grind-
ing along a saw chain.
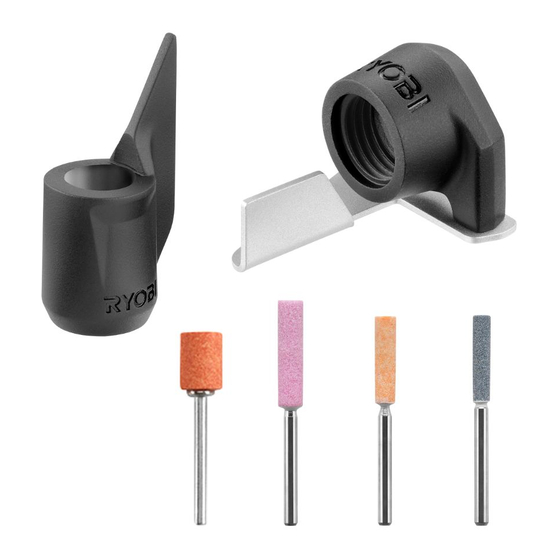
INSTALLING THE CHAINSAW SHARPENING
GUIDE
See Figures 1 - 4.
The sharpening guide may be used on four different sizes of chains
(see the chart in figure 3). Once you have determined the size or pitch
of your chain and the number of spacers needed, follow the steps
below to install.
Verify the rotary tool switch is in the OFF (O) position and unplug the
rotary tool or remove the battery pack, if applicable.
Remove accessories and quick-change collet according to the rotary
tool operator's manual.
Hold the collar firmly, then turn it counterclockwise to loosen and
remove.
Install the quick-change collet and accessory according to the rotary
tool operator's manual. Ensure collet and accessory are secure.
Insert the appropriate sharpening bit leaving approximately 1/4 in.
space between the sharpening bit and the collet.
Assemble the attachment by inserting the screws through the guide
and spacers, if needed, into the clamp.
Hold the attachment head firmly and turn it clockwise to tighten and
secure.
Check to be sure the guide is positioned correctly relative to the
sharpening bit.
USING THE CHAINSAW SHARPENING GUIDE
See Figure 5.
Consult your operator's manual to properly tension the chain prior
to sharpening.
Place the saw on a flat, level surface.
Carefully inspect the chain for any damaged or broken sections.
NOTE: Always wear heavy gloves when handling the saw chain. Do
not sharpen if chain has been damaged.
Verify the rotary tool switch is set to the OFF (O) position and insert
the power cord into an outlet or install the battery pack, if applicable.
Start the tool and select the appropriate speed according to the
rotary tool operator's manual.
Position the sharpening guide as shown, keeping the sharpening bit
level with the top plate of the tooth.
Slowly guide the sharpening bit against the tooth.
File all left hand cutters in one direction. Rotate the chainsaw to the
other side of the chain and file the right hand cutters.
Remove the filings with a wire brush if necessary.
When finished, turn off the rotary tool.
TTI CONSUMER POWER TOOLS, INC.
P.O. Box 1288, Anderson, SC 29622
Phone 1-800-525-2579 www.ryobitools.com
CHAINSAW
SHARPENING GUIDE
A90SG01
Fig. 1
A
A - Collar (collier, collar)
Fig. 2
i n .
p o )
1 / 4
( 1 / 4
p u l
m m
( 1 / 4
6 , 4
m m
6 , 4
B
A - Quick-change collet (collet à changement rapide, portaherramientas de
cambio rápido)
B - Sharpening bit (embout d'affûtage, punta de afilado)
Fig. 3
A
A - Clamp (bride, abrazadera)
B - Spacers (pièces d'écartement,
separadors)
C - Guide (guide, guía)
D - Screw (vis, tornillo)
Sharpening Bit
Chain Size/Pitch
1/4 in. pitch
3/8 in. pitch
3/8 in. pitch (low profile)
.325 in. pitch
Fig. 4
A
A - Attachment head (tête de l'accessoire, cabezal del accesorio)
Fig. 5
g . )
A
B
C
Number of Spacers
Diameter
5/32 in.
No spacers needed
7/32 in.
Two spacers needed
5/32 in.
No spacers needed
3/16 in.
One spacer needed
4-5-21 (REV:01)
E
998000886
Advertisement
Table of Contents

Related Manuals for Ryobi A90SG01


Summary of Contents for Ryobi A90SG01
- Page 1 Fig. 1 CHAINSAW SHARPENING GUIDE A90SG01 For use with RYOBI FVM51, TVM01, RRT100, and RRT200 Rotary Tools. WARNING! To reduce the risk of injury, user must read and understand the operator’s manual for their rotary tool and this instruction sheet.
- Page 2 GUIDE D’AIGUISAGE DE LA SCIE À CHAÎNE GUÍA PARA AFILAR MOTOSIERRA A90SG01 A90SG01 Conçu pour être utilisé avec les outils rotatifs FVM51, TVM01, Para usar con las herramientas giratorias RYOBI FVM51, TVM01, RRT100 et RRT200 RYOBI. RRT100 y RRT200. AVERTISSEMENT! ¡ADVERTENCIA! Pour réduire les risques de blessures, l’utilisateur doit lire et veiller à...
Need help?
Do you have a question about the A90SG01 and is the answer not in the manual?
Questions and answers