Advertisement
Quick Links
Advertisement

Subscribe to Our Youtube Channel
Related Manuals for PowerPac iFan IF9669


Summary of Contents for PowerPac iFan IF9669
- Page 1 iFAN 12” STAND FAN WITH CONVERTIBLE HEIGHT AIR CIRCULATOR IF9669 Remote Control...
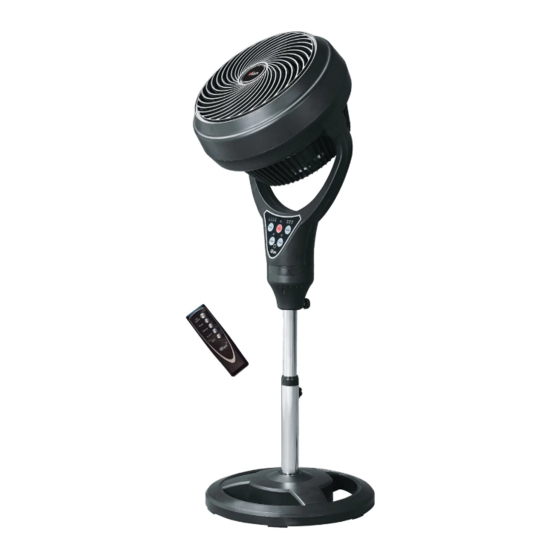
- Page 2 Parts & Description LIST OF COMPONENTS Front Grille Fan Blade Back Grille Head Tilt Holder Control Panel Main Body assembly Main Body screw Extension Pole Height Adjustment screw Outer Pole Base Remote Control Main Body Holder...
- Page 3 ① Front Grille ② Fan Blade ③ Back ④ Head Tilt Holder ⑤ Control Panel ⑥ Main Body Assembly ⑫ Remote Control ⑦ Main Body Screw ⑧ Extension Pole ⑨ Height Adjustment Screw ⑬ Main Body Holder ⑩ Outer Pole ⑪...
- Page 4 Front Fan Blade Back Grille Control Panel...
-
Page 5: How To Assemble
HOW TO ASSEMBLE Warning: DO NOT operate the fan with any of its parts unassembled. The entire assembled unit works as a single appliance. The fan must only operate in the upright position. Any other position will be hazardous. ⑪ 1. - Page 6 With Outer Pole ⑪ ⑩ ⑧ ⑪ ⑩ ⑪ 3. Holding the Base, insert the Outer Pole containing the Extension Pole into the Base. Screw the Outer Pole clockwise into the Base and tighten securely. ⑧ Extension Pole ⑧ Extension Pole ⑨...
- Page 7 ⑩ ⑪ ⑪ ⑩ Insert the Outer Pole onto the Base and screw clockwise...
- Page 8 ⑧ ⑩ ⑨ ⑧ 4. Pull the Extension Pole out of the Outer Pole to your desired height and ⑩ tighten using the Height Adjustment Screw between the Extension Pole and Outer Pole. ⑧ Extension Pole ⑨ Height Adjustment Screw ⑩...
- Page 9 Without Outer Pole ⑪ ⑪ ⑬ ⑪ ⑬ 7. Holding the Base, insert the Main Body Holder into the Base. Screw the Main Body Holder clockwise into the Base and tighten securely. ⑬ ⑪ Insert the Main Body Holder into the Base and screw clockwise ⑦...
- Page 10 ⑥ ⑦ 9. Secure the Main Body Assembly by tightening the Main Body Screw. ⑥ 10. Be careful when you are holding the Main Body Assembly, which is heavy due to it housing a powerful motor.
- Page 11 Warnings ATTENTION : Read this booklet carefully as it contains important instructions for a safe installation, use and maintenance. Important instructions to be kept for future reference. The following basic precautions should always be followed when using electrical appliances: 1. Read all instructions before using the appliance. The Appliance 2.
- Page 12 capacity or otherwise) may cause injuries to persons or damage to the appliance. 9. The packing materials (plastic bags, expanded polystyrene, etc.) must be kept out of the reach of children or disabled persons since they represent potential sources of danger. Location 10.
- Page 13 Control to switch the appliance ON. Press the Speed Button on the Control Panel or the Remote Control to the fan speed (Low – Medium – High) you desire. e. (optional) Press the Timer Button on the Control Panel or the Remote Control to set the Timer to 1, 2, 4 or 8 hours.
- Page 14 19. Plug and unplug the power cable firmly holding it with dry hands. Always unplug the power cable to avoid overheating and avoid stretching it (DO NOT pull it, tug it or use it to drag the appliance to which is connected). Before unplugging the appliance, press the ‘Power’...
- Page 15 HOW TO USE To turn ON 1. Press the Power Button on the Control Panel / Remote Control to switch the appliance ON. Press the Speed Button on the Control Panel / Remote Control to the fan speed (Low – Medium – High) you desire. 2.
-
Page 16: How To Clean
HOW TO CLEAN 1. Switch the appliance OFF. Wait for the appliance to cool down completely. 2. To disassemble a. Unscrew the screws that hold the Front and Back Grilles together. Keep track of where you have placed the screws as you will need them later in step 6. - Page 17 3. Clean the exterior parts of the fan including the Front Grille, Back Grille and fan blades thoroughly with warm water & dish-washing agent and a soft cloth, and immediately wipe dry. DO NOT use any of the following agents as a cleaner: gasoline, thinners or benzene.
-
Page 18: Specification
ENVIRONMENTAL TIP This appliance, along with all other electronic appliances, should, when it is no longer capable of functioning, be disposed with the least possible environmental damage according to the local regulations in your area. In most cases you can discard the appliance at your local recycling centre. -
Page 19: Warranty
3. This warranty does not cover the repair or replacement of part/s damaged by misuse, accidents, negligence, alterations, or modifications in any way, or repairs done by any repair organisation without the prior consent of PowerPac Electrical Pte Ltd. 4. Repair and service are to be performed at: 5 Changi South Lane #03-01 Singapore 486045. - Page 20 In accordance with the terms and conditions of this limited warranty as stated above, PowerPac Electrical Pte Ltd, at its expense shall provide free services for the appliance within the warranty period from its date of purchase from our Authorised...
Need help?
Do you have a question about the iFan IF9669 and is the answer not in the manual?
Questions and answers