Page 1
IQaudIO User Guide This document covers the installation, software configuration and usage of IQaudIO audio cards for the Raspberry Pi. If you would like to see additional information within this document please email us at info@iqaudio.com For those who simply need the /boot/config.txt details —>...
Page 2
9) Connecting the Pi-DigiAMP+ to your Raspberry Pi 10) Connecting the Pi-AMP+ to your Pi-DAC+ 11) Building the Raspberry Pi and IQaudIO sound cards into your Pi-CASE+ 12) Configuring Linux/Raspbian to include sound card support 13) Checking audio is working through the IQaudIO sound card 14) Advanced troubleshooting 15) Controlling the Pi-AMP+ or Pi-DigiAMP+’s Mute / Un-mute...
1) Getting Started Thank you for choosing an IQaudIO sound card. Next you need to play music, but first you may need to configure the Raspberry Pi’s and software package you want to use. The IQaudIO product family. The IQaudIO sound cards are all designed to work with the current Raspberry Pi, those that have a 40way male GPIO pin header.
Page 4
IQaudIO sound card installed correctly on your Raspberry Pi. Each IQaudIO sound cards has a specific purpose / is designed for specific use cases. Select the board that best integrates with your existing HiFi equipment. If you don’t have any existing equipment then simply buy a set of speakers and use the Pi-DigiAMP+.
Page 5
(found at /boot/config.txt) and ensuring the correct device tree overlay is included. This is also how you disable the Pi’s onboard audio if it exists. We’ve included below the entries needed for the IQaudIO boards and also the quickest image that can be downloaded from our website.
Page 6
This is again similar with the Shairport-sync utility - it turns the Pi into a Apple Airport compatible speaker, music and volume is then controlled from your iPad / iPhone, or iTunes. Below, LivingRoom and Snug are both RaspberryPi running Shairport-sync. Other “headless”...
Page 7
How do I install software on the Pi? The Raspberry Pi loads its software from the micro-SD card. Most audio applications assume they are the only thing running on the Pi so most require a dedicated SD card. The applications are normally distributed as a compressed .img file (likely a .zip or .gz file) and this .img file will need to be written to the Pi’s SD card to allow the Pi to boot.
Page 8
2) The NEW Pi-DAC+ The Pi-DAC+ is a fully HAT compliant add-on accessory for the Raspberry Pi A+/B+/Pi2/Rpi3/RPi3B The Pi-DAC+ takes the digital audio signals (I2S) from the Raspberry Pi and through the onboard Texas Instruments PCM5122 DAC delivers variable output (hardware volume control) analog audio to the Pi-DAC+’s Phono connectors.
Page 9
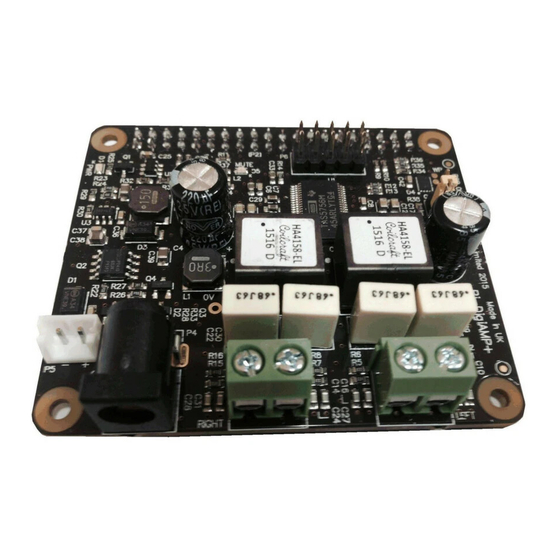
3) The New Pi-DigiAMP+ The Pi-DigiAMP+ is a fully HAT compliant add-on accessory for the Raspberry Pi. The Pi-DigiAMP+ takes the digital audio signals (I2S) from the Raspberry Pi and through the onboard Texas Instruments TAS5756M PowerDAC delivers direct connection to stereo speakers at up to 2x35w with variable output.
Page 10
The Pi-DAC PRO users the Texas Instruments PCM5242 to deliver outstanding Signal to Noise Ration and supports Balanced / Differential out in parallel to Phono / RCA line level output. It also includes the IQaudIO Headphone amp. The Pi-DAC PRO can be connected to the Raspberry Pi A+/B+/RPi2 or RPi3’s 40way pin header without any additional soldering.
Page 11
5) The Pi-AMP+ (Legacy product) The Pi-AMP+ is an add-on accessory for the Legacy Pi-DAC+ / Pi-DAC PRO and Raspberry Pi. The Pi-AMP+ takes the variable output analog audio from the Pi-DAC+ and through the onboard Texas Instruments TPA3118D2 Class D amplifier delivers audio to the Pi-AMP+’s speaker terminals delivering up to 2x35w@19v input.
Page 12
6) Pi-Digi+ The Pi-Digi+ is a fully HAT compliant add-on accessory for the Raspberry Pi. The Pi-Digi+ takes the digital audio signals (I2S) from the Raspberry Pi and through the onboard Wolfson / Cirus Logic WM8804 delivers Optical TOSLINK and isolated electrical SPDIF connection to an external DAC.
Page 13
7) The Pi-DACZero / DACZeroHeadphone The Pi-DACZero is a smaller version of the IQaudIO Pi-DAC+ which is designed to be used with the Raspberry Pi-Zero. The Pi-DACZero delivers audio Line Out and uses the same Linux drivers as the Pi-DAC+.
Page 14
8) Connecting the Pi-DAC+ to your Raspberry Pi WARNING: PLEASE ENSURE ALL CABLES ARE DISCONNECTED FROM THE Pi-DAC+ AND THE RASPBERRY PI BEFORE ATTEMPTING THIS PROCEDURE. The Pi-DAC+ can be connected to the Raspberry Pi’s 40way pin header without any additional soldering.
Page 15
Once the Pi-DAC+ has been fitted the remaining screws can be tightened (finger tight please) as required. If you are using the Pi-CASE+ then replace the 4x screws beneath the Pi with the 4x 5mm PCB standoffs provided with the Pi-CASE+ v28 24-Oct–2018...
Page 16
Apply power to your Raspberry Pi in the normal way. You should see that the Raspberry Pi and the Pi-DAC+ both have power LEDs – this indicates that the power is successfully being applied to the Pi-DAC+. You can now remove power and reconnect any necessary peripherals. v28 24-Oct–2018...
Page 17
9) Connecting the Pi-DigiAMP+ to your Raspberry Pi (Pictures are of LEGACY product) WARNING: PLEASE ENSURE ALL CABLES ARE DISCONNECTED FROM THE Pi-DigiAMP+ AND THE RASPBERRY PI BEFORE ATTEMPTING THIS PROCEDURE. The Pi-DigiAMP+ can be connected to the Raspberry Pi’s 40way pin header without any additional soldering.
Page 18
Once the Pi-DigiAMP+ has been fitted the remaining screws can be tightened (finger tight please) as require If you are using the Pi-CASE+ then replace the 4x screws beneath the Pi with the 4x 5mm PCB standoffs provided with the Pi-CASE+ v28 24-Oct–2018...
Page 19
DO NOT APPLY POWER TO YOUR RASPBERRY PI VIA THE PI’s MICRO USB SOCKET. The Pi/Pi-DigiAMP+ combination MUST be powered via the Pi-DigiAMP+, not the Raspberry Pi. Once you are happy with that the Raspberry Pi and Pi-DigiAMP+ are connected correctly you are nearly ready to apply power.
Need help?
Do you have a question about the Pi-DAC+ and is the answer not in the manual?
Questions and answers