Table of Contents
Advertisement
IQaudIO
User Guide v20
This document covers the installation, software configuration and
usage of IQaudIO audio cards for the Raspberry Pi A+, B+, RPi2, Pi-
Zero and Raspberry Pi 3.
If you would like to see additional information within this document please email us at
info@iqaudio.com
For those who just need to know what setting should
be applied to /boot/config.txt in order to load the
IQaudIO device drivers —> Just jump to section 9
IQaudIO Limited, Company No: 09461908
Advertisement
Table of Contents

Related Manuals for IQaudIO PI-DAC+


Summary of Contents for IQaudIO PI-DAC+
- Page 1 User Guide v20 This document covers the installation, software configuration and usage of IQaudIO audio cards for the Raspberry Pi A+, B+, RPi2, Pi- Zero and Raspberry Pi 3. If you would like to see additional information within this document please email us at info@iqaudio.com...
- Page 2 6) Connecting the Pi-DigiAMP+ to your Raspberry Pi 7) Connecting the Pi-AMP+ to your Pi-DAC+ 8) Building the Raspberry Pi and IQaudIO sound cards into your Pi-CASE+ 9) Configuring Raspbian to include sound card support 10) Checking audio is working through the IQaudIO sound card 11) Advanced troubleshooting 12) Controlling the Pi-AMP+ or Pi-DigiAMP+’s Mute / Un-mute...
- Page 3 1) Overview The full range of IQaudIO sound cards and accessories are available directly from IQaudIO Limited (www.iqaudio.com) or through various Worldwide distribution channels. Please note that although most distributors of our products supply the same optional extras such as PCB standoffs / optional pin headers etc., not all of those selling our products do.
- Page 4 2) The Pi-DAC+ The Pi-DAC+ is a fully HAT compliant add-on accessory for the Raspberry Pi A+/B+/Pi2. The Pi-DAC+ takes the digital audio signals (I2S) from the Raspberry Pi and through the onboard Texas Instruments PCM5122 DAC delivers variable output (hardware volume control) analog audio to the Pi-DAC+’s Phono connectors.
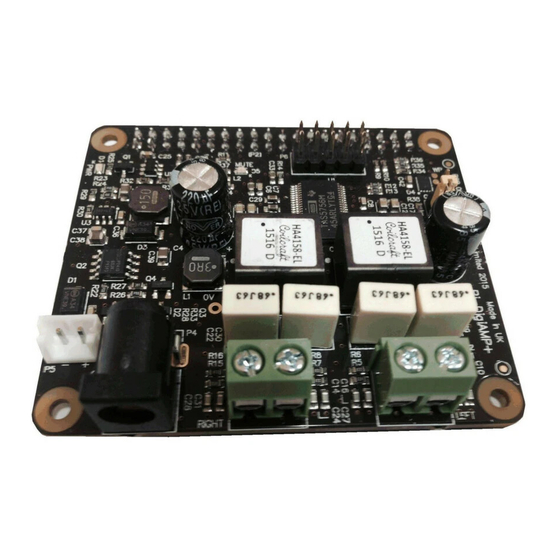
- Page 5 3) The Pi-DigiAMP+ The Pi-DigiAMP+ is a fully HAT compliant add-on accessory for the Raspberry Pi. The Pi-DigiAMP+ takes the digital audio signals (I2S) from the Raspberry Pi and through the onboard Texas Instruments TAS5756M PowerDAC delivers direct connection to stereo speakers at up to 2x35w with variable output.
- Page 6 4) The Pi-AMP+ The Pi-AMP+ is an add-on accessory for the Pi-DAC+ and Raspberry Pi. The Pi-AMP+ takes the variable output analog audio from the Pi-DAC+ and through the onboard Texas Instruments TPA3118D2 Class D amplifier delivers audio to the Pi-AMP+’s speaker terminals delivering up to 2x35w@19v input.
- Page 7 5) Connecting the Pi-DAC+ to your Raspberry Pi WARNING: PLEASE ENSURE ALL CABLES ARE DISCONNECTED FROM THE Pi-DAC+ AND THE RASPBERRY PI BEFORE ATTEMPTING THIS PROCEDURE. The Pi-DAC+ can be connected to the Raspberry Pi’s 40way pin header without any additional soldering.
- Page 8 Once the Pi-DAC+ has been fitted the remaining screws can be tightened (finger tight please) as required. If you are using the Pi-CASE+ then replace the 4x screws beneath the Pi with the 4x 5mm PCB standoffs provided with the Pi-CASE+ v20 19-Aug-2016...
- Page 9 Apply power to your Raspberry Pi in the normal way. You should see that the Raspberry Pi and the Pi-DAC+ both have power LEDs – this indicates that the power is successfully being applied to the Pi-DAC+. You can now remove power and reconnect any necessary peripherals. v20 19-Aug-2016...
- Page 10 6) Connecting the Pi-DigiAMP+ to your Raspberry Pi WARNING: PLEASE ENSURE ALL CABLES ARE DISCONNECTED FROM THE Pi-DigiAMP+ AND THE RASPBERRY PI BEFORE ATTEMPTING THIS PROCEDURE. The Pi-DigiAMP+ can be connected to the Raspberry Pi’s 40way pin header without any additional soldering.
- Page 11 Once the Pi-DigiAMP+ has been fitted the remaining screws can be tightened (finger tight please) as require If you are using the Pi-CASE+ then replace the 4x screws beneath the Pi with the 4x 5mm PCB standoffs provided with the Pi-CASE+ v20 19-Aug-2016...
- Page 12 DO NOT APPLY POWER TO YOUR RASPBERRY PI VIA THE PI’s MICRO USB SOCKET. The Pi/Pi-DigiAMP+ combination MUST be powered via the Pi-DigiAMP+, not the Raspberry Pi. Once you are happy with that the Raspberry Pi and Pi-DigiAMP+ are connected correctly you are nearly ready to apply power.
- Page 13 P3 is for connecting the RIGHT speaker P1 is for connecting the LEFT speaker Attach the speaker -ve terminal (often black) to Attach the speaker +ve terminal (often red) to the - on the amplifier output + on the amplifier output Now select the output gain +20db or +26db by selecting the appropriate pin header position on P7.
- Page 14 7) Connecting the Pi-AMP+ to your Pi-DAC+ WARNING: ENSURE YOU HAVE DISCONNECTED ALL POWER BEFORE ATTEMPTING THIS PROCEDURE The Pi-AMP+ connects to the Pi-DAC+ through both Pi-DAC+’s two pin headers (the 2x4 audio pin header, and the 2x5 power header). NOTE: Older Pi-DAC+ may not have the 2x5 power header fitted.
- Page 15 The male/female spacers should replace the 4 screws (these should be retained) previously used to secure the Pi-DAC+ to the Raspberry Pi. Once the Pi-AMP+ has been fitted the remaining screws (from the Pi-DAC+) can be tightened (finger tight is fine) as required to secure the full PCB stack. v20 19-Aug -2016...
- Page 16 DO NOT APPLY POWER TO YOUR RASPBERRY PI VIA THE PI’s MICRO USB SOCKET. The Pi/DAC+/AMP+ combination MUST be powered via the Pi-AMP+, not the Raspberry Pi. Once you are happy with that the Raspberry Pi / DAC+ and AMP+ are connected correctly you are ready to apply power.
- Page 17 For accurate performance, your loudspeakers must be connected in phase. For both left and right loudspeakers. P3 is for connecting the RIGHT speaker P2 is for connecting the LEFT speaker Attach the speaker -ve terminal (often black) to the - on the amplifier output Attach the speaker +ve terminal (often red) to + on the amplifier output v20 ...
- Page 18 8) Building the Raspberry Pi and IQaudIO sound cards into your Pi-CASE+ The following may prove helpful when building your Raspberry Pi and IQaudIO sounds card into the appropriate Pi-CASE+. All acrylic CASE+ installations follow the same process: • If there is a protective film applied to either side of your acrylic, remove it now.
- Page 19 a) Lay out the CASE+ sides corresponding to the Raspberry Pi / Pi-DAC+ / Pi-DigiAMP+ / Pi-AMP+ v20 19-Aug -2016...
- Page 20 b) Then, build the sides up around the Raspberry Pi. Use sticky tape at each corner to make things simpler to assemble. c) Add the base (with text outwards) and screw the case to the Raspberry Pi v20 19-Aug -2016...
- Page 21 d) If you are building the CASE+ for Pi-DigiAMP+ or Pi-AMP+ then now is the time to secure the speaker cables before fitting the top. e) Pi-CASE+ top in place v20 19-Aug -2016...
- Page 22 Now add the 4 nuts and bolts – Do not over tighten, finger tight is OK f) Completed Pi-CASE+ with Raspberry Pi and Pi-DAC+ inside g) Now apply the small transparent bumper stickers to the base of each Bolt. h) Now to complete screw the remaining 4 screws from the bottom of the case into the 5mm spacers inside.
- Page 23 The CASE+ for DAC+ and Raspberry Pi A+ The CASE+ for DAC+ / Pi-DigiAMP and Raspberry Pi B+ The CASE+ for DAC+ / AMP+ and Raspberry Pi B+ v20 19-Aug -2016...
- Page 24 IQaudIO boards based on the TI PCM5122 chipset use the same basic configuration. pi@raspberrypi ~ $ sudo nano /boot/config.txt dtoverlay=iqaudio-dacplus From Raspbian 4.4.14+ onwards it is also possible to control any of the IQaudIO AMP modules mute state from the config.txt file with additional optional parameters: dtoverlay=iqaudio-dacplus,unmute_amp This will give a "one-shot"...
- Page 25 Once restarted SSH into the Pi and check that the audio drivers / card is available to ALSA. pi@raspberrypi ~ $ aplay -l If the IQaudIO board and drivers have been installed correctly you should see something similar to: pi@iqaudio ~ $ aplay -l...
- Page 26 10) Checking audio is working through the IQaudIO sound card Once support is active using devicetree you should now be able to listen to music. • Once the Raspberry Pi boots, log in and check that the IQaudIO board is visible as an ALSA audio card by running , the output should be similar to that below.
- Page 27 Please note that there are now, from the Feb 2015 Raspbian releases, 3 volume controls for the Pi- DAC+ / Pi-DigiAMP+. This can be confusing but for simplicity just ensure that the Analogue and Analoge Playback Boost volume controls are set to Maximum (100) “Digital”...
- Page 28 –l alsamixer IQaudIO card then please re-check the section above and ensure that the configuration is correct. If you are still having problems them check that the IQaudIO sound card modules are loaded etc. pi@iqaudio lsmod...
- Page 29 12) Controlling the Pi-AMP+ / Pi-DigiAMP+’s Mute / Un-mute MUTE state is toggled by GPIO22 on the Raspberry Pi. The latest IQaudIO device tree supports the unmute of the AMP through additional parameters (from Raspbian 4.4.14+ onwards) … dtoverlay=iqaudio-dacplus,unmute_amp "one-shot" unmute when kernel module loads.
- Page 30 IQaudIO Pi-DAC+ support is built in. Write SD card image, boot Pi. connect from web browser to volumio.local select the pull down menu and select Playback options, here change the audio interface to I2S and IQaudIO DAC, beneath this ensure the Mixer is set to “Digital” under volume options.
- Page 31 From a fresh RuneAudio distribution: IQaudIO Pi-DAC+ support is built in. Write SD card image, boot Pi. ssh into the Pi as root (password rune) and edit /boot/config.txt to select the IQaudio Pi-DAC+ devicetree overlay. Save and reboot connect from web browser to runeaudio.local...
- Page 32 14) Adding the optional PIN headers to the Pi-DAC+ The Pi-DAC+ will work without adding any additional pin headers. A 30 way pin header is for those who may want to access the B+’s GPIO and add things like rotary encoders, LCD screens or IR sensors.
- Page 33 • Not all features of the PCM512x device driver have been fully tested. Changing settings other than the standard Mixer may NOT provide the expected result. • We expect the following Raspberry Pi GPIO to be used by IQaudIO products o GPIO22 (AMP+ & DigiAMP+ mute / unmute support) o GPIO23/24 for our Rotary Encoder (volume control) software o GPIO25 for the IR Sensor software.
- Page 34 ¤ ¤ GPIO3 (I2C SCL1) ¤ ¤ (GROUND) 0v (TXD0) GPIO14 GPIO4 (GCLK) ¤ ¤ <----- Now available on BLACK IQaudIO Pi-DAC+ 0v (GROUND) ¤ ¤ (RXD0) GPIO15 (I2S CLK) GPIO18 GPIO17 (GEN0) ¤ ¤ GPIO27 (GEN2) ¤ ¤ (GROUND) 0v...
- Page 35 The Pi-DAC+ (BLACK) re-exposes the Raspberry Pi signals including UART / SPI CS: Signals used by Pi-AMP+ (To back power Pi and Pi-DAC+) Pin# NAME NAME Pin# ☐ 3.3v (DC Power) ¤ (DC Power) 5v GPIO2 (I2C SDA1) ¤ ¤ (DC Power) 5v GPIO3 (I2C SCL1) ¤...
- Page 36 16) Using RPi2 and external USB devices Note that if you want to enable 1.2AMP USB support (to allow USB hard disks to power up when the Pi-DAC+ / AMP+ is in use) then you may also want to add the following line to your /boot/config.txt file: max_usb_current=1 Please ensure your Pi power supply is able to deliver ~2amp if you are powering via mini USB and...
- Page 37 If being run at startup (in /etc/rc.local) make sure that the call is done as a separate process (for example as: /usr/pi/iqaudio/tools/IQ_rot&) By default IQ_rot uses the mixer name PCM – if the driver’s volume control mixer is not “PCM” then the IQ_rot source code will need to be modified to access the correct mixer.
- Page 38 If being run at startup (in /etc/rc.local) make sure that the call is done as a separate process (for example as: /usr/pi/iqaudio/tools/IQ_ir&) By default IQ_ir uses the mixer name PCM – if the driver’s volume control mixer is not “PCM” then the IQ_ir source code will need to be modified to access the correct mixer.
- Page 39 19) Sonic_Pi and IQaudIO Pi-DAC+/Pi-DigiAMP+ It is now possible to use Sonic_PI with the IQaudIO devices. Simply add the following device tree overlay to your /boot/config.txt and reboot. dtoverlay=i2s-mmap 20) Saving alsamixer settings Storing the alsamixer setting can be achieved by performing the following at the command line:...
Need help?
Do you have a question about the PI-DAC+ and is the answer not in the manual?
Questions and answers