Advertisement
Digital Wireless Weather Station
OPERATING INSTRUCTION
Base unit: WT2076B
Wireless sensor: WT2022A
If you want to know about our features or support solutions, please let us know! We really hope that owning
an Wittime Technology product is not only a practical experience, but also a pleasure.
Please email us at: Casa-wittime@hotmail.com
Advertisement
Table of Contents

Related Manuals for Wittime WT2076B


Summary of Contents for Wittime WT2076B
- Page 1 Wireless sensor: WT2022A If you want to know about our features or support solutions, please let us know! We really hope that owning an Wittime Technology product is not only a practical experience, but also a pleasure. Please email us at: Casa-wittime@hotmail.com...
-
Page 2: Intended Use
Safety Read the following advice carefully and store these operating instructions in case you want to reread something later. If you give the item to someone else, give them these operating instructions as well. • This device may be used by children over 8 years of age and over, as well as by persons with reduced physical, sensory or mental abilities, or lack of experience and / or knowledge if they are supervised or instructed regarding the safe use of the equipment and have understood the resulting hazards. -
Page 3: Unpacking And Checking
• Do not modify the items or the power cable. Only allow repairs to be carried out by a specialist workshop as improperly repaired devices endanger the user. Unpacking and checking 1. Remove the weather station from the packaging, remove all protective films and keep the packaging materials out of the reach of children. - Page 4 Wireless sensor • Range of up to 328 ft (100 meters) (in open area) • Wall mounting bracket Overview of the weather station Base unit – view from above...
- Page 5 Base unit –Back Detachable base - How to plug in power adaptor? Please put the adaptor line through the hole [ 5 ] and plug it into power socket [ 3]. After this step, please assemble the detachable base to the base unit backside.
- Page 6 Operating elements and parts of the base unit Operating buttons Button MODE * Switch temperature unit (°C or °F) * Activate settings mode * Save changes to settings Button CH * Display weather data from various wireless sensors ( channel 1.2.3) * Reconnect wireless sensor connection Button ALARM * Switching the alarm on/off...
-
Page 7: Initial Setup
Wireless sensor Red pilot light Loop for hanging Sliding switch 1 2 3: Set sensor number (transmission channel) Battery compartment If you wish to use only the wireless sensor included in the delivery, as a general rule, the transmission channel does not need to be changed. This is only necessary if you wish to use additional wireless sensors;... - Page 8 - If possible, use alkaline batteries instead of zinc-carbon batteries. Alkaline batteries last longer, particularly outside in low temperatures. Using additional wireless sensors The weather station comes with one wireless sensor. However, you can operate the weather station with up to three wireless sensors.
- Page 9 Setting the air pressure at the location When the weather station is connected to the adapter or batteries on the first time, it will enter the air pressure mode. You will see the air pressure unit starts to flash. Now you can set the air pressure through UP and DOWN button.
-
Page 10: Choosing The Location
Choosing the location ATTENTION - Protect the base unit and wireless sensor from dust, shocks, extreme temperatures and direct sunlight. - Protect the base unit from moisture. Only place the base unit in a dry, enclosed space. - The wireless sensor is protected against moisture but must be protected against water, e.g. rain. General The base unit and wireless sensor exchange information over a radio frequency. - Page 11 Time function Setting the alarm There is alarm on the weather station. You can set it through below steps. 1. Long press the ALARM button till the time starts flashing. 2. Set the desired hour for the alarm with the UP and DOWN button. 3.
-
Page 12: Weather Information
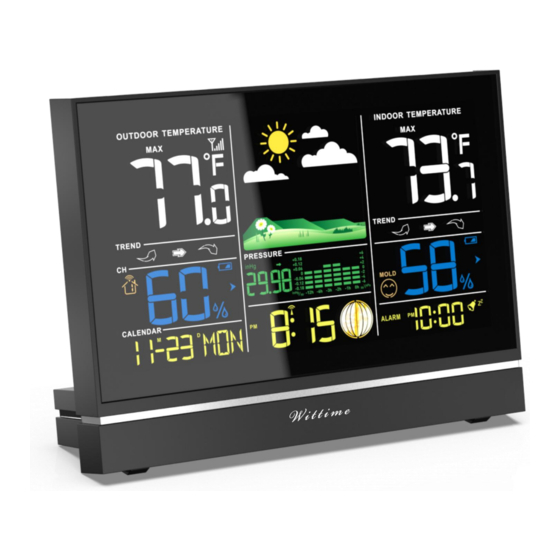
Deactivate/Activate alarm The alarm clock is off by default and needs to be activated manually. • press ALARM once: on the display, alarm is activated. • press ALARM twice: disappear, alarm is deactivated. Stopping the alarm You will be woken by the alarm at the set time, and the sound will become more and more intense as the alarm continues. - Page 13 Current channel of outdoor sensor Mold indicator Dew point Heat index Outdoor Humidity Outdoor Humidity trend Low battery indicator for outdoor sensor Outdoor temperature trend Temperature unit:°F or °C Radio frequency reception symbol Maximum outdoor temperature and humidity Outdoor temperature...
- Page 14 Maximum indoor temperature and humidity Indoor temperature Indoor temperature trend Comfort indicator Indoor humidity Indoor humidity trend Low battery indicator for outdoor sensor Temperature unit:°F or °C Daily MAX/MIN data The highest and lowest temperature and humidity values by repeatedly pressing the UP button. •...
- Page 15 Trend rising constant falling Temperature Humidity Air pressure trend When the air pressure rises again, the symbol will be displayed continuously again. The arrow shows the weather trend. If it points upwards or downwards, it means that the weather rises or falls by more than 0.06 inHg (2 hPa) in an hour.
- Page 16 Temperature alarm - If the wireless sensor measures a temperature between 33.8 °F and 26.6°F, there is a risk of frost and a snowflake symbol will flash. If the temperature falls below 26.6°F for an extended period of time, the snowflake symbol will be constantly displayed. Note: Even if the temperature alarm is not displayed, when the temperature is around freezing point, there is generally always a risk of frost and/or black ice.
- Page 17 Heat index (display for outdoors) The heat index (“HEAT” on the display) is comprised of the temperature and humidity and displays the perceived temperature. - The heat index can only be displayed when the outdoor temperature rises above 80°F. Phases of the moon The phases of the moon displayed are automatically updated with the date.
-
Page 18: Resetting The Weather Station
DST function Weather station will adapt to winter / summer time automatically. Summer time: the second Sunday of March at 1:59 59’ changes to 3:00 00’ Winter time: the first Sunday of November at 1:59 59’ changes to 1:00 00’ Switching the light on A) Battery operation Press any buttons to light up the display for 10 seconds. -
Page 19: Troubleshooting
2. Wipe the base unit with a slightly damp cloth when required. 3. Dry off the device completely before connecting it with the switching adapter again. Technical Data Base unit Model: WT2076B Power consumption: 5.0V 600 mA Power supply: 3 x LR03 (AAA) / 1.5 V Temperature measuring range: 14.2°F ~ 122°F... - Page 20 Humidity measuring accuracy:+/- 3 % with a measuring range of 30% to 80%, +/-5% with measuring range of 1% to 29% and 81% to 99% Resolution: 1 % Wireless sensor Model: WT2022A Batteries: 2 x LR6 type (AA) 1.5 V Temperature measuring range: - 40°F to 158°F Temperature measuring accuracy: +/-0.5°F Protection type: IPX4: Protection against splash water from all directions...
-
Page 21: Warranty And Support
Manufacturer and supplier are not responsible for malfunction where interference occurs. Warranty and support Wittime Technology, Ltd. provides a 1-year limited time warranty (from date of purchase) on this product relating to manufacturing defects in materials & workmanship. Before returning a product, please contact our friendly customer support with questions:...
Need help?
Do you have a question about the WT2076B and is the answer not in the manual?
Questions and answers
How to turn the alarm clock off
To turn off the Wittime WT2076B alarm clock, you can:
1. Snooze: Press the SNOOZE•LIGHT button to pause the alarm for approximately 5 minutes.
2. Switch off completely: Press any button on the base unit (except SNOOZE•LIGHT) to stop the alarm. It will ring again after 24 hours.
3. Automatic stop: If no buttons are pressed, the alarm will turn off automatically after 2 minutes and ring again after 24 hours.
This answer is automatically generated
How do I keep the display on? It keeps going out.
For the Wittime WT2076B, keep the display on by powering the base unit through the power adapter and the power mains. The display will remain constantly illuminated in this mode.
This answer is automatically generated
Unit is wt2076b. On occasions the whole screen will be totally blank, using 110 volt for power. it will then operate normally.
The Wittime WT2076B screen may go blank intermittently if the power adapter is not plugged in correctly or if the batteries in the main unit are not properly inserted. Check the connection of the power adapter and ensure the batteries, if used, are securely in place.
This answer is automatically generated