
Related Manuals for Wittime WT2081


Summary of Contents for Wittime WT2081
- Page 1 Digital Wireless Weather Station OPERATING INSTRUCTION Base unit: WT2081 Wireless sensor: WT2039A Remove the protective film from the display before use.
-
Page 2: Unpacking And Checking
Safety Read the following advice carefully and store these operating instructions in case you want to reread something later. If you give the item to someone else, give them these operating instructions as well. • This device may be used by children over 8 years of age and over, as well as by persons with reduced physical, sensory or mental abilities, or lack of experience and / or knowledge if they are supervised or instructed regarding the safe use of the equipment and have understood the resulting hazards. -
Page 3: Items Included In The Delivery
Items included in the delivery • The weather station, consisting of base station and wireless sensor • 2 batteries - LR03 type (AAA) / 1.5 V (base unit) • 2 batteries - LR03 type (AAA) / 1.5 V (wireless sensor) •... - Page 4 Base unit –Back Operating elements and parts of the base unit Operating buttons Button * Display alarm time * Activate settings mode * Save changes to settings Button...
-
Page 5: Wireless Sensor
* Set values (increase) * Display stored MAX and MIN values Button * Illumination backlight * Activate snooze function * Activate setting mode for weather symbol Button * Set values (decrease) * Display: Mold indicator, dew-point, heat index Button * Switching the alarm on/off Button * Display weather data from various wireless sensors (channel 1.2.3) * Reconnect wireless sensor connection... -
Page 6: Initial Setup
Loop for hanging Battery compartment Red pilot light If you wish to use only the wireless sensor included in the delivery, as a general rule, the transmission channel does not need to be changed. This is only necessary if you wish to use additional wireless sensors; see “ Using additional wireless sensors ”. - Page 7 4. Press and hold the button on the base unit until the radio frequency symbol flashes. The base unit will now retrieve the weather information from all available wireless sensors. Base unit You can operate the wireless weather station using the switching adapter or with batteries. If the wireless weather station is connected to a power socket, it will be operated using the power mains, even if there are batteries in the device.
-
Page 8: Setting The Time And Date Manually
Setting the time and date manually 1. Press and hold the button until the display for the year begins to flash. 2. Set the year with the buttons. 3. Press to store the setting. 4. Continue as described: - Set a value with - Store a setting with 5. -
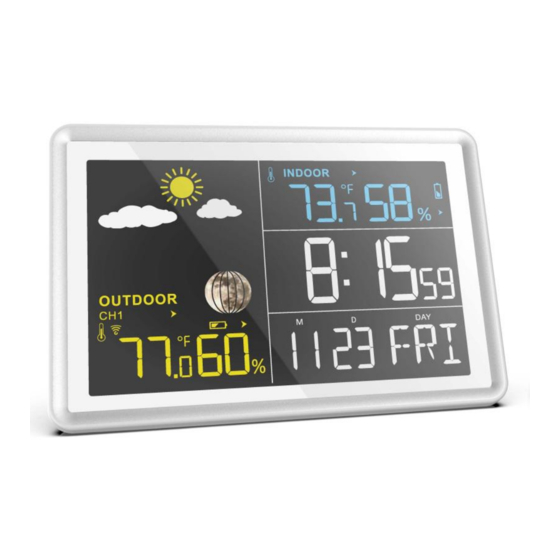
Page 9: Display Indicators
Base unit DANGER When installing the device on a wall, there must be no electrical cables, gas or water pipes in the wall at the installation site. Otherwise there is a risk of electric shock! • You can put the base unit on the desk or hang it up. It’s better to put on the desk. Wireless sensor •... -
Page 10: Alarm Function
PM symbol Second Hour Daylight saving time (DST) Alarm symbol Month Snooze symbol Date Minute Languages (only refer to day of week) Alarm function The base unit allows you to set two different alarm times. For example, you can set an alarm for the morning and for after an afternoon nap by activating both alarm times. -
Page 11: Weather Information
The alarm signal is paused for approx. 5 minutes, the bell symbol and symbol will flash on the display. Afterwards, the alarm will sound and wake you up again. You can repeat this process multiple times. Weather information Temperature and humidity Indoor thermo &... -
Page 12: Weather Trend
Outdoor thermo & hygro symbol Current transmission channel to the base unit Mold indicator Dew point Temperature trend Heat index Low battery indicator Humidity trend Stored maximum and minimum values Humidity in percent Temperature Radio frequency reception symbol The highest and lowest temperature and humidity values by repeatedly pressing the button. - Page 13 Temperature alarm - If the wireless sensor measures a temperature between 33.8 °F and 30.2°F, there is a risk of frost and a snowflake symbol will flash. If the temperature falls below 30.2°F for an extended period of time, the snowflake symbol will be constantly displayed. Note: Even if the temperature alarm is not displayed, when the temperature is around freezing point, there is generally always a risk of frost and/or black ice.
- Page 14 Mold indicator (display for indoors and outdoors) The mold indicator (“MOLD” on the display) is comprised of the temperature and humidity. The indicator displays how likely it is that mold will start to grow. Possible indicators: Dew-point display (display for outdoors) The dew point (“DEW”...
-
Page 15: Low Battery Indicator
Switching the light on A) Battery operation Press any buttons to light up the display for 10 seconds. B) Power mains operation When the base unit is powered through the switching adapter and the power mains, the display is constantly illuminated. Press the SNOOZE/LIGHT button repeatedly to select the following settings for the display illumination: Bright >>... -
Page 16: Troubleshooting
2. Wipe the base unit with a slightly damp cloth when required. 3. Dry off the device completely before connecting it with the switching adapter again. Technical Data Base unit Model: WT2081 Power consumption: 5.0V 600 mA Power supply: x LR03 (AAA) / 1.5 V Temperature measuring range: 14.2°F ~ 122°F... -
Page 17: Fcc Statement
Wireless sensor Model: WT2039A Batteries: 2 x LR03 (AAA) 1.5 V Temperature measuring range: - 40°F to 158°F Protection type: IPX4: Protection against splash water from all directions Transmission frequency: 433 MHz Range: max. 328 ft (100 meters) (in open area) Switching adapter Power supply: 100-240V~50/60Hz 0.3A Max Output: 5.0V...
Need help?
Do you have a question about the WT2081 and is the answer not in the manual?
Questions and answers
How do I change C to F on both the indoor and outdoor temperatures?
To change the temperature display from Celsius to Fahrenheit on the Wittime WT2081:
1. For the base unit (indoor temperature): Look for a °C/°F button on the base unit and press it to switch between Celsius and Fahrenheit.
2. For the wireless sensor (outdoor temperature): Locate the °C/°F button on the wireless sensor and press it to toggle between Celsius and Fahrenheit.
These steps will adjust the temperature display accordingly.
This answer is automatically generated
@Mr. Anderson I cannot find a "C/F" button on the indoor base unit. Now what? I'm ready to throw this unit away and buy from a different company.
How do I change C to F for both the indoor and outdoor temperature?
To change the temperature display from Celsius to Fahrenheit on the Wittime WT2081, press the "°C/°F" button on the wireless sensor.
This answer is automatically generated
@Mr. Anderson I don't see a C/F button on the wireless sensor.
What remote sensors work with WT2081 and where can you buy one?
The compatible remote sensor for the Wittime WT2081 is the WT2039A.
This answer is automatically generated
change pm to ****
To change PM to AM on the Wittime WT2081, you need to adjust the time settings. Follow these steps:
1. Press and hold the time-setting button until the hour indicator starts flashing.
2. Use the up or down buttons to adjust the hour. Keep scrolling until the AM time appears.
3. Press the time-setting button again to confirm the hour, then adjust the minutes if needed.
4. Press the time-setting button once more to save the changes.
Ensure that the correct time format (12-hour or 24-hour) is set if applicable.
This answer is automatically generated
does it automatically adjust to day light savings time?
Yes, the Wittime WT2081 automatically adjusts to daylight saving time. It changes to summertime on the second Sunday of March at 2:00 AM and to wintertime on the first Sunday of November at 1:00 AM.
This answer is automatically generated
The outdoor sensor isn't working correctly. Can I purchase a replacement outdoor sensor?
Yes, the manual states that the weather station can operate with up to three wireless sensors and that additional wireless sensors are available for purchase via their online shop.
This answer is automatically generated
How do you change the time date and day
The specific steps to change the time, date, and day on the Wittime WT2081 are not provided in the available information. Therefore, the procedure cannot be determined.
This answer is automatically generated
How do you SHUT OFF the alarm permanently. itkeeps going off every 24 hours when I think I shut it off. Do not want to use the alarm function at all
aaaaaaaaaaaaaaaaaaaaaaaa
Where is the C/F button located on the base unit of WT2081?