Table of Contents
Advertisement
Quick Links
DRYWALL PANEL ROLLING LIFTER
ITEM: 65044 11FT & 65045 16FT
OWNER'S MANUAL AND SAFETY INSTRUCTIONS
SAVE THIS MANUAL: KEEP THIS MANUAL FOR SAFETY WARNINGS, PRECAUTIONS, ASSEMBLY,
OPERATING, INSPECTION, MAINTENANCE AND CLEANING PROCEDURES. WRITE THE PRODUCT'S
SERIAL NUMBER ON THE BACK OF THE MANUAL NEAR THE ASSEMBLY DIAGRAM (OR MONTH
AND YEAR OF PURCHASE IF PRODUCT HAS NO NUMBER).
FOR QUESTIONS PLEASE CALL OUR CUSTOMER SUPPORT: (909) 628 4900 MON-FRI 9AM TO 3PM PST
Advertisement
Table of Contents

Related Manuals for Stark 65044

Summary of Contents for Stark 65044
- Page 1 DRYWALL PANEL ROLLING LIFTER ITEM: 65044 11FT & 65045 16FT OWNER’S MANUAL AND SAFETY INSTRUCTIONS SAVE THIS MANUAL: KEEP THIS MANUAL FOR SAFETY WARNINGS, PRECAUTIONS, ASSEMBLY, OPERATING, INSPECTION, MAINTENANCE AND CLEANING PROCEDURES. WRITE THE PRODUCT’S SERIAL NUMBER ON THE BACK OF THE MANUAL NEAR THE ASSEMBLY DIAGRAM (OR MONTH AND YEAR OF PURCHASE IF PRODUCT HAS NO NUMBER).
-
Page 2: Important Safety Information
IMPORTANT SAFETY INFORMATION SAFETY The warnings, precautions, and instructions discussed in this instruction manual cannot cover all possible conditions and situations that may occur. It must be understood by the operator that common sense and caution are factors which cannot be built into this product, but must be supplied by the operator. Read carefully and understand all ASSEMBLY AND OPERATION INSTRUCTIONS before operating. -
Page 3: Product Information
PRODUCT INFORMATION... -
Page 4: Parts Information
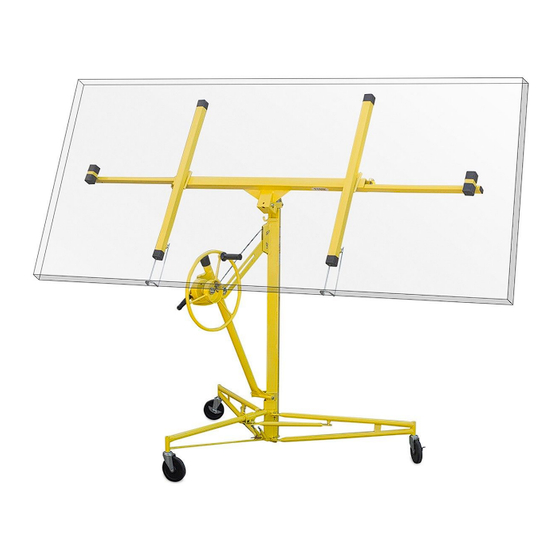
PARTS INFORMATION... - Page 5 ASSEMBLY COMPONENTS: The Drywall Lift is shipped as several components that must be assembled before use: • Tripod base assembly. • Frame assembly, which includes a winch assembly and standard (4-ft) telescoping lift sections • Cradle assembly, without its detachable crossarms •...
-
Page 6: Operation
OPERATION Tilt Latch To allow the cradle to tilt (for loading a dry wall panel, or for raising the pane! to a side wall or sloped ceiling); or to remove the cradle from the frame, pivot the tilt latch out and down. To lock the cradle onto the frame without tilting, pivot the latch up to engage the stud on the cradle. - Page 7 OPERATION To Load a Drywall Panel 1. Set (lower) the backstop, so the Lift won’t roll backward 2. Swing open the panel support hooks on the two crossarms. Be sure the cradle is turned so the support hooks are on the opposite side from the winch wheel.
-
Page 8: Disassembly / Maintenance
DISASSEMBLY / MAINTENANCE To Load a Drywall Panel To disassemble the Drywall Lift for transport or compact storage; 1. Crank the cradle all the way down. 2. Slide the cradle outriggers all the way in until they latch. Close the panel support hooks. - Page 9 OPERATION 5. Place the drywall panel on the Cradle, with the outer side of the panel (the good side) facing the cradle. Carefully lean the panel on the Crossarms, being careful not to damage the edges of the panel. 6. If the panel will be installed on a flat ceiling, tilt the Cradle back to its horizontal position and lock in place with the Tilt Pin.
- Page 10 DISCLAIMER PLEASE READ THE FOLLOWING CAREFULLY THE MANUFACTURER AND/OR DISTRIBUTOR HAS PROVIDED THE PARTS LIST AND ASSEMBLY DIAGRAM IN THIS MANUAL AS A REFERENCE TOOL ONLY. NEITHER THE MANUFACTURER OR DISTRIBUTOR MAKES ANY REPRESENTATION OR WARRANTY OF ANY KIND TO THE BUYER THAT HE OR SHE IS QUALIFIED TO MAKE ANY REPAIRS TO THE PRODUCT, OR THAT HE OR SHE IS QUALIFIED TO REPLACE ANY PARTS OF THE PRODUCT.
Need help?
Do you have a question about the 65044 and is the answer not in the manual?
Questions and answers