Zoning ZITY Installation And Service Manual
Hide thumbs
Also See for ZITY:
- Technical and installation manual (28 pages) ,
- Quick installation manual (12 pages)
Table of Contents
Advertisement
Quick Links
Advertisement
Table of Contents

Related Manuals for Zoning ZITY

Summary of Contents for Zoning ZITY
-
Page 3: Table Of Contents
Frequency inhibitors and radio equipment operating in a permanent transmission mode in the same frequency band (433 MHz) may impair the normal operation of the ZONING. The system is designed to work on two different frequencies (433.92 and 434.33 MHz) to minimise this type of problem. -
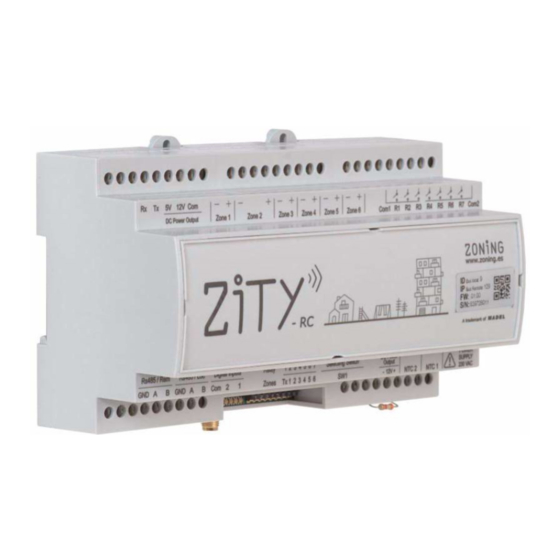
Page 4: Connecting The System
RS485 remote communication 433/434 MHz Radio bus for home automation com- transmission antenna (only munication/ BMS or NetBox in ZITY-RC control units) (MODBUS RTU-SLAVE protocol) Fig.1 Connecting all ZONING SYSTEM components in the ZITY control unit. -
Page 5: Wiring Diagrams
1.1-A Direct expansion system with via radio thermostats and NetBox gateway... - Page 6 Direct expansion system with wired thermostats and NetBox gateway.
- Page 7 1.1-C Hydronic systems. Fancoil For the connection of thermostats, motorized dampers and NetBox, Refer to diagrams above. 2– Pipe FANCOIL Installation Individual Collective Location Type Battery inlet NTC 1 Optional Optional pipe Remove Battery inlet NTC2 Optional resistor pipe 4– Pipe FANCOIL Installation Individual Collective...
- Page 8 NTC1 for the pro- duction equipment output and NTC2 for the inlet temperatures to the radiant floor. To activate in the ZITY the radiant protocol, the switches must be positioned as follows: 1.1-E Direct Expansion/ Radiant combined hybrid systems...
-
Page 9: Ntc Probe Functions
1.2 Power supply 1.3 NTC Probes DIRECT EXPANSION 1x1 and VRF Installation type With gateway No gateway Location NTC 1 Do not connect Do not connect NTC2 Leave resistor (1) Advisable or leave resistor Air return *1: Only install in FUJITSU– GENERAL machines with gateway. The other brands do not require a sensor. Installation type Individual Collective... -
Page 10: Control Leds And Output Relays Functions
1.4 Installations with more than 6 zones In installations with more than 6 zones, 1 or 2 zone expansion modules will be connected. The first expansion module controls zones 7 to 12. A third module can be added, which will control from zone 13 to zone 18. -
Page 11: System Settings
Configuring the system is a two-step process: 1 Configure the switches of the ZITY control unit: S e l e c t s w i t c h S W 1 a c c o r d i n g t o t h e t y p e o f m a c h i n e a n d p o s i t i o n t h e D I P 8 i n l e a r n i n g m o d e . - Page 12 2.3.A ZOE-RC thermostats with ZITY-RC: After locating the corresponding radio ID of the ZITY-RC unit, assign a zone number to each thermostat and select which thermostat will be MASTER or Slave. 2.3.B ZEUS-RC thermostats with ZITY-RC: Assign ID number / Zone / Master– Slave.
- Page 13 2.3.B ZEBRA thermostats with ZITY-W (by wire) 1 Connect the thermostats and the control unit via the following steps: · For the Master thermostat: define a single Master per installation. Configure menus 5 (Master/ Slave), 6 (Flexifan), 9 (Actives Modes), 14 (Zone Number) and 16 (Keypad Lock):...
-
Page 14: Learning Mode
The learning process should be carried out at the same The LEDs for the associated zones will be enabled in each time in all the control units, main board (ZITY-RC or ZITY- W) control unit. The main board will detect, apart from the and expansion modules (ZITY-W/ME). -
Page 15: Most Common Errors
4 Most common errors 4.1 For all installations: ERROR INDICATOR CAUSE SOLUTION · Check that voltage is reaching the ZITY On supplying 230Vac to No voltage or no the control unit, no LED learning control unit (230VAC ±10%). lights up on the control unit ·... - Page 16 Rs485/Rem . · Check the position of switch 7 of the ZITY or the active modes of the thermostat, to avoid not working in radiant modes. The R3 LED in the relay row Sensor error ·...
-
Page 17: Zoe-Rc Thermostat Advanced Settings
5 ZOE-RC Thermostat advanced settings : ZOE-RC timer-thermostats have an expert menu (Se2) for setting various system parameters. The parameters that can be configured are shown in the following table: Parameter Description Values Radio frequency Fr00 = 433 Mhz; Fr01 = 434 Mhz (*) Setpoint/ ambient temperature Tc00 = Setpoint temp. -
Page 18: Zeus-Rc Thermostat Advanced Settings
6 ZEUS-RC advanced settings: ZEUS-RC thermostat have an expert menu for setting various system parameters. To access the expert menu, follow this procedure: Parameter Description Values Radio frequency Fr = 434 Mhz (*) Fr = 433 Mhz; Lock modes (1) OFF = No lock (*) ON = Menu key lock Hysteresis (1) -
Page 19: Zebra Thermostat Advanced Settings
7 ZEBRA Thermostat advanced settings The ZEBRA timer-thermostats have a menu for setting various system pa- rameters. The parameters that can be configured are shown in the following table : To access the menu, follow the next steps: · Master thermostat (Place Master in OFF and MODE button 3s): Programming Turn off the Press MODE 3s... - Page 20 Parameters Parameters Description Values ZEBRA V1 ZEBRA V2 Active modes 0= Cool air + Fan; 1= Heat air + fan; 2= Cool/ heat air + fan (*); 3= Radiant heat; 4= Radiant cool; 5= Frío + Calor radiante; 6= Air heat + Radiant heat + FAN; 7= Radiant cool + cool air + FAN;...
-
Page 21: Sw1 Central Zity Advanced Settings
8 SW1 central ZITY advanced settings: The SW1 switch is used to configure the ZITY control unit according to the type of installation and operating frequency. DIP 8 is used to place the unit in learning mode during start-up (see the corresponding section). -
Page 22: Technical Characteristics
Technical characteristics MADEL ATD hereby declares that ZEUS/ ZOE / ZEBRA / ZITY equipment complies with the essential requirements and any other applicable or enforceable provisions of Directives 2014/35/UE LVD, 2014/30/UE EMC and 2014/53/UE RED, 2011/65/UE. Central de control ZITY (receptor) ZEUS-RC radio thermostat ·... -
Page 23: Warranty Terms
The procedure to follow in the case of return of the Madel ZONING system under warranty is as follows: If there is any problem, you should contact MADEL tech- nical support service (902.550.290) who will try to solve any problems and answer any questions about the installation.
Need help?
Do you have a question about the ZITY and is the answer not in the manual?
Questions and answers