Moultrie Panoramic-150 Manual
- User manual (7 pages) ,
- Instructions manual (7 pages)
Advertisement
- 1 CAMERA OVERVIEW
- 2 QUICK START INSTRUCTIONS
- 3 DEFAULT SETTINGS
- 4 CAPTURE MODES
-
5
SETUP AND PROGRAMMING
- 5.1 Setup Menu
- 5.2 Date/Time
- 5.3 Capture Mode
- 5.4 Photo Quality
- 5.5 Photo Delay
- 5.6 Multi-Shot
- 5.7 Video Resolution
- 5.8 Video Length
- 5.9 Camera Name
- 5.10 Temperature
- 5.11 Info Strip
- 5.12 Time Lapse Frequency
- 5.13 Time Lapse Duration
- 5.14 Battery Life
- 5.15 GPS Latitude
- 5.16 GPS Longitude
- 5.17 Default Settings
- 5.18 Delete All Photos
- 5.19 Security Code
- 6 ADVANCED INFORMATION
- 7 CAMERA SPECIFICATIONS
- 8 Important Battery lnformation
- 9 Moultrie Limited Warranty
- 10 Documents / Resources
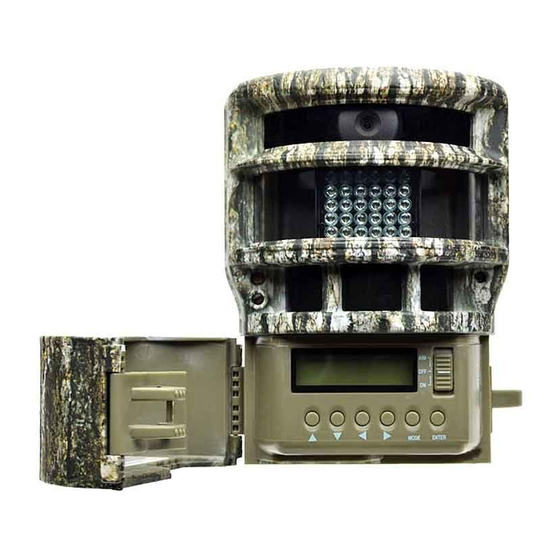
CAMERA OVERVIEW

ON / OFF / AIM
Used for turning On, turning Off, or IR testing. When AIM is ON, the red AIM LED light on the front of the camera will illuminate. When Aim is ON and the PIR sensor detects motion, the red LED on the front of the camera will come on for 2 seconds and then shut off. As you walk towards center the LED will appear brighter.
MODE BUTTON
The Mode Button selects Camera Setup or Main Screen. When camera mode is selected, the UP and DOWN buttons navigate through the menu options. The Mode Button is also used to wake-up the camera and turn on the display when the camera is in power saving (or sleep) mode.
ENTER, UP/DOWN and LEFT/RIGHT BUTTONS
The ENTER button selects the item to be changed. The UP/DOWN and LEFT/RIGHT buttons are used to step through the menu options. Pressing the ENTER button again, selects the option indicated on the display. The ENTER button is also used to manually take a picture.
BATTERY COMPARTMENT
The camera is powered by six (6) C-cell alkaline batteries. Slide the Unlock switch to the front and grab the small handle under the switch to slide-out the battery compartment tray.
SD CARD SLOT
Accepts up to a 32GB SD Card for photo and video storage.
NOTE: An SD Card must be installed for the camera to operate (sold separately).
USB PORT
Download still pictures and video onto your computer by connecting a mini-USB cable (sold separately) to the USB port.
EXTERNAL POWER PORT
Accepts the Moultrie PowerPanel or Moultrie Battery Box accessories (sold separately) only. Refer to www.moultriefeeders.com for more information.
NOTE: The use of any other power source will void your warranty and possibly harm your camera.
QUICK START INSTRUCTIONS
STEP 1
Slide the UNLOCK switch on the bottom of Camera and use the knob to pull the slide-out Battery Tray. Install six (6) C-cell alkaline batteries with polarities as indicated in the Battery Tray. Re-install the Battery Tray and insert your SD card.
STEP 2
Thread the provided Mounting Strap through the Eyelets on the back of the camera and secure to a tree or pole approximately 36" from the ground as shown.
STEP 3
Turn Camera on by sliding ON/OFF/AIM switch to the ON position.
STEP 4
Press the MODE button one time to get to the Main Selection Screen, select Setup. Set Time and Date by pressing ENTER, using UP/DOWN to adjust selected field, LEFT/RIGHT to move to the next field and ENTER when done.
STEP 5
Press MODE button until MENU SELECTION screen is displayed. Use the UP/DOWN buttons until the MAIN SCREEN option is highlighted yellow. Press ENTER.
STEP 6
Switch camera to AIM. Aim camera using motion detection to determine target area. Walk in front of the camera at the desired distance and the camera LED will flash showing the covered area.
STEP 7
Switch camera to ON.Your camera will now automatically take pictures whenever an animal is detected in range, based on the default settings below.

DEFAULT SETTINGS
| Capture Mode | PANORAMIC |
| Photo Quality | 4.0 MP |
| Photo Delay after each photo is taken | 15 SECONDS |
| Multi Shot Count | OFF |
| Video Resolution | VGA |
| Video Length | 10 SECONDS |
| Camera Name | MOULTRIECA M |
| Temperature | FAHRENHEIT |
| Info Strip printed on photos | ON |
| Time Lapse Frequency | 30 SECONDS |
| Time Lapse Duration | 3 HOUR |
| GPS Latitude | 000.000000 N |
| GPS Longitude | 000.000000 E |
| Delete All? | NO |
| Default Setting | NO |
| Security Code | 00000 |
CAPTURE MODES
The P-150 offers five capture modes as described below. The default capture mode is Panoramic.
SINGLE MODE
Still photos are taken when an animal is detected. The number of photos taken when an animal is detected is configurable in Settings. The position in which the photo is taken (right, center, or left) depends on which sensor detects an animal. Photos are stored in the DCIM/100MFCAM folder on the SD card.
PANORAMIC MODE
Still photos are taken when an animal is detected. When any of the sensors detect an animal, the camera will take a series of three photos, one at each position (right, center, left) and combine these into one panoramic photo. Photos are stored in the DCIM/100MFCAM folder on the SD card.
TIME LAPSE MODE
The camera takes photos at a specified interval during the day and stores them in a separate TIME folder for each day of time lapse capture. The camera takes a series of Time Lapse Photos twice a day; once in the morning and once in the evening. The morning Time Lapse Photo Series begins 15 min before sunrise. The evening Time Lapse Photo series ends 15 min after sunset. See chart below as a reference. The length of each Time Lapse Photo Series is determined by the Time Lapse Duration setting in the camera menu. The camera will detect the correct sunrise and sunset times automatically and adjust itself accordingly. The Time Lapse Photo Series images are stored in the TIME folder on the SD card with a subfolder for each day.

It will take the camera 24hrs to properly adjust to the correct sunrise and sunset times. As a default the camera will start the morning Time Lapse Photo Series at 5:45am and end the evening video at 6:15pm. To reset the sunrise and sunset times back to the default times, use the Default Settings option in the menu.

NOTE: The camera can still be triggered to take a photo under certain settings while in Time Lapse mode. Please see the "Time Lapse Frequency" settings in the camera setup section.
HYBRID CAM MODE
Camera operates in Time Lapse mode during the day and Motion Detect mode during the night. Thirty minutes after dusk the camera will enter the Motion Detect mode and take night photos when the PIR sensor is triggered.
VIDEO MODE
Camera records a video when an animal is detected by the motion sensor. During daylight hours the camera will record 5, 10, 30, 60, or 90 seconds in length. During night the camera will record a video with a maximum length of 20 seconds. The video length is configurable in SETTINGS.
SETUP AND PROGRAMMING
Setup Menu
The UP/DOWN buttons are used to navigate through the available setting choices. UP/DOWN moves to the next menu item, and ENTER selects the item to be changed. Additional menu choices are available by hitting the UP/DOWN button when either the first/last option is highlighted.
Date/Time
Set Date /Time - on the SETUP DATE/TIME screen, use the UP/DOWN buttons to modify the month. Press LEFT/RIGHT buttons to move to the next field. Press the ENTER button again to save your selections. The Time and Date is retained between battery changes. Time is not automatically adjusted for daylight savings.

Capture Mode
Press the UP/DOWN buttons to highlight the desired mode. Press the ENTER button to save the mode and return to the Camera Setup Menu. There are five capture mode settings –PANORAMIC, SINGLE ZONE, TIME LAPSE, HYBRID CAM or VIDEO. Refer to the CAPTURE MODE section of this manual for details.

Photo Quality
The higher the quality of the photo/image the more memory and battery life it consumes. However, higher quality images have higher resolution which results in clearer images – especially when zooming in. There are four photo/image quality settings -0.5 MP, 2.0 MP, 4.0 MP and 8.0 MP. Press the UP/DOWN buttons to highlight the desired setting. Press the ENTER button to save the setting and return to the Camera Setup Menu. Refer to SPECIFICATIONS section of this document for details on number of images stored based on Photo Quality.

Photo Delay
The photo delay determines the number of minutes between pictures when an animal is detected and remains in range. To change the delay time, press the UP/DOWN buttons to highlight the desired setting. Press the ENTER button to save the setting and return to the Camera Setup Menu. Additional menu choices are available by hitting the UP/DOWN button when the first/last option is highlighted. Photo Delays can be set to 5, 15 and 30 seconds, 1, 5, 10, 30 and 60 minutes.

Multi-Shot
When the camera is configured for Single Mode in the Capture Mode screen, the camera can take 1,2, or 3 pictures each time and animal is detected. To change the number of pictures taken, press the UP/DOWN buttons to highlight the desired setting. Press the ENTER button to save the setting and return to the Camera Setup Menu.

Video Resolution
Video resolution can be set to VGA or HD. The higher the quality of the video, the more memory it consumes. However, higher quality videos have higher resolution.
VGA: 720 x 400 @ 24fps
HD: 1280 x 720 @ 24fps
Press the UP/DOWN buttons to highlight the desired setting. Press the ENTER button to save the setting and return to the Camera Setup Menu.

Video Length
When the camera is configured for VIDEO in the Capture Mode screen, the camera will record video for a designated amount of time each time an animal is detected. To change the amount of time recorded, press the UP/DOWN buttons to highlight the desired setting. Press the ENTER button to save the setting and return to the Camera Setup Menu. The maximum video length for a nighttime IR video is 20 seconds.

Camera Name
The Camera Name is imprinted on the photos and provides a point of reference when multiple cameras are used. To change the Camera Name, use the LEFT/RIGHT buttons to highlight the character to be modified. Press the UP/DOWN button to select the desired character (A to Z, 0 to 9, dash or space). Press LEFT/RIGHT to move to the next character. Press the ENTER button to save the new camera name and return to the Camera Setup Menu.

Temperature
The temperature is imprinted on each photo and can be in degrees Fahrenheit or Celsius. To change the temperature units, press the UP/DOWN buttons to highlight the desired setting. Press the ENTER button to save the setting and return to the Camera Setup Menu.

Info Strip
When the Info Strip is turned ON, the information strip, as described in the Advanced Setup section of this manual, is imprinted on the photos. The Temperature, Moon phase, Date, Time, Camera Name, & Moultrie logo are imprinted on the bottom of each picture. When the Info Strip is turned OFF, the photo contains no information strip. To change the Info Strip setting, press the LEFT/RIGHT buttons to highlight the desired setting. Press the ENTER button to save the setting and return to the Camera Setup Menu.

Time Lapse Frequency
Used to set the time frequency between each photo in Time Lapse mode. To change the time frequency, press the UP/DOWN buttons to high- light the desired setting. Press the ENTER button to save the setting and return to the Camera Setup Menu. Time Frequency can be set to 30 or 60 seconds, 2 minutes and 5 minutes.
NOTE: Increasing the Time Frequency will decrease the battery life of the camera.

Time Lapse Duration
Time Duration is used to limit the time periods that the camera will be active. To change the time lapse duration, press the UP/DOWN buttons to highlight the desired setting. Press the ENTER button to save the setting and return to the Camera Setup Menu. Plot duration can be set to 1, 2, 3, or 4 hours.
1 Hour – Time Lapse cam takes photos for 1 hour twice a day.
2 Hour – Time Lapse cam takes photos for 2 hours twice a day.
3 Hour – Time Lapse cam takes photos for 3 hours twice a day.
4 Hour – Time Lapse cam takes photos for 4 hours twice a day.
NOTE: Increasing the Time Duration will decrease the battery life of the camera.

Battery Life
This feature provides an estimated battery life of the camera. The battery life is expressed as "### Days". Pressing the MODE button will return to the Camera Setup menu. NOTE: The number of days shown is based on using 6 C-cell alkaline batteries with 5 day and 5 night photos per day. Actual battery life will vary depending on type of battery, weather conditions and camera usage.

ATTENTION: Use extreme caution when enabling GEOTAGGING within your camera and uploading photographs to the internet. This information could give someone the exact location of your camera.
Your use of the geotagging features of this camera is at your own risk. Neither Moultrie nor any person associated with Moultrie makes any warranty or representation with respect to security of any data linked to photographs uploaded to the Internet. In no event will Moultrie or its affiliates be liable for damages of any kind arising out of or in connection with your use of the camera, the geotagging feature or any other features associated with this camera.
GPS Latitude
This GPS function allows the user to manually enter their location from 000.000000 N or S to 179.999999 N or S for better and more stratigic game tracking. This information will imprint in the EXIF data of the photo taken. To enter the location use the UP or DOWN navigation keys to populate the field and use the RIGHT or LEFT navigation keys to select the desired field.

GPS Longitude
This GPS function allows the user to manually enter their location from 000.000000 E or W to 179.999999 E or W for better and more stratigic game tracking. This information will imprint in the EXIF data of the photo taken. To enter the location use the UP or DOWN navigation keys to populate the field and use the RIGHT or LEFT navigation keys to select the desired field.

Default Settings
To restore all the settings back to the factory default, press the LEFT/RIGHT buttons to highlight the YES setting. Press the ENTER button to restore the default settings and return to the Camera Setup Menu.

Delete All Photos
To remove all content on the SD card, press the LEFT/RIGHT buttons to highlight the YES setting. Press the ENTER button to erase photos and return to the Camera Setup Menu.

Security Code
This feature prevents unauthorized use of the camera should it become lost or stolen by requiring a 5 digit security code to be entered to unlock the camera. The security code is 5 digits, each digit being a number 0-9. The default code is "00000". Once the code is changed from the default code, the camera will prompt you to enter the correct code whenever:
The camera is turned on
The camera is woken up from sleep mode
The camera is connected to USB

ADVANCED INFORMATION
Viewing Pictures on Computer via USB
- Plug USB cable (sold separately) into the USB port on your Windows 7/Vista/XP computer.
- Plug other end of USB cable into the camera's USB port.
- To access JPG pictures and AVI movie files, navigate to "My Computer" and double click the "Moultrie CAM" drive. Picture files will be stored in theDCIM/100MFCAM directory; video files are located in the DCIM directory.
- To exit USB mode, follow Windows' instructions for properly disconnecting a removable drive and then unplug.
Information on Picture
The info strip below will appear at the bottom of the photo/video:

Moon Phase
The icons for the moon phase are as follows:

CAMERA SPECIFICATIONS
| Photo Resolutions (Single) | |
| 0.5 MP | 854 x 480 |
| 2.0 MP | 1920 x 1080 |
| 4.0 MP | 2560 x 1440 |
| 6.0 MP | 3340 x 1872 |
| 8.0 MP | 3840 x 2160 |
| Photo Resolutions (Panoramic) | |
| 0.5 MP | 2544 x 480 |
| 2.0 MP | 3360 x 630 |
| 4.0 MP | 4800 x 900 |
| 6.0 MP | 5760 x 1080 |
| 8.0 MP | 6384 x 1197 |
| Video Resolutions | |
| VGA | 848 x 480 @ 24fps |
| HD | 1280 x 720 @ 24fps |
| Approximate photos stored 4GB SD card | |
| 0.5 MP | 23,000 |
| 2.0 MP | 4,500 |
| 4.0 MP | 3,600 |
| 8.0 MP | 2,500 |
| Approximate video time stored 4GB SD card | |
| HD | 45 minutes |
| VGA | 75 minutes |
| SD Memory Card | 32 GB Max |
| Optical Field of View | 150 degrees |
| Batteries | 6 Alkaline C-cells |
| Approximate Detection Range | 40 +/-5 feet |
Important Battery lnformation
- Only use alkaline batteries. We recommend the use of Duracell or Energizer batteries.
- Do not mix old and new batteries. Always replace ALL the batteries at the same time.
- When the camera is not in use, please remove the batteries.
Moultrie Limited Warranty
This product has been thoroughly tested and inspected before shipment. It is guaranteed from defects in material and workmanship from the date of purchase for 1 year. Under this limited guarantee we agree to replace or repair free of charge any part or parts which have been found to be defective in original material or workmanship. Should you require in-warranty service, call our Customer Service Department. If your problem cannot be addressed over the telephone, we may need you to send us your defective product plus proof of purchase.
You must register your camera at www.moultriefeeders.com/warranty to activate your 1-year warranty.
FCC Statements

Note: changes and modifications not expressly approved by the party responsible could void the user's authority to operate this device.
This device complies with Part 15 of the FCC Rules. Operation is subject to the following two conditions: (1) This device may not cause harmful interference, and (2) this device must accept any interference received, including interference that may cause undesired operation.
NOTE: THE MANUFACTURER IS NOT RESPONSIBLE FOR ANY RADIO OR TV INTERFERENCE CAUSED BY UNAUTHORIZED MODIFICATIONS TO THIS EQUIPMENT. SUCH MODIFICATIONS COULD VOID THE USER'S AUTHORITY TO OPERATE THE EQUIPMENT.
NOTE: This device complies with the limits for a Class B digital device, pursuant to Part 15 of the FCC Rules. These limits are designed to provide reasonable protection against harmful interference in a residential installation. This device generates, uses, and can radiate radio frequency energy and, if not installed and used in accordance with the instructions, may cause harmful interference to radio communications. However, there is no guarantee that interference will not occur in a particular installation. If this device does cause harmful interference to radio or television reception, which can be determined by turning the equipment off and on, the user is encouraged to try to correct the interference by one or more of the following measures:
- Reorient or relocate the receiving antenna.
- lncrease the separation between the equipment and receiver.
- Connect the equipment into an outlet on a circuit different from that to which the receiver is connected.
- Consult the dealer or an experienced radio/TV technician for help.
Our Service Department will gladly answer any questions you have. Call 800-653-3334, Monday - Friday, 8:00 AM to 5:00 PM CST.

Documents / Resources
References
Download manual
Here you can download full pdf version of manual, it may contain additional safety instructions, warranty information, FCC rules, etc.
Advertisement


Need help?
Do you have a question about the P-150 and is the answer not in the manual?
Questions and answers