
Related Manuals for Synthesis Technology MOTM-110 Ring Mod & VCA


Summary of Contents for Synthesis Technology MOTM-110 Ring Mod & VCA
- Page 1 MOTM-110 Ring Mod & VCA Assembly Instructions Synthesis Technology 6625 Quail Ridge Dr. Fort Worth, TX 76180 (888) 818-MOTM www.synthtech.com June 3, 1999...
- Page 2 2ea SPDT toggle switch SW1, SW2 3ea 100K cermet trim pot TP1 - 3 1ea 18pin DIP socket for U1 1ea MTA-156 power connector Knobs, 5ea, ALCO PKES90B1/4 Jacks, 6ea Switchcraft 112A SYNTHESIS TECHNOLOGY PAGE 2 MOTM-110 ASSEMBLY WWW.SYNTHTECH.COM...
- Page 3 6ea #6 KEPS nuts (2 for attaching bracket to front panel, 4 for pc board) 3ea small heatshrink tubing 5ea small tie-wraps Organic Solder No-clean Solder PC Board, MOTM-110 Power cable SYNTHESIS TECHNOLOGY PAGE 3 MOTM-110 ASSEMBLY WWW.SYNTHTECH.COM...
-
Page 4: General Information
The flux leaves a residue on the pc board that should be cleaned with warm water. DO NOT USE SOAP OR OTHER CLEANSERS. Most of the parts in the kits are ‘waterproof’, and can be washed in the sink. The flux is OSHA approved for flushing down the drain, so SYNTHESIS TECHNOLOGY PAGE 4 MOTM-110 ASSEMBLY... - Page 5 Locate the 150K 1% (they look different than the others) and solder into R2 & R7. Locate the 1K resistors and solder into R3, R12, R21, R23 & R24. Locate the 100K resistors and solder into R8, R9, R11, R13, R14, & R16. SYNTHESIS TECHNOLOGY PAGE 5 MOTM-110 ASSEMBLY WWW.SYNTHTECH.COM...
- Page 6 Locate the 0.001mfd yellow box cap. It is stamped 102 on the top. Solder into C18. Locate the 0.01mfd yellow box caps. They are stamped 103 . Solder into C9, C10, C11. SYNTHESIS TECHNOLOGY PAGE 6 MOTM-110 ASSEMBLY WWW.SYNTHTECH.COM...
- Page 7 Locate the 0.47mfd yellow box caps. They are stamped 474. Solder into C6, C7, C8. SYNTHESIS TECHNOLOGY PAGE 7 MOTM-110 ASSEMBLY WWW.SYNTHTECH.COM...
- Page 8 Inspect the solder joints. Any solder shorts? Too much solder? Missing joints? Wash the board under warm water. Scrub gently. Dry. THIS IS A GOOD STOPPING PLACE TO REST OR PUT THE KIT AWAY UNTIL LATER. SYNTHESIS TECHNOLOGY PAGE 8 MOTM-110 ASSEMBLY WWW.SYNTHTECH.COM...
- Page 9 Note that the tie wraps must thread from the top, or there may not be sufficient room between the pc board and the mounting bracket. The excess tie wrap is cut off. SYNTHESIS TECHNOLOGY PAGE 9 MOTM-110 ASSEMBLY...
- Page 10 DO NOT OVERTIGHTEN! You are now ready to attach the pc board to the bracket, and then wire up to the panel. See the illustration at the end of the document. SYNTHESIS TECHNOLOGY PAGE 10 MOTM-110 ASSEMBLY...
- Page 11 Be sure you are holding the bracket all the way down on the studs. Now use 2 of the #6 KEPS nuts to tighten the bracket to the panel. SYNTHESIS TECHNOLOGY PAGE 11 MOTM-110 ASSEMBLY...
- Page 12 For each pot, place the flat washer on the threads, then the hex nut. Tighten. SYNTHESIS TECHNOLOGY PAGE 12 MOTM-110 ASSEMBLY WWW.SYNTHTECH.COM...
- Page 13 Shrink the tubing with a heat gun. If you do not have a heat gun, then one at a time slide the tubing up, and without actually touching the tubing, SYNTHESIS TECHNOLOGY PAGE 13 MOTM-110 ASSEMBLY...
- Page 14 Using a small, flat screwdriver turn the white screw part of each trimmer until it is half-way. This is when the slot is vertical. You will not adjust the CV REJECT trim, as this requires a DVM or scope. SYNTHESIS TECHNOLOGY PAGE 14 MOTM-110 ASSEMBLY WWW.SYNTHTECH.COM...
- Page 15 Set the X IN and Y IN switches to DC. Turn UNBALance, X IN and Y IN to 0. Using a jumper wire, alligator clip, or equivalent, attach the X IN signal lug to the +15V power supply. SYNTHESIS TECHNOLOGY PAGE 15 MOTM-110 ASSEMBLY WWW.SYNTHTECH.COM...
- Page 16 Turn the X IN pot to 2. With a DVM or scope, look at right side of R8 (square pad) and Ground. Adjust the X IN pot until you read 5.0 volts (or close enough). SYNTHESIS TECHNOLOGY PAGE 16 MOTM-110 ASSEMBLY...
- Page 17 The output of the 3330 is a current, so a high speed, low noise op amp U2A is used to convert the current to a voltage, using R27. You can set the output voltage to cover different ranges by adjusting the value of R27. SYNTHESIS TECHNOLOGY PAGE 17 MOTM-110 ASSEMBLY...
- Page 18 Since the musical scale is exponential, the output of a ring mod sounds very ‘metallic’ or ‘clangy’ since the sum and difference frequencies are not harmonically related. But of course, this is EXACTLY the effect we are looking for! SYNTHESIS TECHNOLOGY PAGE 18 MOTM-110 ASSEMBLY...
-
Page 19: Normal Operation
The thing that you must be aware of is something called carrier suppression. Ideally, the ring mod ONLY produces the sum and difference frequencies, and NONE of the original frequencies. However, this is never the case. Circuit design limitations are SYNTHESIS TECHNOLOGY PAGE 19 MOTM-110 ASSEMBLY... -
Page 20: Troubleshooting
There is nothing on all 6 jacks on the top (switched) lug. The board has all the right parts in all the right places. No solder shorts or missing joints. SYNTHESIS TECHNOLOGY PAGE 20 MOTM-110 ASSEMBLY WWW.SYNTHTECH.COM... - Page 21 If you still can not get the module to perform correctly, please contact us by phone/fax at (817) 498-3782 or by email to synth1@airmail.net Thank you for purchasing the MOTM-110 kit. SYNTHESIS TECHNOLOGY PAGE 21 MOTM-110 ASSEMBLY WWW.SYNTHTECH.COM...
- Page 22 50K min Output Impedance 1K typical GENERAL Power Supply -15VDC @ 20 ma +15VDC @ 20 ma Size 2U x 5U 3.47” x 8.72” 88.1mm x 221.5mm Depth behind panel 4.375 “ 111.1mm SYNTHESIS TECHNOLOGY PAGE 22 MOTM-110 ASSEMBLY WWW.SYNTHTECH.COM...
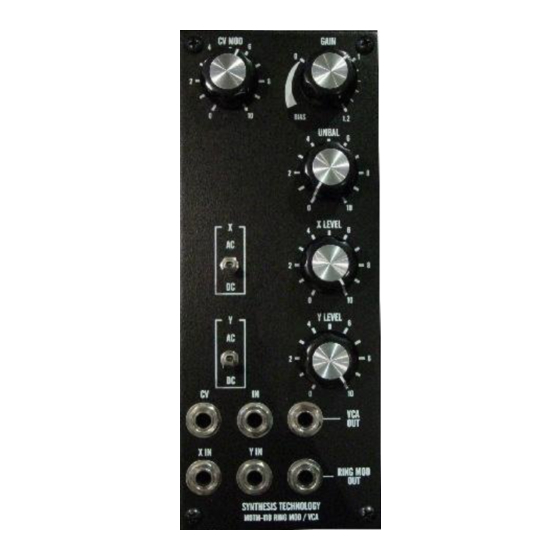
- Page 23 Y LEVEL Attenuates the signal fed into the Y IN jack. X AC/DC Couples the X IN signal either AC or DC. Y AC/DC Couples the Y IN signal either AC or DC. SYNTHESIS TECHNOLOGY PAGE 23 MOTM-110 ASSEMBLY WWW.SYNTHTECH.COM...
Need help?
Do you have a question about the MOTM-110 Ring Mod & VCA and is the answer not in the manual?
Questions and answers