
Subscribe to Our Youtube Channel
Related Manuals for imilab EC3 Pro


Summary of Contents for imilab EC3 Pro
- Page 1 IMILAB EC3 Pro Outdoor Security Camera User Manual Read this manual carefully before use, and retain it for future reference.
- Page 2 CONTENTS English 01-15 Deutsche 16-30 Español 31-45 Italiano 46-60 Français 61-75 Pусский 76-90...
-
Page 3: Product Introduction
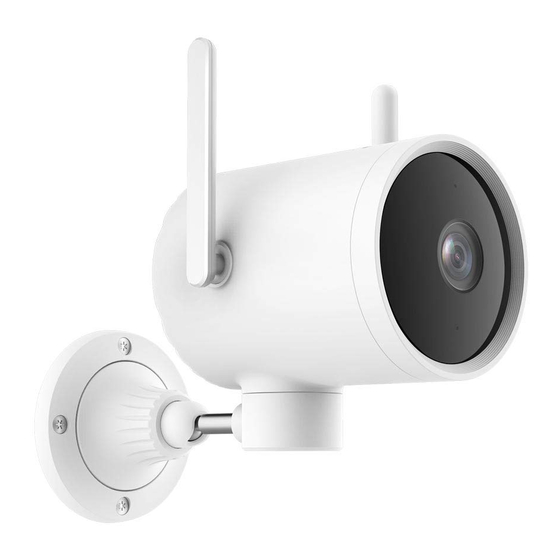
Product Introduction Reset button Wall base (can be rotated to adjust the camera angle) Micro SD card slot Knob Speaker In this instruction manual, images of the device, accessories and user interface are for illustrative purposes only and should only be used for reference. The actual device may differ from the illustrations due to product updates and upgrades. - Page 4 Antenna Indicator light Power supply Packing list: IMILAB EC3 Pro Outdoor Security Camera, wall mounting pack, power adapter, user manual EN-02...
-
Page 5: Installing The Device
Installing the Device Then secure the camera to the metal rod with a screw. Note: The warranty does not cover any damage caused by improper installation. Please follow the instructions. Mounting the device Note: Please check that the Wi-Fi signal is strong enough before mounting the device. 1. - Page 6 2. Insert four plastic expansion nuts into the holes. 3. Cover part of power cable with the base plate as indicated. 4. Put the base plate on the wall. Ensure that the power cable goes straight down. Secure the base plate by inserting the screws into the expansion nuts.
- Page 7 Note: In order to prevent accidents and injuries, please secure the device firmly onto the wall as illustrated. The wall on which the device is mounted must have a loading capacity of at least 3 times the weight of the device. Do not install the device near a heat source, such as an air-conditioner compressor, air vent of a range hood or air vent of a gas water heater.
-
Page 8: Connecting The Device
Connecting the Device Turn on the camera Step 1: Insert the power supply cable into the camera's power supply port. Connect the other end of the power supply cable to a power source. Step 2: When connected to a power supply, the indicator light will show the camera's status. -
Page 9: Specifications
Restoring factory settings Press and hold the reset button to restore the factory settings. The content inside the micro SD card will not be deleted. Specifications Name: IMILAB EC3 Pro Outdoor Security Camera Item Dimensions: 158*91*117mm Model: CMSXJ42A Net Weight:435g Input: 12V Viewing Angle: 110°... - Page 10 Connecting to Mi Home App This product works with Mi Home and can be controlled using the Mi Home app. Scan the QR code to download and install the Mi Home app. If you already have Mi Home app installed, you will be directed to the device connection page. You can also search for "Mi Home"...
-
Page 11: Infrared Night Vision
Infrared Night Vision The light sensor can automatically switch the device to night vision mode through IR-CUT based on changes in the lighting of the environment.The device features 2 built-in infrared night vision lights that ensure recording stays clear even in darkness. 2021 3 20:51:05 Infrared night vision effect illustration... -
Page 12: Video Playback
Video Playback Past videos can only be viewed when a compatible micro SD card is inserted in IMILAB EC3 Pro Outdoor Security Camera. After inserting a micro SD card and turning on the device, the camera will automatically start recording. -
Page 13: Sharing A Video
Sharing a Video In the control interface for IMILAB EC3 Pro Outdoor Security Camera in the Mi Home app, you can set the device as a shared device in the settings menu and invite others to watch the recordings. Users must download the Mi Home app and login to their Xiaomi account in order to view the recordings of the shared device. -
Page 14: Home Security
Home Security The Home Security function can be turned on/off in the control interface for IMILAB EC3 Pro Outdoor Security Camera in the Mi Home app. The device can detect and record movements within the viewing angle and push the recording to the client. Users can set the surveillance time, alert sensitivity, alert interval, etc. - Page 15 Precautions The working temperature of the device is -20℃ to 40℃. Do not use the device when the temperature is too high or too low. For better results, avoid placing the camera in front of or next or a glass surface, a white-colored wall or other reflective surfaces as this may cause the recording to have un-even lighting between the foreground and background or be over-exposed.
- Page 16 equipment generates, uses, and canradiate radio frequency energy, and if not installed and used in accordance with the instructions, may cause harmful interference to radio communications. However, there is no guarantee that interference will not occur in a particular installation. If this equipment does cause harmful interference to radio or television reception, which can be determined by turning the equipment off...
- Page 17 For pluggable equipment, the socket-outlet (power adaptor) shall be installed near the equipment and shall be easily accessible. Hereby, Shanghai Imilab Technology Co., Ltd. declares that the radio equipment type IMILAB EC3 Pro Outdoor Security Camera is in compliance with Directive 2014/53/EU. EN-15...
- Page 18 Einführung zum Produkt Rücksetzungstaste Wandsockel (kann gedreht werden, um den Kamerawinkel anzupassen) Micro-SD-Kartenschlitz Knauf Lautsprecher In dieser Gebrauchsanweisung dienen Abbildungen des Geräts, Zubehörteile und Benutzeroberfläche allein illustrativen Zwecken und sollten nur als Referenz verwendet werden. Das tatsächliche Gerät kann von den Abbildungen aufgrund von Produkt-Updates und Upgrades abweichen.
- Page 19 Antenne Anzeigelicht Stromversorgung Verpackungsliste: IMILAB EC3 Pro Outdoor-Überwachungskamera, Wandmontage-Paket, Stromadapter, Benutzerhandbuch DE-17...
-
Page 20: Installation Des Geräts
Installation des Geräts Sichern Sie die Kamera mit einer Schraube an der Metallstange. Hinweis: Die Garantie deckt keinen Schaden, der durch eine fehlerhafte Installation hervorgerufen wird. Bitte befolgen Sie die Anweisungen. Befestigung des Geräts Hinweis: Bitte überprüfen Sie, dass das WiFi-Signal stark genug ist, bevor Sie das Gerät befestigen. - Page 21 2. Führen Sie vier Kunststoffspreizmuttern in die Löcher ein. 3. Decken Sie den Teil des Stromkabels wie angegeben mit der Basisplatte ab. 4. Bringen Sie die Basisplatte an der Wand an. Stellen Sie sicher, dass das Stromkabel geradeaus nach unten verläuft. Sichern Sie die Basisplatte, indem Sie die Schrauben in die Spreizmuttern einführen.
- Page 22 Hinweis: Um Unfälle und Verletzungen zu vermeiden, befestigen Sie das Gerät wie angegeben fest an der Wand. Die Wand, an der das Gerät befestigt wird, muss über eine Tragekapazität von mindestens dem 3-fachen des Gewichtes des Geräts verfügen. Befestigen Sie das Gerät nicht in der Nähe einer Hitzequelle, wie z. B. einem Klimaanlagenkompressor, einer Entlüftung einer Dunstabzugshaube oder einer Entl üftung eines Gas-Wasserheizers.
- Page 23 Anschluss des Geräts Einschalten der Kamera Schritt 1: Stecken Sie das Stromversorgungskabel in die Stromversorgungsbuchse der Kamera. Verbinden Sie das andere Ende des Stromversorgungskabels mit einer Stromquelle. Schritt 2: Wenn an eine Stromquelle angeschlossen zeigt das Anzeigelicht den Status der Kamera an. Wenn das Anzeigelicht gelb ist, wird die Kamera eingeschaltet; wenn das Anzeigelicht gelb blinkt, wartet das Gerät auf den Verbindungsaufbau.
-
Page 24: Spezifikationen
Wiederherstellung der Werkseinstellungen Drücken und halten Sie die Rückstelltaste, um die Werskeinstellungen wiederherzustellen. Der Inhalt im Innern der Micro SD-Karte wird nicht gelöscht. Spezifikationen Name: IMILAB EC3 Pro Outdoor-Ü Objektausmaße: 158*91*117mm berwachungskamera Nettogewicht:435g Modell: CMSXJ42A Blickwinkel: 110° Energiezufuhr: 12V Blende: F2.1 Auflösung: 2304×1296... - Page 25 Verbindung mit der Mi Home-App Dieses Produkt funktioniert mit Mi Home und kann durch Verwendung der Mi Home-App gesteuert werden. Scannen Sie den QR-Code, um die Mi Home-App herunterzuladen und zu installieren. Wenn Sie die Mi Home-App bereits installiert haben, werden Sie auf die Seite Gerät-Verbindung weitergeleitet.
- Page 26 Infrarot-Nachtsicht Der Lichtsensor kann, basierend auf Veränderungen an den Lichtverhältnissen der Umgebung, durch IR CUT das Gerät auf Nachtsicht-Modus umstellen. Das Geraet verfügt über 2 eingebaute Infrarot-Nachtsicht-Leuchten, die sicherstellen, dass sie Aufnahme sogar bei Dunkelheit deutlich bleibt. 2021 3 20:51:05 Darstellung der Wirkung der Infrarot-Nachtsicht DE-24...
- Page 27 Video-Playback Frühere Videos können nur angesehen werden, wenn eine kompatible Micro SD-Karte in die IMILAB EC3 Pro Outdoor-Überwachungskamera eingeführt wird. Nach dem Einführen einer Micro SD-Karte und dem Einschalten des Geräts, wird die Kamera automatisch mit der Aufnahme beginnen. Tippen Sie auf der Steueroberfläche der Mi Home-App auf die Playback-Taste, um auf die Video-Playback-Seite zu gelangen.
- Page 28 Teilen eines Videos Auf der Steueroberfläche für die IMILAB EC3 Pro Outdoor-Überwachungskamera in der Mi Home-App können Sie das Gerät im Einstellungsmenü als ein geteiltes Gerät einstellen und andere einladen, die Aufnahmen anzusehen. Benutzer müssen die Mi Home-App herunterladen und sich auf ihr Xiaomi-Konto anmelden, um die Aufzeichnungen des geteilten Geräts anzusehen.
- Page 29 Haussicherheit Die Haussicherheit-Funktion kann auf der Steueroberfläche für die IMILAB EC3 Pro Outdoor-Überwachungskamera auf der Mi Home-App ein-/ausgeschaltet werden. Das Gerät kann Bewegungen innerhalb eines Blickwinkels Bewegungen erkennen und aufzeichnen und die Aufzeichnung an den Kunden weiterleiten. Benutzer können die Überwachungszeit, die Alarmempfindlichkeit, das Alarmintervall usw. einstellen.
- Page 30 Vorsichtsmaßnahmen Die Arbeitstemperatur des Geräts beträgt -20 ℃ bis 40 ℃. Verwenden Sie das Gerät nicht, wenn die Temperatur zu hoch oder zu niedrig ist. Vermeiden Sie für bessere Ergebnisse eine Platzierung der Kamera vor oder in der Nähe von oder auf einer Glasoberfläche, einer weißgefärbten Wand oder anderen spiegelnden Oberflächen, da dies dazu führen könnte, dass die Aufzeichnung zwischen Vorder- und Hintergrund unregelmäßig oder übermäßig beleuchtet ist.
- Page 31 Interferenzen, die einen unerwünschten Betrieb verursachen können. Hinweis: Dieses Gerät wurde getestet und erfüllt die Grenzwerte für ein digitales Gerät der Klasse B gemäß Teil 15 der FCC-Bestimmungen. Diese Grenzwerte bieten einen angemessenen Schutz vor schädlichen Interferenzen in einer Wohninstallation. Dieses Gerät erzeugt, verwendet und strahlt Radiofrequenzenergie aus.
- Page 32 Erklärungen zum Adapter Bei Geräten mit Stecker muss die Steckdose (Netzadapter) in der Nähe des Geräts angebracht und leicht zugänglich sein. Hiermit erklärt Shanghai Imilab Technology Co., Ltd., dass die Funkgeräte vom Typ IMILAB EC3 Pro Outdoor-Überwachungskamera der Richtlinie 2014/53/EU entsprechen. DE-30...
-
Page 33: Introducción Al Producto
Introducción al producto Botón de reinicio Base de pared (se puede rotar para ajustar el ángulo de Ranura de la la cámara) tarjeta Micro SD Mando regulador Altavoz En este manual de instrucciones, las imágenes del dispositivo, los accesorios y la interfaz de usuario tienen fines ilustrativos y solo deben usarse como referencia. - Page 34 Antena Micrófono Luz indicadora Fuente de alimentación Contenido de la caja: Cámara de seguridad para exterior IMILAB EC3 Pro, paquete de montaje en pared, adaptador de corriente, manual del usuario ES-32...
-
Page 35: Instalación Del Dispositivo
Instalación del dispositivo Fije la cámara a la varilla metálica con un tornillo. Nota: La garantía no cubre ningún daño causado por una instalación incorrecta. Siga las instrucciones. Montaje del dispositivo Nota: Antes de montar el dispositivo, compruebe que la señal de Wi-Fi es lo suficientemente fuerte. - Page 36 2. Inserte cuatro tacos de expansión de plástico en los orificios. 3. Cubra parte del cable de alimentación con la placa base como se indica. 4. Coloque la placa base en la pared. Asegúrese de que el cable de alimentación cae hacía abajo.
- Page 37 Nota: Para evitar accidentes y lesiones, fije el dispositivo firmemente a la pared como se muestra en la ilustración. La pared en la que se monte el dispositivo debe tener una capacidad de carga de al menos 3 veces el peso del dispositivo. No instale el dispositivo cerca de una fuente de calor, como un compresor de aire acondicionado, la salida de aire de una campana extractora o la salida de aire de un calentador de agua a gas.
-
Page 38: Conexión Del Dispositivo
Conexión del dispositivo Encienda la cámara Paso 1: Inserte el cable de alimentación en el puerto de alimentación de la cámara. Conecte el otro extremo del cable de alimentación a una fuente de alimentación. Paso 2: Cuando se conecta a una fuente de alimentación, la luz indicadora muestra el estado de la cámara. -
Page 39: Especificaciones
Temperatura de funcionamiento: -20℃~ 40℃ Conectividad inalámbrica: Wi-Fi IEEE 802.11 b/g/n 2.4GHz FCC ID: 2APA9-CMSXJ42A Fabricante: Shanghai Imilab Technology Co., Ltd. Dirección: Sala 001A, Planta 11, Bloque 1, N.º 588 Zixing Road, Distrito Minhang, Shanghai, China Para obtener información adicional, visite www.imilab.com. - Page 40 Conexión a la aplicación Mi Home Este producto funciona con Mi Home y se puede controlar utilizando la aplicación Mi Home. Escanee el código QR para descargar e instalar la aplicación Mi Home. En el caso de que ya tenga instalada la aplicación Mi Home, se le dirigirá a la página de conexión del dispositivo.
- Page 41 Visión nocturna por infrarrojos El sensor lumínico puede cambiar de manera automática el dispositivo al modo de visión nocturna a través de IR-CUT, en función de los cambios en la iluminación del entorno. El dispositivo cuenta con 2 luces de visión nocturna por infrarrojos incorporadas que garantizan que la grabación se mantenga clara incluso en la oscuridad.
-
Page 42: Reproducción De Vídeo
Los vídeo antiguos se pueden ver cuando se inserta una tarjeta micro SD en la Cámara de seguridad para exterior IMILAB EC3 Pro. Después de insertar una tarjeta micro SD y de encender el dispositivo, la cámara comenzará a grabar automáticamente. - Page 43 Compartir un vídeo En la interfaz de control de la cámara de seguridad para exterior IMILAB EC3 Pro de la aplicación Mi Home, puede configurar el dispositivo como dispositivo compartido en el menú de configuración e invitar a otros para que vean las grabaciones. Los usuarios deben descargar la aplicación Mi Home e iniciar sesión en una cuenta Xiaomi para ver...
- Page 44 Seguridad para el hogar La función de seguridad para el hogar se puede encender/ apagar en la interfaz de control para la Cámara de seguridad para exterior IMILAB EC3 Pro de la aplicación Mi Home. El dispositivo puede detectar y grabar movimientos dentro del ángulo de visión y enviar esta grabación al cliente.
- Page 45 Precauciones La temperatura de funcionamiento del dispositivo es desde -20℃ hasta 40℃. No utilice en dispositivo cuando la temperatura sea demasiado alta o baja. Para obtener mejores resultados, evite colocar la cámara cerca o frente a una superficie de vidrio, una pared de color blanco u otras superficies reflectantes, ya que esto puede hacer que la grabación tenga una iluminación desigual entre el primer plano y el fondo o que quede sobreexpuesta.
- Page 46 Nota: este equipo ha sido probado y cumple con los límites para el dispositivo digital de Clase B, de conformidad con la Parte 15 de las Normas de la FCC. Estos límites están diseñados para proporcionar una protección razonable contra interferencias perjudiciales para una instalación residencial.
- Page 47 Por la presente, Shanghai Imilab Technology Co. Ltd. declara que el tipo de equipo de radio de la Cámara de seguridad para exterior IMILAB EC3 Pro cumple con la Directiva 2014/53/EU.
-
Page 48: Introduzione Al Prodotto
Introduzione al prodotto Tasto Reset Supporto a muro (può essere ruotato per regolare l'angolazione Slot per scheda della telecamera) Micro SD Pomello Altoparlante In questo manuale di istruzioni, le immagini del dispositivo, degli accessori e dell'interfaccia utente sono solo a scopo illustrativo e devono essere utilizzate solo come riferimento. - Page 49 Antenna Microfono Spia luminosa Alimentazione elettrica Lista imballaggio: Telecamera di Sicurezza per Esterni IMILAB EC3 Pro, pacchetto di montaggio a parete, adattatore di alimentazione, manuale utente IT-47...
-
Page 50: Installazione Del Dispositivo
Installazione del dispositivo Quindi fissare la telecamera all'asta di metallo con una vite. Nota: La garanzia non copre eventuali danni causati da un'installazione non corretta. Si prega di seguire le istruzioni. Montaggio del dispositivo Nota: Si prega di verificare che il segnale Wi-Fi sia sufficientemente forte prima di montare il dispositivo. - Page 51 2. Inserire quattro dadi ad espansione in plastica nei fori. 3. Coprire parte del cavo di alimentazione con la piastra di base come indicato. 4. Metti la piastra del supporto sul muro. Assicurarsi che il cavo di alimentazione vada dritto verso il basso. Fissare la piastra del supporto inserendo le viti nei dadi ad espansione.
- Page 52 Nota: Per prevenire incidenti e lesioni, fissare saldamente il dispositivo alla parete come illustrato. La parete su cui è montato il dispositivo deve avere una capacità di carico di almeno 3 volte il peso del dispositivo. Non installare il dispositivo vicino a una fonte di calore, come il compressore di un condizionatore d'aria, la presa d'aria di una cappa o la presa d'aria di uno scaldabagno a gas.
-
Page 53: Collegamento Del Dispositivo
Collegamento del dispositivo Accendi la telecamera Passo 1: Inserire il cavo di alimentazione nella porta di alimentazione della telecamera. Collegare l'altra estremità del cavo di alimentazione a una fonte di alimentazione. Passo 2: Quando è collegato a un alimentatore, l'indicatore luminoso mostrerà lo stato della telecamera. - Page 54 Temperatura operativa: -20℃~ 40℃ Connettività wireless: Wi-Fi IEEE 802.11 b/g/n 2.4GHz ID FCC: 2APA9-CMSXJ42A Prodotto da: Shanghai Imilab Technology Co., Ltd. Indirizzo: Room 001A, Floor 11, Block 1, No. 588 Zixing Road, Minhang District, Shanghai, China Per maggiori informazioni, visitare il sito www.imilab.com.
- Page 55 Connessione all'app Mi Home Questo prodotto funziona con Mi Home e può essere controllato tramite l'app Mi Home. Scansiona il codice QR per scaricare e installare l'app Mi Home. Se hai già installato l'app Mi Home, verrai indirizzato alla pagina di connessione del dispositivo. Puoi anche cercare "Mi Home"...
- Page 56 Visione notturna a infrarossi Il sensore di luce può commutare automaticamente il dispositivo in modalità di visione notturna tramite IR-CUT in base ai cambiamenti nell'illuminazione dell'ambiente. Il dispositivo è dotato di 2 luci per la visione notturna a infrarossi integrate che assicurano che la registrazione rimanga chiara anche al buio.
-
Page 57: Riproduzione Video
Riproduzione video I video precedenti possono essere visualizzati solo quando una scheda micro SD compatibile è inserita nella Telecamera di Sicurezza Esterna IMILAB EC3 Pro. Dopo aver inserito una scheda micro SD e acceso il dispositivo, la videocamera inizierà automaticamente la registrazione. - Page 58 Condivisione di un video Nell'interfaccia di controllo della Telecamera di Sicurezza Esterna IMILAB EC3 Pro, nell'app Mi Home puoi impostare il dispositivo come dispositivo condiviso nel menu delle impostazioni e invitare altri a guardare le registrazioni. Gli utenti devono scaricare l'app Mi Home e accedere al proprio account Xiaomi per visualizzare le registrazioni del dispositivo condiviso.
- Page 59 Sicurezza domestica La funzione Home Security può essere attivata/disattivata nell'interfaccia di controllo della Telecamera di Sicurezza Esterna IMILAB EC3 Pro nell'app Mi Home. Il dispositivo può rilevare e registrare i movimenti all'interno dell'angolo di visualizzazione e inviare la registrazione al cliente. Gli utenti possono impostare il tempo di sorveglianza, la sensibilità...
-
Page 60: Dichiarazione Fcc
Precauzioni La temperatura di lavoro del dispositivo è da -20℃ a 40 ℃ Non utilizzare il dispositivo quando la temperatura è troppo alta o troppo bassa. Per ottenere risultati migliori, evitare di posizionare la telecamera davanti o accanto a una superficie di vetro, una parete bianca o altre superfici riflettenti poiché ciò potrebbe causare un'illuminazione non uniforme della registrazione tra il primo piano e lo sfondo o essere sovraesposta . - Page 61 Nota: Questa apparecchiatura è stata testata ed è risultata conforme ai limiti per un dispositivo digitale di Classe B, ai sensi della Parte 15 delle Norme FCC. Questi limiti sono progettati per fornire una protezione ragionevole contro le interferenze dannose in un'installazione residenziale.
- Page 62 Per le apparecchiature collegabili, la presa (adattatore di alimentazione) deve essere collegata vicino all'apparecchiatura e deve essere facilmente accessibile. Con la presente, Shanghai Imilab Technology Co., Ltd. dichiara che il tipo di apparecchiatura radio Telecamera di Sicurezza Esterna IMILAB EC3 Pro è conforme alla Direttiva 2014/53/UE.
-
Page 63: Présentation Du Produit
Présentation du produit Bouton de réinitialisation Base murale (peut être tournée pour ajuster l’angle de la caméra) Fente pour carte microSD Bouton Haut-parleur Dans ce manuel d’instructions, les images de l’appareil, des accessoires et de l’interface utilisateur ne sont données qu’à titre d’illustration et ne doivent être utilisées qu’à... - Page 64 Antenne Microphone Voyant Alimentation électrique Liste d’emballage : Caméra de sécurité extérieure IMILAB EC3 Pro, kit de fixation murale, adaptateur secteur, manuel d’utilisation. FR-62...
-
Page 65: Installation De L'appareil
Installation de l’appareil Fixez ensuite la caméra à la tige métallique avec une vis. Note : La garantie ne couvre pas les dommages causés par une installation incorrecte. Veuillez suivre les instructions. Montage de l’appareil Note : Veuillez vérifier que le signal Wi-Fi est suffisamment puissant avant de monter l’appareil. - Page 66 2. Insérez quatre écrous de dilatation en plastique dans les trous. 3. Recouvrez une partie du câble d’alimentation avec la plaque de base comme indiqué. 4. Posez la plaque de base sur le mur. Assurez-vous que le câble d’alimentation descend tout droit. Fixez la plaque de base en insérant les vis dans les écrous d'expansion.
- Page 67 Note : Afin d’éviter les accidents et les blessures, veuillez fixer fermement l’appareil au mur comme illustré. Le mur sur lequel l’appareil est monté doit avoir une capacité de charge d’au moins 3 fois le poids de l’appareil. N’installez pas l’appareil à proximité d’une source de chaleur, comme le compresseur d’un climatiseur, la bouche d’aération d’une hotte de cuisine ou la bouche d’aération d’un chauffe-eau à...
-
Page 68: Connexion De L'appareil
Connexion de l’appareil Allumez la caméra Étape 1 : Insérez le câble d’alimentation dans le port d’alimentation de la caméra. Connectez l’autre extrémité du câble d’alimentation à une source d’alimentation. Étape 2 : Lorsqu’il est connecté à une source d’alimentation, le témoin lumineux indique l’état de l’appareil. Lorsque le témoin lumineux est jaune, l’appareil est en cours de mise sous tension ;... -
Page 69: Caractéristiques
Résolution : 2304×1296 Température de fonctionnement : -20℃~ 40℃ Connectivité sans fil : Wi-Fi IEEE 802,11 b/g/n 2,4 GHz FCC ID: 2APA9-CMSXJ42A Fabricant : Shanghai Imilab Technology Co., Ltd. Adresse : Salle 001A, étage 11, bloc 1, rue 588 Zixing, district de Minhang, Shanghai, Chine. Pour plus d’informations, rendez-vous sur : www.imilab.com. - Page 70 Connexion à l’application Mi Home Ce produit fonctionne avec Mi Home et peut être contrôlé à l’aide de l’application Mi Home. Scannez le code QR pour télécharger et installer l’application Mi Home. Si l ’application Mi Home est déjà installée, vous serez dirigé vers la page de connexion de l’appareil.
-
Page 71: Vision Nocturne Infrarouge
Vision nocturne infrarouge Le capteur de lumière peut automatiquement passer l’appareil en mode de vision nocturne grâce à l’IR-CUT en fonction des changements d’éclairage de l’environnement. L’appareil dispose de 2 lumières de vision nocturne infrarouge intégrées qui garantissent que l’enregistrement reste clair même dans l’obscurité. 2021 3 20:51:05 Illustration de l’effet de vision nocturne infrarouge... -
Page 72: Lecture Des Vidéos
Lecture des vidéos Les vidéos passées ne peuvent être visionnées que si une carte micro-SD compatible est insérée dans la caméra de sécurité extérieure IMILAB EC3 Pro. Après avoir inséré une carte micro SD et allumé l’appareil, la caméra commence automatiquement à... - Page 73 Partager une vidéo Dans l’interface de contrôle de la caméra de sécurité extérieure IMILAB EC3 Pro dans l’application Mi Home, vous pouvez définir l’appareil comme un appareil partagé dans le menu des paramètres et inviter d’autres personnes à regarder les enregistrements.
- Page 74 Sécurité domestique La fonction de sécurité domestique peut être activée ou désactivée dans l’interface de contrôle de la caméra de sécurité extérieure IMILAB EC3 Pro dans l’application Mi Home. L’appareil peut détecter et enregistrer les mouvements dans l’angle de vue et pousser l’enregistrement vers le client.
- Page 75 Mises en garde La température de fonctionnement de l’appareil est de -20℃ à 40℃. N’utilisez pas l’appareil lorsque la température est trop élevée ou trop basse. Pour de meilleurs résultats, évitez de placer l’appareil devant ou à côté d’une surface en verre, d’un mur de couleur blanche ou d’autres surfaces réfléchissantes, car l’enregistrement pourrait présenter un éclairage inégal entre le premier plan et l’arrière-plan ou être surexposé.
- Page 76 Note : Cet équipement a été testé et déclaré conforme aux limites d’un appareil numérique de classe B, conformément à la partie 15 des règles de la FCC. Ces limites sont conçues pour fournir une protection raisonnable contre les interférences nuisibles dans une installation résidentielle. Cet équipement génère, utilise et peut émettre de l’énergie de fréquence radio, et s’il n’est pas installé...
- Page 77 Pour les équipements enfichables, la prise de courant (adaptateur) doit être installée à proximité de l’équipement et doit être facilement accessible. Par la présente, Shanghai Imilab Technology Co., Ltd. déclare que l’équipement radio de type Caméra de sécurité extérieure IMILAB EC3 Pro est conforme à la directive 2014/53/EU. FR-75...
- Page 78 Общие сведения об устройстве Кнопка сброса Настенное основание (можно поворачивать для регулировки Слот для карты угла камеры) памяти Micro SD Захват Динамик В данном руководстве по эксплуатации изображения устройства, аксессуаров и пользовательского интерфейса приведены только в качестве иллюстрации и должны использоваться только для справки. Фактическое...
- Page 79 Антенна Микрофон Индикатор Питание Упаковочный лист: Камера наружного видеонаблюдения IMILAB EC3 Pro, комплект настенного монтажа, адаптер питания, руководство пользователя RU-77...
- Page 80 Монтаж устройства Закрепите камеру на металлическом стержене с помощью винта. Примечание: Гарантия не распространяется на повреждения в результате неправильного монтажа. Выполняйте инструкции. Монтаж устройства Примечание: Перед монтажом устройства убедитесь, что сигнал Wi-Fi достаточно сильный. 1. Прикрепите позиционную наклейку на требуемом месте монтажа. Просверлите четыре...
- Page 81 2. Вставьте четыре пластмассовые расширительные втулки в отверстия. 3. Накройте часть кабеля питания основанием как показано на рисунке. 4. Установите основание на стену. Убедитесь, что кабель питания проходит прямо вниз. Закрепите основание, вставив винты в расширительные втулки. RU-79...
- Page 82 Примечание: В целях предотвращения несчастных случаев и травм надежно закрепите устройство на стене, как показано на рисунке. Стена, на которой монтируется устройство, должна иметь несущую способность как минимум в 3 раза больше веса устройства. Не устанавливайате устройство вблизи от источников тепла (например, компрессор...
-
Page 83: Подключение Устройства
Подключение устройства Включите камеру Этап 1: Вставьте кабель питания в разъем питания камеры. Подключите другой конец кабеля питания к источнику питания. Этап 2: После подключения к источнику питания индикаторная лампочка отобразит статус камеры. Когда индикатор горит желтым, камера пребывает в процессе... -
Page 84: Технические Характеристики
Адрес: Офис 001A, 11 этаж, корпус 1, № 588 Зиксин Роуд, округ Минанг, Шанхай, Китай (Room 001A, Floor 11, Block 1, No. 588 Zixing Road, Minhang District, Shanghai, China) Для получения дополнительной информации перейдите на www.imilab.com. Отдел поддержки: help@imilab.com. www.imilabhelp.com... - Page 85 Подключение к приложению «Mi Home App» Данное изделие совместимо с приложением «Mi Home» и управляется им. Для загрузки и установки приложения «Mi Home» отсканируйте QR-код. При наличии установленного приложения «Mi Home» выполняется перенаправление на страницу подключения устройства. Для загрузки и установки приложения «Mi Home» можно...
-
Page 86: Функция Инфракрасного Ночного Видения
Функция инфракрасного ночного видения В зависимости от изменений освещения датчик освещенности может автоматически переключать устройство в режим ночного видения с помощью фильтра IR-CUT. Устройство оснащено двумя встроенными инфракрасными лампами ночного видения, обеспечивающими четкость записи даже в темноте. 2021 3 20:51:05 Иллюстрация... -
Page 87: Воспроизведение Видео
Воспроизведение видео Предыдущие видеозаписи можно просматривать только при условии, что в камеру наружного видеонаблюдения IMILAB EC3 Pro вставлена совместимая карта памяти micro SD. Камера автоматически начинает запись после установки карты памяти micro SD и включения устройства. 06:20 IMILAB EC3 Pro Outdoor ... - Page 88 Предоставление доступа к видеозаписям В интерфейсе управления камерой наружного видеонаблюдения IMILAB EC3 Pro в приложении «Mi Home» можно настроить общий доступ к устройству в меню настроек и пригласить других пользователей для просмотра видеозаписей. Пользователи должны загрузить приложение «Mi Home» и войти в свою учетную...
- Page 89 Домашняя система безопасности Функцию домашней системы безопасности можно включать/выключать в интерфейсе управления камерой наружного видеонаблюдения IMILAB EC3 Pro в приложении «Mi Home». Устройство может выполнять фиксацию и запись движений в пределах угла обзора и передавать запись клиенту. Пользователи могут задавать время...
-
Page 90: Меры Предосторожности
Меры предосторожности Рабочая температура устройства: от -20 до 40℃. Не используйте устройство при слишком низкой или слишком высокой температуре. Для получения лучших результатов не размещайте камеру перед или рядом со стеклянной поверхностью, белой стеной или другими отражающими поверхностями, т.к. это может привести к неравномерному освещению видеозаписи... - Page 91 Примечание: Данное оборудование было испытано и признано соответствующим ограничениям для цифровых устройств класса B в соответствии с Частью 15 Правил FCC. Эти ограничения разработаны для обеспечения надлежащей защиты от вредных помех при установке в жилых помещениях. Это оборудование генерирует, использует и может излучать энергию радиоизлучения, и...
- Page 92 Заявление касательно адаптера питания Для оборудования, подключаемого к электросети, сетевая розетка (адаптер питания) должна быть установлена рядом с оборудованием и в легкой доступности. Настоящим компания «Shanghai Imilab Technology Co., Ltd.» заявляет, что камера наружного видеонаблюдения «IMILAB EC3 Pro» радиотехнического типа соответствует Директиве 2014/53/EU.
- Page 93 Manufacturer: Shanghai Imilab Technology Co., Ltd. Address: Room 001A, Floor 11, Block 1, No. 588 Zixing Road, Minhang District, Shanghai, China For further information, please go to www.imilab.com. Support: help@imilab.com www.imilabhelp.com...
Need help?
Do you have a question about the EC3 Pro and is the answer not in the manual?
Questions and answers