
Related Manuals for AGR A22 2021


Summary of Contents for AGR A22 2021
- Page 1 A22 2021 Agriculture Drone Manual V1.0 Making Agriculture Easier, Safer and More Efficient. 2021.01...
- Page 2 A22 2021 Agriculture DroneManual To users Dear user, thank you for choosing AGR Intelligent products! To ensure that you can use this product safely and smoothly, please read the A22 Quick Start Guide after receiving the A22 drone, quickly assemble and activate the drone, and understand the basic operating instructions.For detailed product usage and parameter description, please...
-
Page 3: Table Of Contents
A22 2021 Agriculture DroneManual Catalog 1. Product safety rules .......................... 1 1.1. Pesticide using specification ....................1 1.2. Environmental requirements ....................1 1.3. Pre-Operation inspection ....................... 1 1.4. Safe flight ..........................2 1.5. Maintenance .......................... 2 1.6. Flight restrictions and local regulations ................. 2 1.7. - Page 4 A22 2021 Agriculture DroneManual 5.5.3.1. AB point operation flow ................. 27 5.5.3.2. Adjust spray before working ................28 Add A point ......................... 28 Add B point ......................... 28 5.5.3.3. Adjust the direction of the AB route .............. 28 5.5.3.4. Set AB point operation height ................ 29 5.5.3.5.
- Page 5 7. drone log analysis ........................... 65 7.1. Online log analysis (for mainland China only) ..............65 7.2. Local log copy (for networkless, non-Mainland China) ............66 8. 8. AGR web management platform ....................66 8.1. Registration and login ......................66 8.2. Perfect information ......................67 8.3.
- Page 6 14.2. 16. Pesticide Safety Instructions ..................87 14.3. 17. List of dangers and hazards and countermeasures ............87 14.4. Solutions..........................88 15. Disclaimer............................2 16. RESPONSIBILITY OF EXEMPTION ..................... 3 17. Specifications ..........................4 Factory default parameters ......................8 AGR A22 plant protection drone ......................1...
-
Page 7: Product Safety Rules
1. Product safety rules 1.1. Pesticide using specification Keep away from rivers and nearby water sources when dispensing to avoid pollution. Pesticides are toxic. Please use them with caution and follow the pesticide use specifications. After applying the pesticide, please pay attention to cleaning the skin and cleaning the drone and pesticide box. -
Page 8: Safe Flight
6. Make sure all parts are intact,If parts are worn or damaged, replace them before flying. 7. Make sure that the propeller is undamaged and securely installed, the blade arm is fully extended, and the arm folds are fastened. 1.4. Safe flight 1. -
Page 9: Safety Signs
Warning: After the drone rushes out of the restricted boundary due to inertia, the remote control still has the right to control, but it cannot control the drone to fly further. If the drone is outside the maximum radius and switched from attitude mode to positioning mode (with GPS), the drone will automatically return to within the maximum radius. - Page 10 The “Notice Pesticides are Toxic” logo is affixed to the tank.Users should wear gloves, masks and other protective equipment during use.
-
Page 11: Product Introduction
2. Product Introduction Introduction A22 plant protection drone is a 20L plant protection drone developed by AGR Intelligent combined with operating experience. A22 adopts switchable universal nozzle interface design, compatible with T-type pressure nozzles , equipped with intelligent spraying system, which can switch front or back spraying nozzles, reducing the influence of turbulent flow of the rotor, and improving the targeting of spraying of liquid Pesticides. -
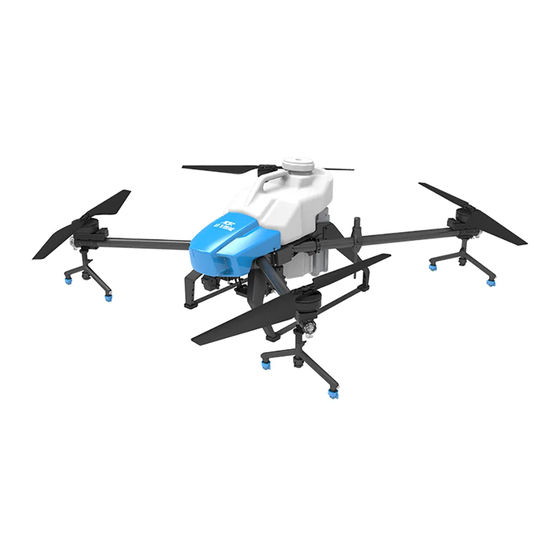
Page 12: A22 Drone Shape And Size
2.1. A22 drone shape and size... -
Page 13: A22 Plant Protection Drone Parts Name
2.2. A22 Plant Protection Drone Parts Name 15 Terrain following radar 1 propeller 16 Diverter 2 motor 17 Spray hub 3 Cover 18 Front obstacle avoidance radar 4 Water tank 19 Magnetic compass 5 Battery CAN-HUB 20 Radar adapter board 6 RTK antenna 7 Arm 22 Central integrated control system... -
Page 14: Remote Control
3. Remote Control... -
Page 15: The Remote Control Button Definition
3.1. The Remote Control Button Definition Number Features Description Antenna Transmission of remote control/data transmission/image transmission signal Unused Left stick Can set American hand/Japanese hand/Chinese hand Return home Return Screen Embedded screen, APP operation Switch Short press to unlock/lock the screen; long press to turn on/off the remote control Unused Right stick... - Page 16 American hands: the left stick controls the drone's rise, down, turn left, and turn right, and the right stick controls the drone's forward, backward, left, and right movements. Chinese hand: the left stick controls the drone's forward, backward, left, and right movement, and the right stick controls the drone's rise, down, turn left, and turn right...
-
Page 17: Match The Remote Controller
Match the Remote Controller 3.3. Remote control linking( the aircraft and the remote controller have been linked before shipment so it can be used after powering on) Instructions: When the remote controller and the aircraft are disconnected from the signal; when the remote controller and the digital link are replaced;... - Page 18 Click the link button, as shown below. As shown in the figure below, after pressing "Start Linking", the remote control will emit a "di di di" sound, and then a "di di di di" sound. At this time, the central control's linking indicator will be steady green, indicating successfully.
-
Page 19: Agr App
Tap "Clear All" or tap "×" or tap the screen and swipe to the left to close the H12 assistant, and then open the AGR APP to connect to the aircraft. H12 is closed as shown in the figure below. -
Page 20: Operation Interface
⑤ Help and feedback: troubleshooting, self-service query of common problems; feedback, feedback on AGR products; after-sales analysis, online after-sales analysis, online positioning of aircraft problems; after-sales repair, repair information registration, progress query. ⑥ Perform operations: view aircraft status and parameter information; set aircraft flight parameter configuration;... - Page 21 low battery alarm. Grey means the drone is not connected "Safe flight" means that the drone flight control system is in a normal state and can be used normally. "System not ready" means the drone is starting, please wait. For more status, please refer to the actual APP tips, such as "Remote control not calibrated", "Magnetic compass abnormal", etc.
- Page 22 ⑤Base station status: Indicates RTK base station type and base station signal, click the base station status to enter RTK setting interface. Indicates a network RTK base station, Indicates a mobile RTK base station 4G signal: Indicates the 4G network signal of the drone . Click the icon to enter the drone ⑥...
- Page 23 Indicates drone power<Severe low voltage alarm power,Please land the drone immediately, otherwise the plane will be forced to land in place and danger may occur! ⑪ More settings ,Click to enter the settings details of the drone, remote control, spray, battery, camera, etc.
-
Page 24: Mission Planning Interface
present ⑯FPV camera screen small window: click to switch to full screen display with map. Hide FPV window or map window ⑰ ⑱ Camera switching button : Click to switch between the downward-looking and forward-looking cameras. 4.3. Mission planning interface ①Mark positioning icon : indicates the position of the mark, forming a boundary point and an obstacle point. - Page 25 drone position". Requirement: The reference point must be in an open position to facilitate safe landing . Reference points must have long-term fixed obvious location characteristics to facilitate identification when the reference points are corrected. ⑤Save: Click "Save" to enter the plot name to save the plot ⑥...
-
Page 26: Share Operator
APP logged in otherwise it cannot be unlocked. When the drone needs to be shared with other users , the shared operator can use their accounts to connect and operate the drone. Operation steps: Open the AGR APP-click the user information icon to enter the user... -
Page 27: Troubleshooting
Open the AGR APP-click the user information icon to enter the troubleshooting interface Users can find problems through system classification, or directly search for problem keywords to find corresponding problem solutions. -
Page 28: Switching Language
The file path—the root directory of the phone file—AGR—record—export. b. If the drone does not have a network during the operation, after the operation is completed, when in good network condition, click the button to upload the operation record to the background for saving to prevent data loss. - Page 29 down to the bottom and click other settings buttons to enter the more settings interface-drop down Choose to switch between Google Maps and GD Maps.
-
Page 30: Drone
5. Drone 5.1. Flight mode Flight mode is switched by RC mode switch 5.1.1. Positioning mode Enable positioning module by GPS or RTK for positioning. In this mode, the drone can automatically lock the position to keep the attitude stable. Manual operations, AB operations, and route operations need to be performed in a fixed-point mode to ensure safe and accurate . -
Page 31: Manual Spray Mode
5.3.1. Manual spray mode The user can set the continuous flow rate value, the drone sprays continuously at the set value, and does not change with the speed and status of the drone. 5.3.2. Speed mode The user can set the maximum flow rate. The set flow rate is the maximum spray flow rate, and the spray flow rate changes linearly with the set flight speed. -
Page 32: Operation Mode
5.5. Operation mode 5.5.1. Manual operation mode Manually operate the drone for spraying. 5.5.2. Manual workflow Turn on spraying via APP or remote control after take-off and enter manual operation — — set operating parameters — — unlock take-off-click APP "Start Manual Operation" or click remote control spray button to start spraying —... -
Page 33: Ab Point Operation Mode
The flying height and speed are related to the manual operation amount of the stick, and the actual flow rate is related to the set spray mode and water pump mode. tips: a. It is recommended to enter the manual operation through the APP when the drone is not taking off, and then confirm or adjust the flight and spraying parameters before starting the operation to avoid excessive power consumption caused by hovering in the air with pesticide and reducing the operating efficiency. -
Page 34: Adjust Spray Before Working
control to adjust drone height — — self-inspection before operation — — start autonomous operation at point AB — — click "end manual operation" — — pop-up window to check the confirmation of operation effect——operation is over. 5.5.3.2. Adjust spray before working After entering the AB operation, it will pop up automatically or click the top operation parameter button before starting the operation to call up the spray setting pop-up window to... -
Page 35: Set Ab Point Operation Height
tips: a. The route direction cannot be changed after starting the operation. Please observe the actual field conditions and select the correct route direction before starting the operation to avoid danger. b. The left-right direction of the route is the left-right line, not the user's direction. For example, if the user stands at point B and faces point A, the left-right direction of the route is opposite to the left-right direction of the user! c. -
Page 36: Spray Adjustment During Operation
5.5.3.6. Spray adjustment during operation After starting the AB operation, the direction of the drone nose can be freely rotated through the remote control, the operation interval cannot be changed, and the pop-up window can be modified as shown below: 5.5.3.7. -
Page 37: Pause Ab Point Operation
tips: a. During the operation, the route can be extended or shortened infinitely. b. Please observe the field conditions carefully when the route is extended or shortened to avoid danger. c. Remote sensing stroke should be greater than 10% of the total formation, otherwise the route of trigger point AB cannot be extended or shortened;... -
Page 38: Adjust Spray Parameters Manually
the drone control is controlled by the remote control. Users can freely operate the drone for manual operations. Parameters such as manual work area will be presented separately in the work report. 5.5.3.10. Adjust spray parameters manually During manual operation, the user can click the status bar button and select the manual spraying to adjust: Select manual operation to perform manual spray adjustment in the following pop-up window:... -
Page 39: Continue Ab Point Work--Break Point And Projection Point
5.5.3.12. Continue AB point work——break point and projection point After the AB operation is paused, you can click the "Continue AB operation" button and select the corresponding point to continue the AB operation. When the drone is on the AB route, the following way points can be selected to resume operations: A. - Page 40 When the drone is out of the AB route, you can resume the operation by selecting the following way points: A. The "0" interruption point, that is, the point at which the AB operation is suspended. Applicable when there are no obstacles on the route. B.
-
Page 41: End Ab Assignment
5.5.3.13. End AB assignment Click “ End AB assignment” to end the AB assignment, and the app will popup the working report window. Tip: The working site in the working report can only be obtained after the network of mobile phone is connected! 5.6. -
Page 42: Map Marking
accuracy is high. Suitable for complex land with many obstacles. Drone mark is to operate the drone to reach the boundaries of the plot to perform the operation. The operation is relatively simple and the accuracy is high, but it is difficult to apply to the plot with complicated boundaries and many obstacles. -
Page 43: Drone Marking
Please do the marking according to the status bar color and remote control accuracy tips to ensure the safety of the operation: Status bar color: Blue means high precision and can be used for normal marking. Orange indicates that the accuracy is average and can mark, but the accuracy is low. Please reserve a safe margin. -
Page 44: Base Station Marking
tips: a. It is recommended that the user connect the video cable when using the drone to do so, which will help improve the accuracy and efficiency of the drone and reduce the security risk. b. It is recommended that drones be used for empty drones without pesticide to avoid wasting electricity. -
Page 45: Edit Route
C. Connect the remote controller to the rover (the ground station needs to turn on Bluetooth),Connect the base station point collector according to the interface prompt. The power of the four corner status indicator is defined as follows. Four corner LED status capacity Green light always on >... -
Page 46: Safety Margin
adjust according to the actual effective spray width of the drone. Operating height, environment, flow rate, etc. all have an effect on effective working spraying. 5.6.2.2. Safety margin In order to prevent the drone from being too close to the edge of the plot and causing danger, the flight route is set to shrink within a certain distance from the plot boundary. -
Page 47: Transit Point
drone position". 5.6.2.7. Transit point When the drone takes off or returns, if there is an obstacle directly from the take-off point to the return point or the return point to the take-off point, a transfer point can be set in advance. The drone will pass the transfer point when entering the route or returning to avoid obstacles. -
Page 48: Set Route Operation Parameters
to call the plot to enter the route operation. 5.6.3.2. Set route operation parameters After uploading the route, it will pop up automatically or click the top operation parameter button to call up the spray setting pop-up window to adjust the spray parameters. When the operation is not started, the operation parameter adjustment can be set to spray mode, water pump mode, operation, and flying speed and flying height. -
Page 49: Modify Working Parameters During The Working
5.6.3.4. Modify working parameters during the working If during the operation, click the top operation parameter button, call out the spray setting pop-up window, you cannot adjust the height again at this time. The height is subject to the stick control. -
Page 50: Pause Automatic Operation
obstacles. 5.6.3.6. pause automatic operation While the drone is operating autonomously, the following operations will pause the automatic operation and stop spraying: A. Reaching the limit distance B. Obstacle detected C. Automatic return after finish spraying D. Click the APP “Pause automatic operation” button E. -
Page 51: Manual Obstacle Avoidance Application
5.6.3.9. Manual obstacle avoidance application pause automatic operation - manually bypass obstacles - continue operation Tips: If it is found that the drone is about to collide with the obstacles, please timely move the stick to the left / right, and pause the automatic operation. After suspending the automatic operation, release the stick and the drone will hover in place. - Page 52 the break point is located. Applicable to the situation where there is an obstacle between the break points 0 to 1. C. End point "2", that is, the end point of the next route of the route where the break point is located.
-
Page 53: Finish Automatic Plan
Tip: The above diagram only represents the position shown in the diagram. When the drone position is not between the break point route and the next route, the projection point is still on the break point route and the next route. Please pay attention to identify the position of the drone and determine whether there is an obstacle between the position of the drone and the projection point to avoid danger! When the position of the drone and the distance between 0, 1, 2, 3, and 4 points is less than 5... -
Page 54: Identify Obstacles
In the APP execute operation interface, click the status bar to enter the device information--click the obstacle avoidance system--enter the obstacle avoidance system interface to view the obstacle avoidance radar connection status, to detect the specific position and distance of the obstacles. -
Page 55: Terrain Following Function
Tips: Obstacle avoidance radar can sense a distance of 2-15 meters. Vertical view angle of obstacle avoidance radar: plus or minus 7.5 ° , horizontal view angle of single radar 112 °. Normal use conditions of obstacle avoidance radar: the minimum flight altitude is higher than 1.5 meters, the flight speed is less than 6m / s, and the ground slope is less than 10 °. -
Page 56: Out-Of-Control Protection Function
Tips: a. Use conditions of terrain following radar: slope ≤ 25 °. b. Terrain following radar height detection range: 0.1-50 meters, normal use altitude ≥ 1.5 meters. c. During the operation, the radar surface should be cleaned in time to avoid the danger of radar failure caused by the adhesion of pesticides or other debris! d. -
Page 57: Low Battery Protection Function
Tips: a. The factory default setting is to hover the plane after the tank is empty. b. The user can enter the APP setting interface to modify the drone action after pesticides exhausted according to the actual situation. c. If the drone returns to the home after the pesticides is exhausted, please make sure that the home point is free of personnel and obstacles to avoid danger. -
Page 58: Power-Off Protection Ups Function
5.12. Power-off protection UPS function The drone's motherboard has built-in capacitors. When the drone is unplugged battery, the motherboard capacitors will continue to supply power to the drone control system and positioning system for about 60 seconds to ensure the continuous operation of the drone control system. - Page 59 The user can manually makes a return in the following ways: You can perform a one-touch home mission by clicking the home button on the remote control. You can click return button, slide to perform a one-touch return flight task. The following methods will make an auto return (set the following behaviors to return in advance in the APP more settings interface) Lost control...
-
Page 60: Magnetic Compass Calibration
Automatic landing will not be interrupted. h. During the return journey, the drone's course will not change. If you need to take over the drone manually in an emergency, please pay attention to the drone's course. 5.14. Magnetic compass calibration Enter the APP execution operation interface, click the more settings button in the upper right corner, enter the drone settings, enter the sensor interface, click "magnetic compass calibration", and follow the APP popup window to perform the magnetic compass calibration. -
Page 61: Accelerometer Calibration
Tips: A. When the RTK is turned off or the RTK is abnormal, the drone will use the magnetic compass in GPS to determine the course. B. Correction angle limitation: leftward correction ≤30 °, leftward correction ≤30 °. 5.16. Accelerometer calibration Enter the APP execution operation interface, click the more settings button in the upper right corner, enter the drone settings, enter the sensor interface, click "Accelerometer calibration", and follow the APP popup window to perform the accelerometer calibration. -
Page 62: Pipe Exhaust Function
5.17. Pipe exhaust function There will be air in the pipeline after spraying the pesticides. Please exhaust before the take-off operation. Avoid landing to exhaust after take-off, improving the work efficiency. Before the drone takes off, you can click the spray button on the remote control directly or enter the pipeline exhaust to start the spray to exhaust. -
Page 63: Function Of Liquid Level Gauge
· Function of liquid level gauge 5.17.2. The liquid level meter can realize the functions of continuous operation without pressure relief, residual liquid level detection, real-time dynamic calibration of flow meter, etc. A. Turn on the "remaining pesticide alarm switch" in the drone setting interface, and then the alarm will be given when the pesticide liquid in the fuselage pipeline is full, and the pesticide liquid in the pipeline will be reserved, so as to realize the function of no pressure relief when adding pesticide again. -
Page 64: Rtk Base Station
Water pump calibration process: add a certain pesticides-pipeline exhaust-add more than 5 liters of clear water-check the health value-automatically turn on the spray and then test-the end of the test and the health value compound requirements (above 80)-calibration Parameter-Calibration succeeded. Tips: a. -
Page 65: Power On
5.18.1. Power on In the shutdown state, press and hold the button until the base station starts to broadcast boot music, and release the button to boot. After power on, the voice module will broadcast in sequence: power-on music, "base station mode/base station inker mode", "please wait while searching for satellites", and "setup successful". -
Page 66: Base Station Paring
5.18.5. Base station paring The base station RTK version of the drone is paired with the mobile base station when it leaves the factory, and the user does not need to perform pairing operations after receiving the drone. When the base station is changed or the base station signal has not been searched for a long time and needs to be paired again, the base station pairing operation is required to connect the RTK on the drone side to the mobile base station. -
Page 67: Switch Language
-- switch language successfully. 6. Upgrade AGR updates the software of drone, remote control, APP and other products from time to time, and users can use the new functions of the product after upgrading. - Page 68 Download firmware to remote control ( Please make sure that the 4G network or WiFi of the remote controller is unobstructed before downloading): Choose Bluetooth upgrade ( Please put the remote control close to the UAV to make sure the Bluetooth connection is smooth):...
-
Page 69: App Upgrade
If the Bluetooth upgrade fails, you can use the following methods to upgrade:Scan the QR code in the download center of the Quick Use Guide and enter the download center to download or log in to AGR Intelligent official website https://www.qifeizn.com——service and support——enter the download page——download software and firmware. - Page 70 Click Advanced Selection Enter the password 999, click OK: Click to upgrade device:...
-
Page 71: Drone Log Analysis
4G network. For general conventional accidents, users can apply for online after-sale analysis and provide the drone ID, accident phenomenon and time of the accident to the AGR after-sales personnel, after-sales personnel can perform log analysis in the background. -
Page 72: Local Log Copy (For Networkless, Non-Mainland China)
- connect one end of the wire to the SD card port - plug in the computer at the other end - open my computer - open central control U disk - Open AGR folder - click logs folder - select the corresponding log according to the aircraft failure time - copy log - send log to after-sales - after-sales analyze the cause of failure Because. -
Page 73: Perfect Information
After successful registration, when you log in for the first time, you need to fill in the relevant information according to the web page tips. After completing the filling in, you can use the platform normally after passing the review. 8.2. -
Page 74: Plant Protection Drone Management
8.3. Plant protection drone management Through the AGR Agricultural Management Platform, the owner of the plant protection drone can view all the parameters of the plant protection drone in real time, lock the plant protection drone, bind the plant protection drone, view the related operation records of the specified drone (skip to the flight statistics page) and other operations. -
Page 75: Real Time Monitoring
8.4. Real time monitoring Through the AGR agricultural management platform, plant protection drone managers can monitor the dynamic information of plant protection drones and pilots in real time. 8.4.1. -
Page 76: Flight Statistics
AGR cloud background, so it is not possible to view working schedule data. Foreign users can independently upload working data to the AGR Cloud platform through the AGR APP, and after uploading, they can view the working statistics online. -
Page 77: Plot Management Faq
Q: Why distinguish between 2020 plot data and 2019 plot data? A: The data of the land routes in 2019 was uploaded through the AGR APP v1.x. The AGR APP v2.x version is newly upgraded. The AGR APP v1.x and v2.x versions of the plot route data are not completely compatible, so the v1.x version data is retained and distinguished by the year. -
Page 78: Personal Information
to the plant protection team you created, and you also have the authority to operate the plant protection team). 8.10. Personal information After logging in to the platform, your nickname is displayed in the upper right corner of the platform. Click on the nickname or avatar to view personal information and exit operations. Click the personal information button to enter the personal information page. -
Page 79: Battery
2. With automatic shutdown function, if don’t use the battery when it is powered on. It will automatically shut down after 10 minutes to save power. 3. You can get real-time battery information, such as voltage, number of cycles, through the AGR APP. -
Page 80: Battery Indicator Description
9.3. Battery indicator description LED1、LED2、LED3、LED4 Power LED1 LED2 LED3 LED4 flash 0%——12% 13%——24% 25%——37% flash 38%——49% 50%——62% flash 63%——74% flash 75%——94% 95%——100% 9.4. Life indicator description When the battery is off, long press the button 5S, LED1, LED2, LED3, LED4 display the battery life Remaining life LED1 LED2... -
Page 81: Battery Parameters
LED5 red, LED6 orange, LED7 white Orange White status Introduction LED5 LED6 LED7 Differential pressure alarm: differential Please balance pressure ≤300mv before using Secondary pressure differential alarm: Please balance differential pressure ≥300mv before using Battery voltage is too low Please charge immediately flash Over temperature alarm: 50 ℃... -
Page 82: Battery Warranty Clause
9.8. Battery warranty clause This battery warranty: The smart battery warranty is 12 months or 400 cycles, whichever comes first. One of the following situations is not covered by the warranty: 1. The battery disassembled by the user. 2. The battery is stored under high temperature and full power. 3. -
Page 83: Charger
10. Charger Preface Thank you for choosing AGR Balanced Charging Power Supply AGR-C6000; this operating instruction is designed to help you better install and use this product, so before using it, please read this instruction carefully and keep it properly. -
Page 84: Product Introduction
10.2. Product Introduction AGR-C2600 can charge 4 sets of batteries at the same time, with a maximum output power of 2400W. Two modes of charging and maintenance can be selected. The charging current can be adjusted between slow charging, normal charging and fast charging. - Page 85 2. AGR-2600 battery connection diagram, you can connect the battery to the charger, if the battery socket does not match, connect the battery through the adapter cable. 1. Before connecting, please check the battery terminals and wiring harness for any obvious defects such as damage or disconnection;...
-
Page 86: Working Mode Description
10.4. Working mode description Fast charge-4 channels alternate charging, single channel charging power 3000W; Standard -2 channels charge at the same time, single channel charging power 1500W; Slow charge-4 channels charge at the same time, single channel charging power 750W; Maintenance mode: 4 channels work in turn;... -
Page 87: Indicator Status Description
10.7. Indicator Status Description 10.8. Charger parameters... -
Page 88: After-Sales Warranty
If your product fails, please contact the after-sales personnel of AGR. 1. The warranty expiration date after the product fails is subject to delivery to the AGR After-sales Service Center; 2. Due to the quality of the product itself within one year from the date of purchase, the warranty is free. -
Page 89: Start And Stop The Drone
Please pay attention to the correct use: the user bears any consequences caused by the operation, the company is not responsible for the expenses beyond the cost of the product and reserves the right to modify this clause; if there is any modification, without notice. 11. - Page 90 Perform the sticks toes-out to lock(suitable for America hand and Japanese hand) Perform the sticks toes-in to lock(suitable for Chinese hand) downward the throttle stick up to lock ( example American hand) A. When the drone is often flying in the air, please do not perform the toes-out stick action, otherwise the drone will stop the propeller in the air and crash! B.
-
Page 91: Steps For Safe Parking
12. Steps for safe parking 1. You can land manually and slowly pull down the throttle lever to make the drone slowly land on a stable ground. 2. After the drone has landed, pull down the stick to the lowest position and hold it for 3 seconds until the motor stops. -
Page 92: Common Fault Handling Instructions
5. If the drone won’t be used for a long time, store the drone in a clean, ventilated, moisture-proof place, avoiding high temperature. 15.Common fault handling instructions 14.1.1. Unstable flying attitude 1. Check whether the screws at the arm and the upper carbon plate are tightened (focus on checking the arm clamps). -
Page 93: Pesticide Safety Instructions
14.2. 16. Pesticide Safety Instructions 1. Check whether the dispensing tools are complete (measuring cups, buckets, mother liquid buckets, stirring rods, rubber gloves, goggles, gas masks, etc.). 2. Strictly follow the dispensing order: foliar fertilizer-wettable powder (not recommended for plant protection drones)-water dispersible granule-suspension agent-microemulsion-water emulsion-water agent-cream. -
Page 94: Solutions
operated carefully to prevent cuts. 6. The propeller under high-speed rotation has a strong cutting force, and you need to stay away from it when flying to avoid accidental injury. 14.4. Solutions Precise application to reduce the risk of pesticides damage. Control pesticide packaging waste and reduce environmental pollution. -
Page 95: Disclaimer
8,The judgment of any form of crash liability is based on the flight log as the sole criterion. 9,The final interpretation right of this disclaimer belongs to AGR. "AGR" has the right to update, revise or terminate the terms of this disclaimer through the official website, APP, etc. without... -
Page 96: Responsibility Of Exemption
16. RESPONSIBILITY OF EXEMPTION When using this product, AGR will not be liable for compensation or legal liability due to direct or indirect personal injury, property damage, etc. due to the following reasons: The operator did not comply with local laws and regulations. -
Page 97: Specifications
17. Specifications Drone status indicator light description and technical specifications Drone tail lights: The color and flashing status of the drone tail lights represent the drone status. To facilitate efficient operations and quickly find problems, please read and keep in mind! Arm indicator light: Under normal conditions: The color of the front arms 1 and 2 is always red;... - Page 99 Technical specifications Model: 3WWDZ-20A Frame Wheelbase:1564mm Size:1210*1210*570mm Package Size:1200*800*530mm power system Motor Stator size:96x16mm value:100 rpm/V Maximum pull force:26.5kg/rotor Maximum power:1500W/rotor Electrical regulation Maximum working current (continuous):150A Maximum working voltage:58.8V Foldable propeller (36120): diameter x pitch36×120 inch Flight parameters Total weight (excluding battery):19.6kg Standard takeoff weight:48.1kg Effective takeoff weight:50.1kg RTK on:horizontal±10cm,vertical±10cm...
- Page 100 Nozzle number:8 Model:KZ8004、KZ8006、KZ8008、 VP11001、VP110015(standard configuration)、VP11002 Maximum system working flow: KZ8004:3.2L/min,KZ8006:4.0L/min KZ8008:5.6L/min,VP11001:3.8L/min VP110015:4.8L/min,VP11002:5.8L/min Atomized particle size: KZ8004:120--240μm,KZ8006:160--260μm KZ8008:190--310μm,VP11001:130--250μm VP110015:170--270μm,VP11002:200--320μm Spray Width : 3—6 meters (8 nozzles,1.5——3meters from crop) Flow meter Flow measurement range : 0.3—10L/min Flow measurement error:≤±2% Measurable liquid: aqueous organic / inorganic pesticides, etc. Battery Standard voltage:50.4V Nominal power:22000mAH...
-
Page 101: Factory Default Parameters
Terrain following slope: ≤25 ° Obstacle avoidance radar Model: MR72-UAV Protection class: IP66 Operating frequency: 77GHz band dynamic target detection Equivalent Isotropic Radiated Power (EIRP): 29dbm Working power consumption: 2.5w power, 5 ~ 32v wide voltage Perceived distance 2-15 meters Field of View (FOV): Vertical plus or minus 7.5 °... - Page 102 Maximum manual speed 6m/s Video decoding method Hard decode Maximum flight height Exposure time automatic Longest flight distance 1000m Map type Gouda Map Takeoff, Height of takeoff Line spacing transit point Return, Height of return Safety margin transit point Searchlight switch on/off Obstacle margin Continuous flow rate in manual...
- Page 103 voltage Low battery alarm percentage Severe low battery alarm 51.0V voltage Severe low battery alarm percentage...
-
Page 104: Agr A22 Plant Protection Drone
AGR AGR Agricultural Plant Protection Platform Hangzhou AGR Intelligent Technology Co., Ltd. After sales phone: 0572—8283753 0571-85239009 Address of Company: No. C901-903, Building 2, No. 452, No. 6 Street, Baiyang Street, Hangzhou Economic and Technological Development Zone...
Need help?
Do you have a question about the A22 2021 and is the answer not in the manual?
Questions and answers