Advertisement
Quick Links
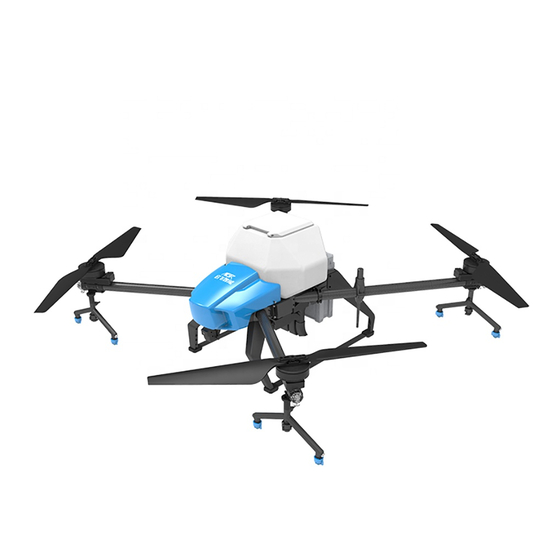
A22 Quick Start Guide
A22 Plant protection drone
Quick Start Guide
( Read before flying )
To users
Dear users, thank you for using Qifei smart products.
In order for you to use the A22 plant protection drone safely and smoothly, please read this quick start guide
carefully!
1
Advertisement

Related Manuals for AGR A22


Summary of Contents for AGR A22
- Page 1 Quick Start Guide ( Read before flying ) To users Dear users, thank you for using Qifei smart products. In order for you to use the A22 plant protection drone safely and smoothly, please read this quick start guide carefully!
- Page 2 A22 Quick Start Guide 1. Know A22 plant protection drone The main structural components of A22 plant protection drone are as follows : 1 Propeller 15 Imitation ground radar 2 Motor 16 1 point 4 shunt 3 Chassis 17 Spray-HUB...
- Page 3 A22 Quick Start Guide Item list Before opening the package and using the product, please check whether it contains all the items listed in this item list in time according to this item list. If any items are missing, please contact...
- Page 4 A22 Quick Start Guide Tank × 1 Arm 1 ~ 4 × 1 drone body × 1 Spray box set × 1 Nozzle × 4 Remote control bag × 1 USB data cable × 1 Tool bag × 1...
- Page 5 A22 Quick Start Guide Main items Mainly contains Number Main items Mainly contains Number Drone Body, shell, tripod, water Tank Tank, lid, filter, etc. body pump, etc. Arm 1 Arm, power, blade, nozzle Arm 3 Arm, power, blade, nozzle Arm 2...
- Page 6 A22 Quick Start Guide M5*14 self-tapping screw Quick guide (Fixed tripod and line card) Sealing plug T-shaped plug Certificate of conformity (hole sealing) File Nylon cable ties (fixed wire Three Guarantees Certificate harness) 12 open-end wrenches Manual 16 open-end wrenches...
- Page 7 2. Assemble the drone Preparation before assembly For the convenience of transportation, the shell of the A22 agricultural drone has been installed on the body before it leaves the factory. We need to remove it temporarily before assembling the drone, and then put it back in place after the standby arm is installed.
- Page 8 A22 Quick Start Guide 4. Install the No. 2 arm: Insert the No. 2 arm from the designated position on the fuselage plate, and then tighten the screws (the removal/assembly method of the No. 1 arm is the same). When tightening, please tighten the screws on both sides of the arm at the same time! 5.
- Page 9 A22 Quick Start Guide center warehouse to complete the assembly of arm 3 (the disassembly/assembly method of arm 4 is the same). Tip: When tightening, please tighten the screws on both sides of the arm at the same time! 7. Connecting the pipeline: After completing the installation of the arm, all the plugs of each circuit and the infusion pipe of the spraying system must be correctly connected.
- Page 10 A22 Quick Start Guide 9. Put the feeder presser, the center line bin cover and the casing back to their original positions and tighten the screws, the fuel tank is loaded into the drone, and the body assembly is completed.
- Page 11 A22 Quick Start Guide Wiring instructions for A22 series modules 1. AG3 PRO flight control:...
- Page 12 A22 Quick Start Guide 2. Radar HUB module: 3. The upper surface of the Spray HUB module:...
- Page 13 A22 Quick Start Guide 4. The lower surface of the Spray HUB module:...
- Page 14 A22 Quick Start Guide...
- Page 15 A22 Quick Start Guide 3. Know the remote 1. Remote control function definition...
- Page 16 A22 Quick Start Guide Numbering Features Description Transmission remote control/data Antenna transmission/image transmission signal Unused Left stick Can set American hand/Japanese hand/Chinese hand Return home Long press to go home Screen Embedded screen, APP operation Short press to unlock/lock the screen; long press to turn...
- Page 17 A22 Quick Start Guide Unused Speaker Voice prompts SIM card slot Insert SIM card Charging port 5V/2A Unused Flight mode switch The two gears are: attitude mode/positioning mode Unused 2. Description of remote control operation mode: The remote controller uses the "American hand" as an example: the left stick controls the flight altitude and direction, and the right stick controls the drone's forward, backward and left and right flight directions.
- Page 18 A22 Quick Start Guide The linking process diagram is as follows: 1. Pull out the medicine box, remove screws 1-5, and open the lid. As shown below. 2. Power on the drone and press and hold the "PAIR" button of the central control, the indicator light flashes green quickly, and the switch position is as shown in the figure below.
- Page 19 A22 Quick Start Guide 4. Click the link button, as shown below. 5. As shown in the figure below, after pressing "Start Linking", the remote control will emit a "di di di" sound, and then a "di di di di" sound. At this time, the central control's linking indicator will...
- Page 20 A22 Quick Start Guide 6. After the pairing is successful, click the "Task button" on the upper right to pop up the background program, as shown in the figure below. 7. Tap "Clear All" or tap " × " or tap the screen and swipe to the left to close the H12 assistant, and then open the Fly APP to connect to the drone.
- Page 21 Be sure to use the designated battery QF14220 (22000mAh-51.8v)! The battery will automatically turn on when the battery is inserted into the drone! 5. Activate A22 plant protection drone 2. Register and log in to your account. 1. Scan the QR code, download and install...
- Page 22 A22 Quick Start Guide The registration invitation code defaults to 000000, which is registered under the name of Qifei. If the user purchases the drone through a dealer, he needs to fill in the dealer invitation code. 3. Know the main interface.
- Page 23 A22 Quick Start Guide 5. Authentication: Fill in and upload ID card and operator certificate information, and submit real-name authentication and operator authentication in turn. Waiting for approval after submission, it is expected to take 1-2 working days. 6. Add airplane: Enter the My Airplane interface and click Add Airplane. Enter the plant protection drone ID number (see the drone nameplate) and activation code (see the first page of the getting started guide) to add the drone.
-
Page 24: Preparation Before Flight
A22 Quick Start Guide 7. According to the above, pair the remote control with the drone. After the pairing is successful, end the H12 assistant background process; then open the APP, enter the main interface, and click "No drone connected" to successfully connect to the paired drone. - Page 25 A22 Quick Start Guide 1. Choose a site: Place the drone on an outdoor site with open terrain, no tall buildings, no communication towers, and no high-voltage lines. 2. Inspect the drone: make sure that the arm screws are not loose, unfold the propeller, and make sure that there are no foreign objects in the battery plug, motor and propeller at the rear of the fuselage.
- Page 26 A22 Quick Start Guide 6. Calibrate the magnetic compass: Enter the APP execution interface, click the more settings button in the upper right corner, enter the drone settings, enter the sensor interface, click "magnetic compass calibration", and follow the APP pop-up window to perform magnetic compass calibration.
- Page 27 A22 Quick Start Guide...
-
Page 28: Start Flying
A22 Quick Start Guide 7. Start flying 1. The user faces the tail of the drone, and the personnel should stay away from the drone at a safe distance of more than 5 meters. 2. Check the remote control operator mode: enter the APP execution interface and check whether the remote control operator on the parameter information bar is correct (abbreviation definition: American-American hand, Chinese-Chinese hand, Japanese-Japanese hand). - Page 29 A22 Quick Start Guide 4. Unlock and take off: Perform the eight-stick action in the left and right joysticks, the drone will unlock and the propeller will rotate at idle speed. Push the throttle stick up and the plane can take off.
- Page 30 A22 Quick Start Guide Lock the outer eight levers Pull down the throttle to lock (for American hands/Japanese hands) (US hand as an example) The inner eight levers are locked (for Chinese hands) A. When the drone is flying frequently in the air, please do not perform the outer eight-stick action, otherwise the drone will stop the propeller in the air and cause a crash! B.
- Page 31 Parameters-upload route-self-check before operation-start route autonomous operation-complete flight route-pop-up window to view the operation effect confirmation letter-end of operation. 5. For more operation modes and detailed functions, please refer to "A22 User Manual" A. Reference point function B. Projection point function C.
- Page 32 A22 Quick Start Guide F. Pump calibration function G. Route extension and shortening function H. Drone firmware upgrade method...
- Page 33 A22 Quick Start Guide 9. Maintenance and maintenance after operation 1. After the operation is completed, remove the nozzle filter and nozzle into clean water to wipe, clean, clean and install it back to the drone. 2. Fill the medicine box with soapy water or washing powder water and turn on the spray until the water flowing out is free of medicine.
- Page 34 A22 Quick Start Guide A. Keep away from rivers and nearby water sources when dispensing medicine to avoid pollution. B. Pesticides are poisonous, please use them with caution and follow the pesticide use specifications. C. After spraying, please wash your skin and clean the drone and medicine box.
- Page 35 E. Do not increase the load, and ensure that the flight is under the take-off weight below 40kg to avoid danger. F. The use of A22 plant protection drones has certain safety risks and is not suitable for people under 18 years of age.
- Page 36 3. The user understands and agrees that the flight data generated when using this product will be uploaded and saved to the AGR Intelligent server. 4. AGR Smart is not responsible for any direct or indirect personal injury and property damage caused by using this product in accordance with the operating guidelines. The user should understand and implement including but not limited to these operating instructions.
- Page 37 A22 Quick Start Guide registration mark are not implemented, the supervisory authority will impose penalties in accordance with relevant regulations.
- Page 38 A22 Quick Start Guide 12. Disclaimer When using this product, AGR Smart will not be liable for compensation or legal liability due to direct or indirect personal injury, property damage, etc. due to the following reasons: 1. The operator did not comply with local laws and regulations.
- Page 39 A22 Quick Start Guide 14. Drone status indicator description and technical specifications Drone taillights : The color and blinking status of the drone tail lights represent the status of the drone. For easy and efficient operation and quick problem finding, please read and remember!
- Page 40 A22 Quick Start Guide Arm indicator: Under normal conditions: the color of the front arm 1 and 2 is always red; the color of the rear arm 3 and 4 is always green...
-
Page 41: Technical Specifications
A22 Quick Start Guide Technical specifications Maximum operating flight speed:10m/s Maximum flight speed:10m/s Product number : 3WWDZ-20A Maximum tolerable wind speed:8m/s Product name : A22 plant protection drone Maximum take-off altitude:2000m Flight control system Recommended working environment Flight control model: AG3 pro... - Page 42 A22 Quick Start Guide Ground radar Remote control Model:nra24 Model: AG12 Working frequency:24.00 GHz-24.20 GHz Built-in battery: 3.7V 1S lithium battery 10000mAh Equivalent isotropic radiated power (EIRP): 25dbm Working power consumption:0.5W Working power consumption:1.4 — 1.8W Working temperature:-10 ℃ -40 ℃...
-
Page 43: Factory Default Parameters
Factory default parameters Set up items Parameter Set up items Parameter Manual maximum speed 6m/s Video decoding method Hard decoding Maximum flying altitude Exposure time Automatic Maximum flying distance 500m Map type Gaode Map Take-off, take-off transit Working distance point height Return home, return home Safety margin transit point height... - Page 44 A22 Quick Start Guide dosage maximum flow rate Spraying flight calibration Airline/AB operation with speed 10000ml 4.0m dosage mode operation interval Serious low voltage Airline/AB operation with speed Landing 5.5m/s protection action mode flight speed Low battery alarm voltage 51.5V Severe low battery alarm voltage 51.0V...
Need help?
Do you have a question about the A22 and is the answer not in the manual?
Questions and answers