
Related Manuals for M-Triangel MG oneS

Summary of Contents for M-Triangel MG oneS
- Page 1 深圳市三角铁科技有限公司 SHENZHEN M-TRIANGEL TECHNOLOGY CO,.LTD MG oneS Laser Marking Machine Brief Introduction of Laser Marking machine...
- Page 2 Please read these instructions carefully before installing and using the product. Dear user: Before using this product, please take the time to read and understand this manual. Please familiarize yourself with the information provided in this manual. It will provide you with important operational information such as safety and other aspects.
-
Page 3: Chapter 1 Overview
Chapter 1 Overview 1.1 Principle of laser marking The laser has high brightness, high accuracy, high monochromaticity and high coherence, which is unmatched by ordinary illumination sources. When the laser beam is focused, it can produce thousands of degrees or even tens of thousands of degrees of high temperature at the focus, making it possible to process almost all materials. -
Page 4: Chapter 2 Equipment Operation Security Protection
electro-optical conversion efficiency, low energy consumption; good marking quality; laser power and frequency computer control Easy to implement tag automation. The company provides dedicated marking software based on the Windows platform. Real-time control of laser power and pulse frequency. The marked content can be text, graphics, pictures, serial number, barcode and their combination, and can be directly input and edited in the special marking software, or edited by graphic software such as AutoCAD or CorelDraw, and the input and output can be controlled... -
Page 5: Chapter 3 Equipment Technical Parameters And Applicable Environment
wavelength of 1064 nm, which avoids direct exposure of the eyes or skin to the laser radiation. Do not attempt to open the device. Any maintenance and service can only be done by a technician authorized by the company. 2.3 Laser hazards The laser output from the laser is invisible infrared light, which can cause tertiary burns even in the case of deviation from the focal length. -
Page 6: Chapter 4 Introduction To Laser Marking Principle
Grid fluctuations: <±5% Grid ground: in line with the international requirements of the equipment room Power consumption of the whole machine: 800W Working environment: Temperature: 15 ~ 35 ° C Humidity: 45 ~ 75% 1. Field lens focal length (optional): F=254mm Effective focus scanning range: 180 mmX180mm 2. - Page 7 a) Good monochromaticity. The light emitted by ordinary light sources contains a wide range of wavelengths, that is, the width of the line is wide. For example, sunlight contains all visible wavelengths, and the laser is a single wavelength. The line width is extremely narrow, usually in the range of hundreds of nanometers to several micrometers.
-
Page 8: Chapter 5 Operation Procedures
and the frequency selection by the fiber grating disposed in the fiber is specified. The spontaneous emission of the wavelength is amplified by oscillation and finally produces a laser output. If the cladding fiber material is doped with different rare earth elements, such as doped with different rare earth elements such as lanthanum, cerium, lanthanum and cerium, the fiber laser has a variety of different laser wavelength outputs. - Page 9 3) Turn on the main power supply 4) Turn on the Galvanometer and Laser...
- Page 10 Control Buttons 1)Galvanometer Switch(power supply for galvanometer) 2)Laser Switch(power supply for laser source) 5)Turn on the computer 6)Install ‘on line marking system’(http://www.imtdown.com/)
- Page 17 ‘on line marking system’ installation finished’...
- Page 18 7)Operation procedures of ‘on line marking system’ Step one:double click the marking system icon Step two:Click ‘one click download’ (For the first installation, you can choose the drawings only after click ‘load the drawings’.) Remarks:One click update (You can click ‘one click update when there is any update of the drawings, and it will not cover the drawings downloaded before)
- Page 19 Step three:Choose the brand and model you want, click’ load the drawing’ Step four:Put the phone on the location spot.
- Page 20 Step five:Press ‘auto focus’button,when the focal indication light on,it is the right focal distance for marking. Step six:put the phone at the device.
- Page 21 Step seven:red point preview(tick ‘mark sel’) Step eight:Click ‘stop’ when red pointer preview is okay,and then click ‘mark’. Last step:Click ‘stop’ when marking finished.
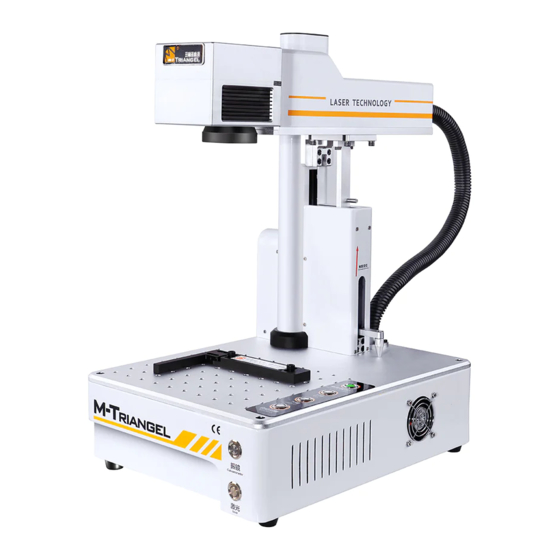
- Page 23 Side view of the machine...
- Page 24 Bevel view of the machine Back view of the machine...
-
Page 25: Chapter 6 The Maintenance
5.2 Switch off the device (1) Turn off the marking software, exit the system according to the normal program and turn off the power of the computer and monitor. (2) Turn off the galvanometer power switch (3) Turn off the laser power switch (4) Turn off the main power switch 5.3 Brief description of software adjustment Generally, when using the device, the user only needs to adjust "speed"... - Page 26 The cleaning method is to mix anhydrous ethanol (analytical grade) and Ether (analytical grade) in a ratio of 3:1, infiltrate the mixture with a long fiber cotton swab or lens paper, and gently scrub the lower end surface of the focusing mirror. A cotton swab or lens paper must be replaced.
Need help?
Do you have a question about the MG oneS and is the answer not in the manual?
Questions and answers