Overland Tandberg RDX QuikStor Quick Start Manual
External usb and internal usb/sata iii devices
Hide thumbs
Also See for RDX QuikStor:
- Quick start (2 pages) ,
- Quick start (2 pages) ,
- Reference manual (24 pages)
Advertisement
For External USB and Internal USB/SATA III Devices
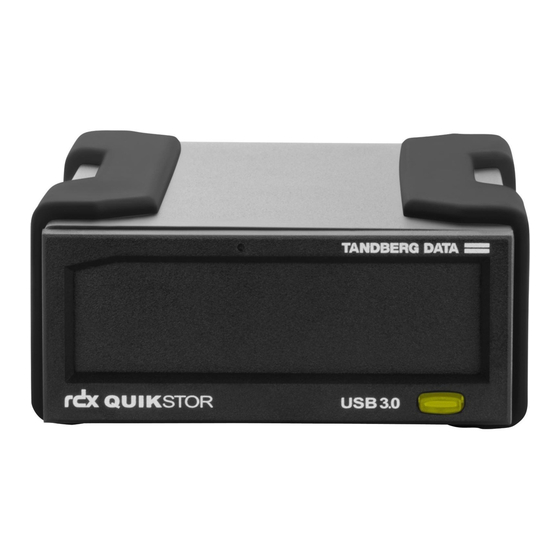
External USB
Internal SATA III + Drive Sled
Activity LED
External USB
Activity LED
NOTE: For a table of the LED statuses, see the
other side of this Quick Start Guide.
10401102-001
Internal SATA
Emergency Eject Hole
Go to
Manager software and release notes for your product. Run the installer,
following the instructions provided.
Internal Drive
With the server powered off, open
the server cover and slide the RDX
Eject Button/Power LED
device into an empty bay. Use the
supplied screws to secure it.
Connect the data cable to the
motherboard or controller card.
Connect both the data and power
cables to the rear of the RDX
Emergency Eject Hole
device. They are keyed for proper
connection.
Reinstall the cover and turn the server back on.
Note the following:
Eject Button/Power LED
• SATA interface - SATA controller driver and BIOS support for AHCI is
required, please verify and enable AHCI before you install the
operating system on your computer device
• USB interface - If you encounter connectivity problems, please order
the appropriate accessory cable. Visit the Tandberg website for the
currently available cables
RDX Media Eject Pin
USB Type-C Adapter
Primary Plug
USB Y-Cable (Ext.)
USB Cable (Int.)
Install RDX Manager
https://ftp1.overlandtandberg.com/rdx
and download the RDX
Install and Connect Cables
USB
SATA
Mounting Screws (Int.)
Power Adapter
(USB Int.)
SATA Cable (Int.)
Power Adapter
(SATA Int.)
External Drive
Connect the primary plug of
the Y-cable to a USB 3.0 port
for maximum transfer rate.
The RDX USB3+ drive is
powered by the USB cable.
If needed, connect the
secondary Y-cable USB plug
to a different port on the
same system (not a power
adapter or different system).
Power Socket
It is important to note that
(for optional Power)
the second plug of the Y-
cable (for power) must be
connected to an USB port on
the same host (not a power adapter or different system).
Typical adapter specs are 5 VDC/2.4 A 5.5mm jack, or 12 VDC/1.0 A
5.5mm jack.
Update RDX Firmware
Go to
https://ftp1.overlandtandberg.com/rdx
RDX Manager Status tab to find your current Firmware Rev under Drive
Data. If a newer version is available, download and install it.
Loading Cartridges
Align cartridge with keyed corner along the top
left side matching the RDX slot.
Keyed Corner Edge
RDX Cartridge
(with selected products)
USB Port
and click Firmware. Check the
©2022 Overland-Tandberg
Advertisement
Table of Contents

Related Manuals for Overland Tandberg RDX QuikStor


Summary of Contents for Overland Tandberg RDX QuikStor
- Page 1 For External USB and Internal USB/SATA III Devices RDX Media Eject Pin USB Type-C Adapter Mounting Screws (Int.) Power Adapter Internal SATA (USB Int.) RDX Cartridge (with selected products) Primary Plug USB Y-Cable (Ext.) USB Cable (Int.) SATA Cable (Int.) Power Adapter External USB (SATA Int.)
- Page 2 For External USB and Internal USB/SATA III Devices LED State Media LED Drive LED Host Color Activity Status Description Status Description Activity NOT READY Media is not inserted properly or is powered down POWER Drive does not have power through USB due to low power mode and host inactivity.
Need help?
Do you have a question about the RDX QuikStor and is the answer not in the manual?
Questions and answers