Advertisement
Quick Links
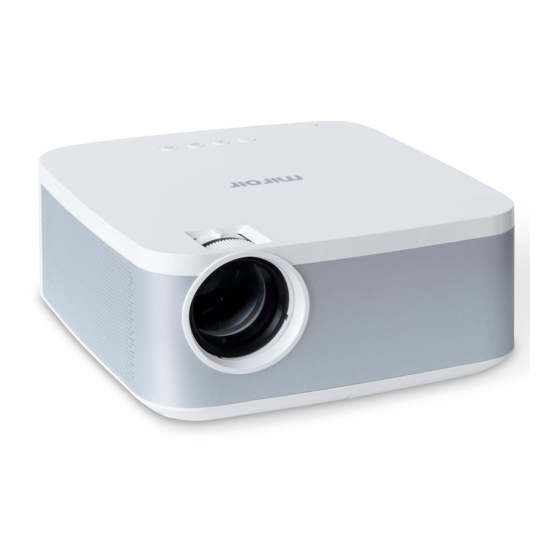
Your Miroir L500S Full HD 1080p Projector
F G
E
D
C
B
A
2
H
I
J
A
Audio Out (3.5mm) - (Optional) Connect an external
speaker or headphones.
B
USB Power and Media Reader Jack – Connect a USB
Power cable to provide power to an HDMI streaming stick.
Plug a USB stick into the port and play movies, or share
pictures.
C
HDMI Video Input - Connect an HDMI cable to a device
that supports HDMI video output.
D
Power Port - Connect included AC Adapter for power. DC
In - 19VDC@3.7A
E
Volume Up and Down - Increase/decrease the volume
output of the projector.
F
HDMI Control - Switch between HDMI-1 and HDMI-2.
G
Power Button - Turn the projector on/off
H
Focus Controls - Turn wheels to adjust focus and keystone.
I
Cooling Vent - IMPORTANT: Do not cover or block airflow
to the vent.
J
Rubber Foot Pads - Provides stability and proper airflow
to cooling vents.
3
Advertisement

Related Manuals for Miroir L500S


Summary of Contents for Miroir L500S
- Page 1 Your Miroir L500S Full HD 1080p Projector Audio Out (3.5mm) - (Optional) Connect an external speaker or headphones. USB Power and Media Reader Jack – Connect a USB Power cable to provide power to an HDMI streaming stick. Plug a USB stick into the port and play movies, or share pictures.
- Page 2 Remote Control Connecting Your Projector with a Cable Connect To Your Laptop HDMI Connect To Your Device A Power B Return C Setting HDMI Cable (Included) D Volume HDMI Adapter HDMI Cable may be required (Included) for your device. (not included) E Search F Direction Connect To Your MacBook USB-C...
- Page 3 Connecting Your Projector Wirelessly WIFI The image is blurry • Connect the L500S to your WIFI network. Open Settings, and select WIFI and • Adjust the projected image’s focus by rolling the focus wheel forwards or backwards. follow the instructions.
- Page 4 Warning: Changes or modifications to this unit not expressly —Connect the equipment into an outlet on a circuit different from approved by the party responsible for compliance could void the that to which the receiver is connected. user’s authority to operate the equipment. —Consult the dealer or an experienced radio/TV technician for help.
Need help?
Do you have a question about the L500S and is the answer not in the manual?
Questions and answers