ROOTECH Accura 2350-DO User Manual
Distribution panel digital power meter/do module
Hide thumbs
Also See for Accura 2350-DO:
- User manual (252 pages) ,
- User manual (222 pages) ,
- User manual (152 pages)
Table of Contents
Advertisement
Quick Links
Advertisement
Table of Contents

Related Manuals for ROOTECH Accura 2350-DO


Summary of Contents for ROOTECH Accura 2350-DO
- Page 2 Always power the device with the correct rated voltage. ◼ Install the device in a suitable electrical cabinet by following recommended installation instructions. Failure ◼ to take these precautions could cause serious injuries or death. Page 2 ⓒ 2018 Rootech Inc. All Rights Reserved...
- Page 3 ◼ About the Manual Rootech, Inc. reserves the right to make changes in the product specifications shown in this User Guide without Rootech, Inc. reserves the right to make changes in the product specifications shown in this User Guide without prior notice. We recommend that customers should obtain the latest information on product specifications and the manual before making orders.
- Page 4 Rootech will decide at its discretion whether to repair or replace it or give a refund for the product for when the warranty period for the product expired or issues related to the product are not applicable for warranty terms and conditions.
- Page 5 The original purchaser should recognize that such defects and failures may cause inaccuracies or malfunctions. No agency, corporate entity, or employee of Rootech or other companies has authority to amend, modify or extend the terms and conditions of this warranty in any way without express written authorization from Rootech, Inc.
- Page 6 Revision History Accura 2350-DO User Guide Revision History The following versions of 「Accura 2350-DO User Guide」 have been released. Revision Date Description 1.00 May 16, 2014 Initial release 1.02 June 17, 2014 Changed the external power supply value from 5 V to 24 V 1.03...
-
Page 7: Table Of Contents
Dimensions ........................................9 Installation..........................................11 Panel Mounting ......................................11 DIN-Rail Mounting ....................................11 Wiring ..........................................12 Chapter 2 Accura 2350-DO Operation/Setup ........................ 13 Power Supply ......................................... 13 Functions ..........................................14 Button Operation ........................................ 16 LCD Screen ..........................................17 Display Mode ......................................17 Setup Mode ......................................... - Page 8 Figures Accura 2350-DO User Guide Figures Fig 1.1 Accura 2350-DO Components .............................. 9 Fig 1.2 Accura 2350-DO Front ................................9 Fig 1.3 Accura 2350-DO Rear ................................9 Fig 1.4 Accura 2350-DO Side................................10 Fig 1.5 Panel Mounting ..................................11 Fig 1.6 DIN-Rail Mounting ................................... 11 Fig 1.7 Connection to Power Supply and DOs and Connection via Cable ..............
-
Page 9: Chapter 1 Installation And Wiring
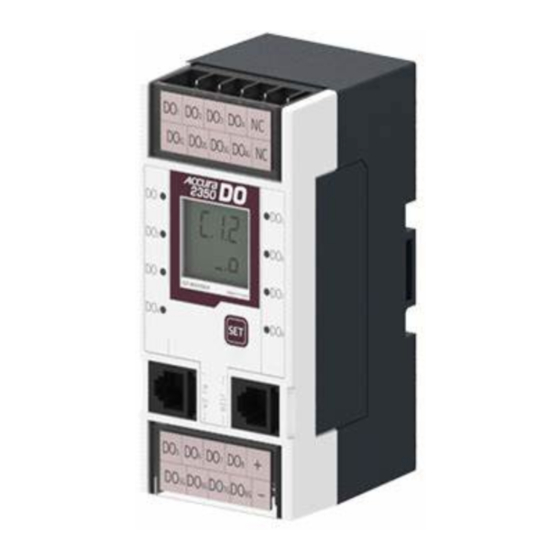
Chapter 1 Installation and Wiring Before Installation Components Fig 1.1 Accura 2350-DO Components Accura 2350-DO Mounting wings L/S Two screws RJ12 6C communication line Dimensions Fig 1.2 Accura 2350-DO Front Fig 1.3 Accura 2350-DO Rear ⓒ 2018 Rootech Inc. All Rights Reserved... -
Page 10: Fig 1.4 Accura 2350-Do Side
Chapter 1 Installation and Wiring Accura 2350-DO User Guide Fig 1.4 Accura 2350-DO Side Page 10 ⓒ 2018 Rootech Inc. All Rights Reserved... -
Page 11: Installation
Accura 2350-DO User Guide Chapter 1 Installation and Wiring Installation Panel Mounting Fig 1.5 Panel Mounting DIN-Rail Mounting Fig 1.6 DIN-Rail Mounting ⓒ 2018 Rootech Inc. All Rights Reserved... -
Page 12: Wiring
Accura 2350-DO User Guide Wiring ① Connect the external power to Accura 2350-DO module. Connections to the external power supply should be made according to the positive/negative polarity of ports. The device can also operate with the internal power supplied via the RJ12 6C communication line when it is not connected to the external power supply. -
Page 13: Chapter 2 Accura 2350-Do Operation/Setup
RJ12 6C communication line. 2. When the external power supply is not connected to the Accura 2350-DO module, make sure to check if the power supply voltage operates properly considering a voltage drop may occur when the maximum current flows through the RJ12 6C communication line. -
Page 14: Functions
Pulses can be output according to the measured energy value. It is unavailable because the command(Logic 1) is automatically cleared after pulse generation. 1.Pulse period and pulse on-time can be set via communication. Page 14 ⓒ 2018 Rootech Inc. All Rights Reserved... -
Page 15: Fig 2.2 Dc Relay Application
Accura 2350-DO User Guide Chapter 2 Accura 2350-DO Operation/Setup Logic values for commands appear on the LCD screen on Accura 2350-DO module as follows. Command Value for Polarity Contact Status 0 [Normal] 1 [numeric value] Closed 0 [numeric value] Open... -
Page 16: Button Operation
Chapter 2 Accura 2350-DO Operation/Setup Accura 2350-DO User Guide Button Operation The SET button on the Accura 2350-DO module is used to perform the following functions. Display mode Displays the module ID and the status of the DO contact Setup mode... -
Page 17: Lcd Screen
LCD Screen Display Mode The LCD screen displays the ID of Accura 2350-DO module and the status of the DO contact. Screens appear in sequence as shown below. Short press the SET button on the display mode to move to the setup mode. -
Page 18: Setup Mode
Outputs the command to open the contact Channel control commands can be issued via Modbus communication. Refer to 「Accura 2300[S]/2350 Communication User Guide」 for details on controls via communication. Page 18 ⓒ 2018 Rootech Inc. All Rights Reserved... -
Page 19: Communication Setup
Description Number 1261 Module ID for Uint16 Designates the ID of Accura 2350-DO module for which extended device device setup is performed setup For the module ID assigned to this register, extended setup for registers 3801 and 3802-4000 is performed. - Page 20 Setup is performed in the same way Channel 1 is set up. Refer to registers 3803-3806. 3987- Channel 8 Setup is performed in the same way Channel 1 is set up. Refer to registers 3803-3806. Page 20 ⓒ 2018 Rootech Inc. All Rights Reserved...
-
Page 21: Led Status Indicators
LED turned on : Closed contact LED turned off : Open contact O5-O8 Displays the contact status of DO5 / DO6 / DO7 / DO8 LED turned on: Closed contact LED turned off: Open contact ⓒ 2018 Rootech Inc. All Rights Reserved... -
Page 22: Chapter 3 Accura 2300[S] Operation/Setup
Fig 3.1 Display Screen of the DO Module showing the Status of Channels 1,2,3,4 / 5,6,7,8 Setup for Accura 2350-DO module can be performed via Modbus communication. It is impossible to set up Accura 2350-DO module with the buttons on Accura 2300[S]. Refer to 「Accura 2300[S]/2350 Communication User Guide」... -
Page 23: Full-Screen Display Mode Of Accura 2300[S]
Accura 2350-DO User Guide Chapter 3 Accura 2300[S] Operation/Setup Full-screen Display Mode of Accura 2300[S] It displays the measurement data of Accura 2300[S] and the selected Accura 2350 module. ⓒ 2018 Rootech Inc. All Rights Reserved... -
Page 24: Appendix A Specifications
Pulses can be output according to the measured energy value. It is unavailable because the command(Logic 1) is automatically cleared after pulse generation. 1. Pulse period and pulse on-time can be set via communication. Page 24 ⓒ 2018 Rootech Inc. All Rights Reserved... - Page 25 RJ12 6C communication line. 2. When the external power supply is not connected to the Accura 2350-DO module, make sure to check if the power supply voltage operates properly considering a voltage drop may occur when the maximum current flows through the RJ12 6C communication line.
-
Page 26: Appendix B Ordering Information
Appendix B Ordering Information Accura 2350-DO User Guide Appendix B Ordering Information Module Name Accura 2350 - DO Page 26 ⓒ 2018 Rootech Inc. All Rights Reserved... - Page 28 Accura 2300/2350, Accura 2300S/2350, Accura 2700/2750, Accura 3000, Accura 3300E, Accura 3300S/3300, Accura 3500S/3500, Accura 3550S/3550, Accura 3700, Accura 5500, and Accura 7500 are trademarks of Rootech Inc. Contact us for detailed product specifications and ordering information. Information contained herein is subject to change without...
Need help?
Do you have a question about the Accura 2350-DO and is the answer not in the manual?
Questions and answers