Table of Contents
Advertisement
IMPORTANT INFORMATION: File in your maintenance records
Consolidated
Operating
Room
Equipment
Powered Instrument Driver
REF 5400-50
Instructions For Use
••••••••••••••••••••••
Instruments Division
4100 E. Milham
Kalamazoo, Michigan
(USA) 49001
1-269-323-7700
1-800-253-3210
US Patents: 6,017,354; 5,689,159; 5,543,695; 6,329,778;
6,045,564; 6,752,816 and other patents pending.
5400-050-799 Rev-
Software Version
6.x
5/05
Advertisement
Table of Contents

Related Manuals for Stryker Core 5400-50


Summary of Contents for Stryker Core 5400-50
- Page 1 IMPORTANT INFORMATION: File in your maintenance records Consolidated Operating Room Equipment Powered Instrument Driver REF 5400-50 Instructions For Use •••••••••••••••••••••• US Patents: 6,017,354; 5,689,159; 5,543,695; 6,329,778; 6,045,564; 6,752,816 and other patents pending. Software Version Instruments Division 4100 E. Milham Kalamazoo, Michigan (USA) 49001 1-269-323-7700 5400-050-799 Rev-...
-
Page 2: Table Of Contents
Table of Contents List of Illustrations ............................4 Compliance Statements ............................. 5 Software License Notice ............................. 5 Limited Warranty ............................5 Important Information ............................6 Indications For Use ............................6 Contraindications ............................6 User/Patient Safety ............................7 System Overview ............................8 Hardware Features and Functions ........................ -
Page 3: List Of Illustrations
List of Illustrations Figure 1. System Block Diagram ........................8 Figure 2. Console Hardware Features and Functions ..................9 Figure 3. Console Interconnect Diagram ......................10 Figure 4. Power Up Screen ..........................15 Figure 5. Plug In Handpiece Cable Screen ...................... 15 Figure 6. -
Page 4: Compliance Statements
Limited Warranty In the USA only, products of Stryker Instruments are warranted to the original purchaser for a period of one year from the date of purchase, with exceptions noted below. Products are warranted to be free from defects in material and workmanship. Abnormal wear and tear or damage caused by misuse or by failure to perform normal and routine maintenance as set out in the Maintenance Manual or Operating Instructions, or as demonstrated by an authorized Stryker Instruments representative, is not covered by the warranty. -
Page 5: Important Information
Indications For Use The Stryker Consolidated Operating Room Equipment (CORE) System is intended for use in the cutting, drilling, reaming, decorticating, and smoothing of teeth, bone, bone cement, and other bone-related tissue in a variety of surgical procedures, including but not limited to Neuro, ENT (Ear, Nose, and Throat), Dental and Endoscopic. -
Page 6: User/Patient Safety
Allow the handpiece to cool before restarting. • Use personal protection equipment. Failure to comply may result in operating room staff injury. *For further information, contact your Stryker Instruments sales representative or Customer Service at 1-800-253-3210. Outside the USA, contact your nearest Stryker subsidiary. -
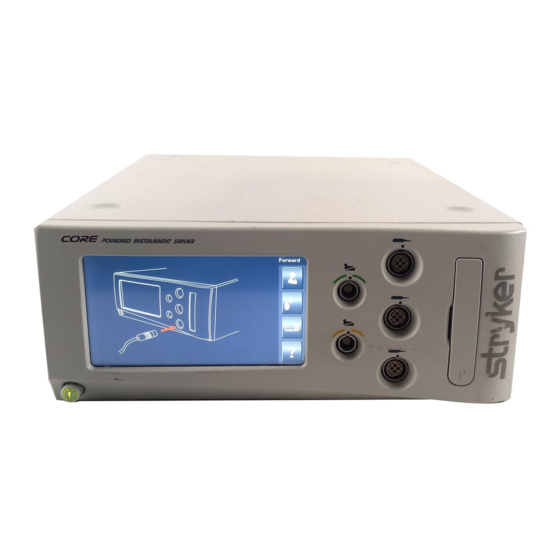
Page 7: System Overview
The console accepts either 115 VAC or 230 VAC input and has the capability to power heavy-duty handpieces. The Stryker Firewire Backbone (SFB) serial connection provides a serial communications channel between the console and other devices. This feature allows software upgrades over a computer network. -
Page 8: Hardware Features And Functions
Footswitch ....................................5100-008-000 Irrigation Pole ..................................... 5100-050-028 Disposable Irrigation Cassette ..............................5400-050-001 Dual Disposable Irrigation Cassette ............................5400-050-002 *Contact your Stryker sales representative or Customer Service at 1-800-253-3210 for a complete list of accessories. Outside the USA, contact your nearest Stryker subsidiary. -
Page 9: Operating Instructions
Operating Instructions To Connect the Components: The console interconnect diagram provides the connection sequence of system components. The numbered call outs correspond to the numbered instructions on the next page. See the instructions for use supplied with each component for specific connection information. - Page 10 Plug the other end of the handpiece cord(s) into the handpiece(s). See instructions for use supplied with each handpiece for connection information. WARNING: Use only Stryker approved cutting accessories. Attach the cutting accessory to the handpieces. See the instructions for use supplied with each handpiece or attachment for cutting accessory installation information.
-
Page 11: Button Definitions
Button Definitions: The button definitions section provides a complete list of the buttons as they appear on screens within the software interface. Button Name Button Name Definitions Definitions HOME Access the HOME screen OSCILLATE Set default mode of to view and adjust handpiece to OSCillate handpieces and system settings... - Page 12 Button Definitions: (cont'd) Button Name Name Button Definitions Definitions Select specific handpiece SAVE Save current console HANDPIECE options and assign them to CURRENT settings to the selected file OPTIONS a particular handpiece SETTINGS in the user preference button favorites list ADJUST Adjust console options in MANAGE...
- Page 13 Button Definitions: (cont'd) Button Name Name Button Definitions Definitions SELECT Select specific network SET HOUR Set console hour NETWORK connections CONNECTIONS SET MINUTE Set console minutes Min. Set console time and date CONSOLE [not available at this time] TIME SET MODE Set AM, PM or 24 hour Mode format...
-
Page 14: To Power Up
To Power Up: This screen is momentarily displayed while the console powers up. Note the software version is displayed in the lower right corner of the screen. owered Instrument Driver XXXX-XXX-XXX X.X_build_X Figure 4. Power Up Screen If no handpieces or cords are connected to the console during initial power up, the following screen will appear: Figure 5. -
Page 15: Software Menu Navigation
Software Menu Navigation The software menu map is a visual representation of how the software is structured and is designed to facilitate navigation. The map also provides the sequence of screen information provided in this manual, top down and left to right. The icons used in this map are button icons used in the software and also reside near header information in this manual. -
Page 16: To Select Settings
To Select Settings: The HOME screen is where most user interaction will take place. Up to three handpieces may be displayed on the screen simultaneously. When the console is initially turned on, the console settings are factory default settings until a user preference file is selected or the settings are manually modified. -
Page 17: To Adjust Handpiece Speed (Or Power)
To Adjust Handpiece Speed (or Power): From the HOME screen, touch the plus and minus buttons to adjust the handpiece speed or power set point in RPMs or percentage of power. NOTE: When you install a cutting accessory with cutter recognition capability or select an attachment, the system will automatically override the selected speed setting in each mode to the speed settings that are appropriate for the installed cutting accessory. -
Page 18: To Adjust Options
To Adjust Options: From the HOME screen, touch the Adjust Options button to adjust the handpiece options (buttons and trigger, such as handswitch). The available handpiece options will depend on the type of handpiece that is identified at the top of the screen. -
Page 19: To Program Footswitch Options
To Program Footswitch Options: From the Adjust Options screen, touch the Program Footswitch button to program the footswitch pedals and pads based on the capabilities of the connected handpiece. Two footswitches may be connected to and simultaneously operated from the same console. However, two footswitches cannot be used to control the same handpiece at the same time. View Handpiece Port Indicates the assigned handpiece port for which the footswitch is programmed. - Page 20 To Program Footswitch Options: WARNING: Read and understand the appropriate Stryker handpiece instructions for use. NOTE: The following is a generic list of footswitch pedal and pad options that are available if the connected handpiece supports the option: Footswitch Pedals [A and B] Options:...
-
Page 21: Figure 12. Assign Footswitch Screen - Automatic
To Program Footswitch Options: (cont'd) WARNING: When a footswitch is connected or disconnected from the console, the handpiece to footswitch assignment will change. Verify the handpiece to footswitch assignment is correct before using a handpiece in a procedure. Failure to comply may result in patient and/or operating room staff injury. -
Page 22: To Set Handpiece Options
To Set Handpiece Options: WARNING: Read and understand the appropriate Stryker handpiece instructions for use. From the Adjust Options screen, touch the Set Handpiece Options button to select specific handpiece options and assign them to a particular handpiece button. Options are handpiece dependent and may not be available if the handpiece does not support them. -
Page 23: To Select A User Preference Favorite
To Select a User Preference Favorite: From the HOME screen, touch the Select a User Preference Favorite button to select a favorite user preference file or replace an existing one. Five favorite files are available. Each file contains specific handpiece(s) settings for a particular procedure. -
Page 24: Figure 17. Select User Preference Favorite - Folder
To Replace a User Preference Favorite (cont'd) Touch to select Touch arrow buttons the desired to scroll through and folder. view the available folders. Select a Select a user preference favorite folder and touch the Open Folder button to access the files. Main Dr.Smith Dr.Jones... -
Page 25: To Adjust Irrigation Pump Settings
To Adjust Irrigation Pump Settings: NOTE: If using the irrigation pump, assemble the irrigation pole to the mounting bracket located on the back of the console. Hang the irrigation bag from the pole. Install the irrigation cassette into the console pump. Attach the irrigation clips onto the handpiece and connect the tubing. -
Page 26: To Access Advance User Mode
To Adjust the Console Options: - Standard and Advance User Mode To Access Advance User Mode From the Adjust Console Options screen, touch the ADV button to gain access to the ADVance User Mode and the User Preference file management system. An Access Advance User Mode pop-up will appear to confirm your request. Once confirmed, the Manage User Preference button will become active. -
Page 27: To Select Console Language Preference - Advance User Mode Only
To Adjust the Console Options: - Advance User Mode To Select Console Language Preference - Advance User Mode Only Adjust console options Touch the button to select the console Touch the language preference. button to English Deutsch Français select the appropriate console language. -
Page 28: To Select Network Connections - Advance User Mode Only
To Adjust the Console Options: - Advance User Mode To Select Network Connections - Advance User Mode Only Touch the button to Select network connections toggle network control ON and OFF. Network Control Touch the button iSWITCH to assign a wireless device to a specific footswitch port. -
Page 29: To Manage User Preference Folders: - Advance User Mode Only
To Manage User Preference Folders: - Advance User Mode Only NOTE: You must be in the Advance User Mode to manage user preferences. See To Adjust Console Options section for details. From the Adjust Console Options screen, touch the Manage User Preferences button to create and modify user preference folders and files. -
Page 30: To Create A New Folder Or File
To Manage User Preference Folders and Files: - Advance User Mode Only To Create a New Folder or File From the Manage User Preferences screen (folder or file screen), touch the Create New Folder or File button to create a new preference folder or file using a keyboard screen. Enter user preference folder Enter a Folder or File XYZ!@#... -
Page 31: To Modify A File
To Manage User Preference Folders and Files: - Advance User Mode Only To Modify a File View and Edit Settings Touch the ADD Handpiece button to add a handpiece to the file. Once handpieces are added to a file, touch the arrow buttons to scroll through and highlight a handpiece. Touch the magnifying glass button to create or edit handpiece settings. -
Page 32: To View Settings
To Manage User Preference Folders and Files: - Advance User Mode Only To View Settings From the Modify File screen, touch the View (magnifying glass) button to view the preference settings of a selected handpiece within a user preference file. Edit - HUMMER 4 Set Speed High... -
Page 33: To Access System Information
To Access System Information: From the Adjust Console Options screen, touch the i About button to obtain specific hardware and software information. Relevant information includes reference part numbers and current revision levels. Information Hardware: Handpiece 1: HW Id CORE HIGH TORQUE Rev x.x 5400-110-000 Rev x Software:... -
Page 34: Troubleshooting Guidelines
*The console is not field repairable. In case of operating difficulties, return this product to Stryker Instruments for repair. For more information, contact your Stryker sales representative or Customer Service at 1-800-253-3210. Periodic Maintenance... -
Page 35: Messages
Are you sure you want to delete this file? QUESTION Are you sure you want to delete this folder and all its contents? QUESTION * For more information, contact your Stryker sales representative or Customer Service at 1-800-253-3210. Outside the USA, contact your nearest Stryker subsidiary. -
Page 36: Specifications
Specifications* Model: REF 5400-50 CORE Powered Instrument Driver (console) Size: 12.5 in. [317.5 mm] width in. [127 mm] height in. [431.8 mm] depth Weight: 20 lbs. [ 9.1 kg] Equipment Type: Class I, Type BF Applied Part Power Supply: Input voltage: 100-120 V ~, 50-60 Hz, 6.0 A 230 V ~, 50 Hz, 3.0 A Enclosure Protection: IPXO Ordinary Equipment... - Page 37 4100 E. Milham Kalamazoo, Michigan (USA) 49001 1-269-323-7700 1-800-253-3210...
Need help?
Do you have a question about the Core 5400-50 and is the answer not in the manual?
Questions and answers