Table of Contents
Advertisement
Quick Links
Advertisement
Table of Contents

Subscribe to Our Youtube Channel
Related Manuals for Ridder HortiJetPro


Summary of Contents for Ridder HortiJetPro
- Page 1 SV 6.3 26/02/2020 96000016 Installation and User Manual HortiJet Pro...
- Page 2 Every effort has been made to ensure the accuracy of the contents of this manual. Nevertheless, Ridder Growing Solutions B.V. assumes no responsibility for any errors in this manual or their possible consequences. Ridder Growing Solutions B.V. is naturally very interested in your comments and additions.
-
Page 3: Table Of Contents
Contents 1 Introduction 1.1 Introduction 1.2 Aims 1.3 Target groups 1.4 Symbols and annotations 1.5 Documentation included 1.6 Disclaimer 2 Product information 2.1 Principles of operation 2.2 Process description 2.3 Product specifications 2.3.1 Basic configuration 2.3.2 Dosing channels 2.3.3 Pumps 2.3.4 Sensors 2.3.5 I/O modules 2.4 Control... - Page 4 5.2.1 Creating the configuration 5.2.2 Checking the configuration 5.2.3 Upload configuration 5.3 Software settings 5.3.1 Setting up fertigation 5.4 Calibrating the sensors 5.5 Pressurizing the HortiJet 5.5.1 Pressure control valves 5.5.2 Step-by-step instructions for pressurizing the HortiJet 5.5.3 Pump precautions 5.6 Using the dosing channels for the first time 5.6.1 Even fertiliser dosing 5.7 Testing the HortiJet...
-
Page 5: Introduction
Water Treatment Process Automation Management Systems The Ridder HortiJet is part of our range of water treatment products and is available in two models: HortiJet Pro; HortiJet-Go! The difference between these models is in how they are controlled. The HortiJet Pro offers more advanced options. -
Page 6: Target Groups
‘dealer’ to mean both the dealer and the installer. The users are growers of land-based crops, worldwide. Ridder Growing Solutions advises both target groups to familiarize themselves with the content of the entire manual, bearing in mind that: sections 4 and 5 have been written specifically for the dealers;... - Page 7 HortiJet Pro Pictogram Name Safety goggles Safety boots 1.4.3 Abbreviations This manual uses the following abbreviations: Symbol Name % (m/m) mass percentage °C degrees Celsius °F degrees Fahrenheit w x d x h width x height x depth centimetre Electrical Conductivity Hertz kilograms L (or l)
-
Page 8: Documentation Included
For other conditions of use, please refer to our General Conditions of Sale. Your warranty will be void if you fail to observe the instructions provided by Ridder Growing Solutions. This manual describes the HortiJet Pro. Certain details of the HortiJet Pro that you will be installing may vary from the situation shown. -
Page 9: Product Information
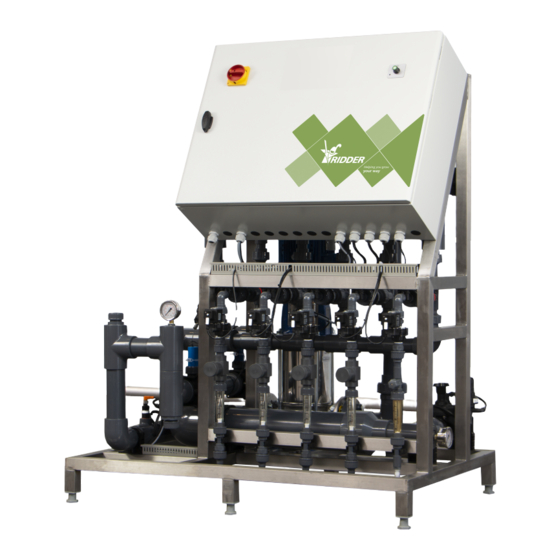
HortiJet Pro Product information This section describes the components and the functioning of the HortiJet Pro. Principles of operation Figure 2-1: Diagram showing the basic operation of the HortiJet Pro. No. Name No. Name Fresh water tank Venturi EC sensor supply (optional) Dosing channel Main irrigation pump Fertilizer tanks / acid tank... -
Page 10: Process Description
HortiJet Pro Process description The HortiJet works as follows: Fresh water is supplied. On the main pipe, there is: an main irrigation pump which supplies water, a filter for the filtration of the water, a pressure gauge (both before and after the filter), a PSV to maintain the pressure at a constant level. -
Page 11: Product Specifications
HortiJet Pro The entire process is regulated by the HortiMaX CX500 process controller. Its tasks include: ensuring that the correct fertigation recipe is mixed (proportion of fertilizers and water). controlling the valves to ensure that the water reaches the crop. Product specifications The HortiJet Pro is available in various configurations, because different dosing channels, pumps, sensors and I/O modules can be added to the HortiJet Pro. -
Page 12: Dosing Channels
HortiJet Pro No. Name No. Name HortiJet pump Pressure gauge for the PRV in the compensation channel HortiJet inlet Power switch EC verification sensor (Panel) cabinet 2.3.2 Dosing channels This section describes the components of a dosing channel. Figure 2-3: Side view of dosing channel No. -
Page 13: Pumps
HortiJet Pro Dosing channel Dosing channel Nitric acid In HortiJet capacity* type** resistance type*** 100 L/h acid max. 5% (m/m) HortiJet Pro 1000 & 600 * You can calculate the required fertilizer dosing capacity by multiplying the maximum required irrigation water (main pipe capacity) by the maximum required fertilizer dosing ratio. -
Page 14: I/O Modules
HortiJet Pro No. Name No. Name EC control sensor EC verification sensor Depending on the configuration, the following sensors can be added: EC sensor: the EC sensor measures the concentration of fertilizers in the water. pH sensor: the pH sensor measures the acidity level of the water. You can have zero, one or two sensors of both types. -
Page 15: Control
HortiJet Pro For more information, please consult the "CompactiMa Modules Insert". Control The HortiJet Pro is controlled by a HortiMaX CX500 process controller. The HortiMaX CX500 software runs on the IPC that is located inside the main panel of the hardware cabinet. -
Page 16: Other Product Characteristics
Your HortiJet Pro comes with various inspection plates. You will find these on the inside of the cabinet. All plates include the following information: Company name, address and logo of Ridder Growing Solutions. Product name and type. CE marking and disposal logo. -
Page 17: Quality Control
HortiJet Pro Drawing plate Figure 2-7: Example drawing plate The drawing plate states: Drawing number Product plate Figure 2-8: Example product plate The product plate states: Production number 2.5.2 Quality control Every HortiJet Pro is checked and tested for correct operation before shipment. The corresponding certificate can be found in the documentation included with the unit. -
Page 18: Guidelines And Standards
HortiJet Pro Please contact Ridder Growing Solutions if this label is missing. 2.5.3 Guidelines and standards The HortiJet conforms to the essential requirements of the guidelines mentioned below, and their adaptation guidelines. Guidelines: EMC Directive 2014/30/EU Low Voltage Directive 2014/35/EU... -
Page 19: Recycling And Disposal
HortiJet Pro 2.6.3 Storage Store the product and the separate components in a dry and dust-free environment. Do not expose products to direct sunlight. Keep the various components in their original packaging for as long as possible. Section "Installation requirements" on page 22 provides a complete overview of the requirements for installing the HortiJet Pro. -
Page 20: Safety
HortiJet Pro Safety This section describes the safety requirements and precautions to be taken. When installing, using and removing the HortiJet Pro, you must comply with the safety requirements and instructions, and take the correct safety measures. Before installation and use: read and make sure you have understood this manual and the accompanying documents, so that you are aware of the operating and safety instructions. -
Page 21: Personal Protective Equipment
HortiJet Pro Please exercise caution when working with acid. If you want to use a supply pipe for a different chemical substance, make sure to check the following: Clean the supply channel before use if there is any risk that the original substance and replacement substance will react with one another. -
Page 22: Installation
The installation of the HortiJet Pro and the other components, together with the installation and configuration of the software, must be carried out by a qualified dealer. Ridder Growing Solutions considers a dealer/installer to be qualified if that person meets the following requirements:... -
Page 23: Water Installation Requirements
HortiJet Pro Avoid exposure to direct sunlight (5). Avoid exposure to hazardous substances (6). Avoid exposure to unnecessary vibrations (7). Make sure that there is sufficient ventilation due to the possible accumulation of harmful vapours (8). Make sure that there is sufficient light to operate and maintain the unit. Make sure that there is sufficient space around the unit to operate and maintain To prevent damage during transport, certain components are: not fastened tightly. - Page 24 HortiJet Pro The following components are required to install the HortiJet Pro: No. Description Specifications Remarks or description Filtration of Up to 500 supply water. microns. Pressure gauge The pressure gauge is necessary to in main pipe determine the choice of pump and to (after filter).
-
Page 25: Electrical Installation Requirements
HortiJet Pro 4.1.4 Electrical installation requirements The requirements are: Ensure that there is a stable power source. Ensure that there are sufficient extra plug sockets near the unit to operate, maintain and install it. Ensure that the equipment and the electricity network is grounded (earthed). Step-by-step installation and commissioning instructions The overview below provides a step-by-step plan. -
Page 26: Connecting Water Supply (Hydronic Installation)
HortiJet Pro Step Section to see for this Pressurize the HortiJet "Pressurizing the HortiJet" on page 37. Open the manual valves on the inlet and outlet for the HortiJet Pro. Open the shut-off valves for the PRV1 and the PSV. Adjust the valves. Using the dosing channels for the first time "Using the dosing channels for the first time"... -
Page 27: Connecting Electrical Components
To connect the electrical components, complete the following steps: 1. Make sure that the supply voltage corresponds to the design specifications of the HortiJet Pro. If this is not the case, please contact Ridder Growing Solutions. 2. Make sure that the power switch is set to 0 (off). -
Page 28: Installing Other Components
HortiJet Pro Installing other components During the initial installation and commissioning of the HortiJet Pro, the components listed below will usually already be connected. However, it is also possible to add and connect these components to the HortiJet later. Before connecting components such as a dosing channel or sensor, check that the HortiJet is switched off and that the manual valves on the inlet and outlet to the HortiJet are closed. -
Page 29: Connecting The Ph Sensor
HortiJet Pro 4.5.3 Connecting the pH sensor Zero, one or two pH sensors can be connected to the HortiJet Pro. If two sensors are connected, the first sensor in the direction of water flow is the control sensor, and the second sensor is the verification sensor (also see section "Sensors"... -
Page 30: Commissioning
Ridder Growing Solutions advises you to use the latest version of the software. You can download the latest version from our online portal. You can find the latest version of the software on the Ridder Growing Solutions portal. To check whether you are using the latest version, complete the following steps: Open an internet browser. -
Page 31: Software Configuration
HortiJet Pro Click the Product info button. (You can find product info in the menu on the left.) Select the software (for example: HortiMaX CX500 or Synopta) until you reach the Product Gallery Page. Click the Versions tab. Here you can see the latest version of the software. - Page 32 HortiJet Pro Add the following components to the system: Standard irrigation unit. Add the following components to the irrigation unit: Draw group; Irrigation group; pH dosing group; EC dosing group; System pump (HortiJet pump); Irrigation valves. Add the following component to the draw group: Flow sensor.
- Page 33 HortiJet Pro Add the following component to the irrigation group: Irrigation group phase is active (control). Add the following component to the pH dosing group: pH tank. Two pH sensors (a control sensor and a verification sensor). Add the following component to the EC dosing group: EC tanks.
-
Page 34: Checking The Configuration
HortiJet Pro For the EC tanks, you need to specify the capacity of the venturis (dosing channels). Select the EC tank. Click the Start tab. Click the Settings button. Enter the capacity of the venturis. 5.2.2 Checking the configuration The configuration of the CX Assistant is saved as a file with the name: site file. This file is then uploaded to the HortiMaX CX500 on the IPC. - Page 35 If no CX500 is displayed, check the connection and try again. Click the desired IPC. Click the Yes button. Click the button Ridder Growing Solutions. Click the Open button. Select the configuration (or site file) you wish to upload.
-
Page 36: Software Settings
HortiJet Pro You need to complete the various fields shown on the Site Information screen. Some information, such as the reference ID, has been provided by Ridder Growing Solutions. The serial numbers are pre-entered unless you have replaced the IPC. -
Page 37: Setting Up Fertigation
HortiJet Pro Have you changed the configuration in the CX Assistant? Check the settings of the relevant controls in Synopta. 5.3.1 Setting up fertigation Use the following controls in Synopta to set up fertigation: Valve groups Valves Periods Fertigation recipes Irrigation Fertilizer dosing Acid dosing... - Page 38 HortiJet Pro Figure 5-1: Location of the PRVs and the PSV on the HortiJet Pro. Name Name Pressure gauge, PRV2. Pressure gauge, PRV1. PRV2. Pressure gauge, PSV. PRV1. PSV. Adjusting the valves The PRV1 and PSV consist of a valve with a plastic rotary knob and a navaton pilot that can be adjusted by using the metal bolt.
-
Page 39: Step-By-Step Instructions For Pressurizing The Hortijet
HortiJet Pro Name Shut-off valve. Navaton pilot valve. Plastic rotary knob to control shut-off valve. Metal bolt to operate the navaton pilot. The shut-off valve has a plastic knob that indicates which way you need to turn it to open the valve or close it. The navaton pilot valve is operated using the metal bolt. -
Page 40: Pump Precautions
Using the dosing channels for the first time Ridder Growing Solutions advises you to test the HortiJet first with water, before using fertilizers and/or acid. To prepare the dosing channels for use, complete the following steps: 1. -
Page 41: Even Fertiliser Dosing
HortiJet Pro 5.6.1 Even fertiliser dosing Due to differences in viscosity, some fertilizers may flow through the venturi faster than others. This can cause uneven dosing. This can be prevented by opening or closing the needle valves (loosen the knob on the front of the needle valve to access the adjuster screw). -
Page 42: User Interface
HortiJet Pro User interface As soon as the dealer has prepared the HortiJet Pro for use, you can operate the HortiJet Pro. This section first explains how to operate the power switch and the HortiJet pump. After that, you will find instructions on how to operate the HortiJet Pro using Synopta. Power switch The power switch is located on the cabinet of the HortiJet. -
Page 43: Operation Using Synopta (Quick Start)
HortiJet Pro HortiJet pump manual operation mode By switching the knob to ‘manual’, the HortiJet pump will begin to work. You can use this function to: test the pump operation; bleed the air from the pipes. HortiJet pump automatic mode The automatic mode means that the HortiJet Pro is in operation. -
Page 44: Valve Group
HortiJet Pro In order to find a control again easily in Synopta, the path to that control is as follows: Controls / Water / Substrate / Irrigation, EC and pH / Irrigation valve groups / Valve group. The third step in this path is always the irrigation method (underlined). For illustration purposes, this is shown here as ‘substrate’. -
Page 45: Fertigation Recipes
HortiJet Pro 6.3.4 Fertigation recipes Controls / Water / Substrate / Irrigation, EC and pH / Irrigation valve groups / Recipes. Under Recipes, you can specify what is dosed and how. Use Recipes to set the desired dosage of water, fertilizers and / or acid. See sections "Irrigation"... -
Page 46: Fertilizer Dosing
HortiJet Pro If you choose this option, enter the settings under: Controls / Water / Substrate / Irrigation, EC and pH / Irrigation valve groups / Irrigation valve. 6.3.6 Fertilizer dosing Controls / Water / Substrate / Irrigation, EC and pH / Irrigation valve groups / Recipes. -
Page 47: Start Conditions
HortiJet Pro Use the pH dosing tab to base the acid dosage on the pH setpoint. 6.3.8 Start conditions Controls / Water / Substrate / Starts. The start conditions for an irrigation cycle can be set for each valve group (and period). -
Page 48: Maintenance
HortiJet Pro Maintenance This section describes how the HortiJet Pro needs to be maintained on a periodic basis. Maintenance guidelines The following guidelines are important for maintaining the HortiJet Pro: Disconnect the mains supply from the HortiJet Pro before performing any maintenance. -
Page 49: Annual Maintenance
HortiJet Pro Annual maintenance The following inspection and maintenance tasks should be performed on the HortiJet Pro on a yearly basis: Update software. Clean, check and, if necessary, calibrate pH sensors. Clean, check and, if necessary, calibrate EC sensors. Check operation of the HortiJet Pro (see section "Testing the HortiJet" on page 41). -
Page 50: Appendices
HortiJet Pro Appendices Glossary CompactiMa module An I/O module that peripherals (inputs and outputs) can be connected to. Controls A collective term for the settings, measurements, alarms and readouts based on which the HortiJet is controlled. Dosing module The dosing module consists of one or more dosing channels for fertilizers (and/or acid). - Page 51 HortiJet Pro Micron One micron is one-millionth of a metre. Needle valves Valves that can shut off or regulate the flow of a liquid using a thin pin with a sharp tip. Pressure gauge (manometer) Measurement instrument used to gauge pressure. Pressure switch A switch that is activated by pressure.
-
Page 52: Checklist For Step-By-Step Installation Procedure
HortiJet Pro Checklist for step-by-step installation procedure The table below can be used as a checklist for the installation and commissioning procedure for the HortiJet Pro. The right column shows page references to the relevant sections. You can use the spaces in the left column to tick off each step as you complete it. This procedure assumes that: Synopta and the HortiMaX CX500 are installed. - Page 53 HortiJet Pro Section to see for Completed No. Step this Pressurize the HortiJet "Pressurizing the HortiJet" on page 37. Open the manual valves on the inlet and outlet for the HortiJet Pro. Open the shut-off valves for the PRV1 and the PSV. Adjust the valves.
Need help?
Do you have a question about the HortiJetPro and is the answer not in the manual?
Questions and answers