Table of Contents

Related Manuals for Columbus Instruments Tail-Flick Analgesia Meter


Summary of Contents for Columbus Instruments Tail-Flick Analgesia Meter
- Page 1 Service requests for this instrument can be made by phone, fax, e-mail or through our web site: www.colinst.com/service.htm Please include your S/N:_______________ Tail-Flick Analgesia Meter Instruction Manual Copyright 1993 0104 -301M...
-
Page 2: Table Of Contents
TABLE OF CONTENTS 1. SPECIFICATIONS 1.0 Basic Specifications 1.1 Physical Specifications 1.2 Input Specifications 1.21 Footswitch Input 1.3 Output Specifications 1.31 Printer Output 1.32 RS-232 Serial Output 1.4 Front Panel Controls 1.5 Rear Panel Connections 2. OPERATION 2.0 Introduction 2.1 System Installation 2.11 Interfacing to a Computer 2.2 First Time Operation 2.3 Setting the Printer Output... -
Page 3: Specifications
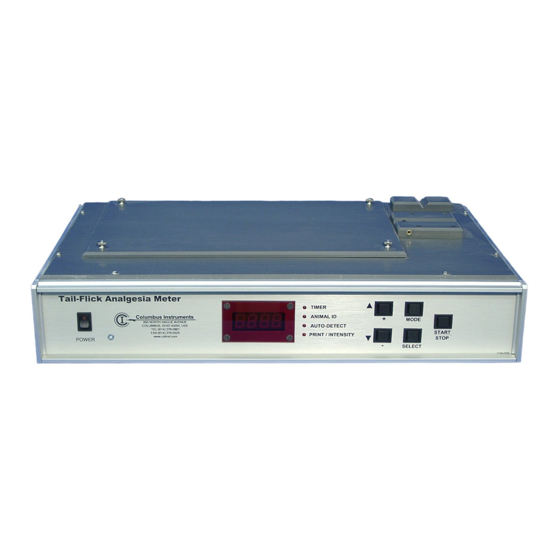
- SECTION 1 - SPECIFICATIONS... - Page 4 TAIL-FLICK ANALGESIA METER SPECIFICATIONS The larger (9” X 14”) adapter plate is used for testing mice and the smaller (1 ¼” X 3”) adapter block is used for testing rats. Rats and mice are the terms used for the animal reference, even though any similar sized animals may be used. The rat adapter block has a storage spot on the upper right corner of the unit.
-
Page 5: Basic Specifications
To test mice, replace the rat adapter block with the mouse adapter plate and store the rat adapter block in the provided space. When replacing the mouse adapter plate, line up the pins that are closest to the sensor block first. The mouse adapter plate should be centered with the sensor block, leaving ~ 3”... -
Page 6: Physical Specifications
1.1 PHYSICAL SPECIFICATIONS Power requirements: ~ 45 Watts Maximum 100-240 VAC 50-60Hz. Size: (48cm x 33cm x 9cm) 19" x 13" x 3.5" Weight: (~7.26kg) ~ 16lb Animal restrainers: Cylindrical, clear plastic x-small 15-30 grams – mice small 30-125 grams – mice medium 125-250 grams –... -
Page 7: Rs-232 Serial Output
1.32 RS-232 Serial Output The serial output jack is a 25 pin female D-sub connector on the rear panel next to the printer output. The serial output is a simple three-wire RS-232 interface with none of the handshake lines used. It is a standard "modem" connection with the output data on pin 3 and the input on pin 2. - Page 8 4. ANIMAL ID -- This displays the subject ID number. It will automatically increment by one for each timing cycle. 5. AUTO-DETECT -- Displays whether the automatic detection circuitry is activated. 6. PRINT / INTENSITY -- Displays whether the printer is on or off and the lamps intensity level.
-
Page 9: Rear Panel Connections
1.5 REAR PANEL CONNECTIONS AC power cord input jack -- plug the power cord in here. Fuse holder -- A 3-ampere medium delay fuse should be used.. Printer Connection -- A standard IBM printer cable should be connected between this output jack and the printer. (Refer to section 1.31) RS-232 Serial Port -- A 9 pin to 25 pin serial cable connects this output to the serial port of your computer. -
Page 10: Operation
- SECTION 2 - OPERATION... -
Page 11: Introduction
2.0 INTRODUCTION The Columbus Instruments Tail-Flick Analgesia Meter is designed for rapid and efficient screening of analgesia levels in small laboratory animals. We employ a shutter- controlled heat lamp as a standard heat source. The lamp is located below the animal so as to provide a less confining environment. -
Page 12: Interfacing To A Computer
Tail-Flick system software running to receive the incoming data and store it to the hard drive. Columbus Instruments provides a DOS and a Windows interface program for IBM compatible computers with the Tail-Flick system. -
Page 13: Setting The Tail-Flick Lamp Intensity
NOTE: If you have the printer option turned on and run a test without an operational printer connected to the unit, or the printer cable isn’t plugged in properly the message "PErr" will appear on the Tail-Flick display. This indicates a Printer Error. Press any button and the unit will go back to timer mode. -
Page 14: Setting The Animal Id Number
none of the other buttons are active. Only releasing the START / STOP button or footswitch can terminate the experiment and stop the timer. When the START / STOP button is pressed again, the timer is automatically reset, and begins timing from 00.00 seconds. When the timer is stopped, the Tail-Flick sends the timer reading and subject number to the display, the printer and serial port if those options are selected. -
Page 15: Auto-Detect
Auto-Detect Use the mode button to select auto-detect. The red LED by the auto-detect on the front panel will be lit and the display will show a flashing “OFF”. Use either the “+”, or the “-“ buttons to change the display to “ON”. The foot switch and the start/stop switch will still start the test as before, but instead of depressing and holding the switch you will press and release the button. -
Page 16: Technical Notes, Accessories
- SECTION 3 - TECHNICAL NOTES, ACCESSORIES... -
Page 17: Using The Tail-Flick Rs-232 Interface Option
3.0 TECHNICAL NOTES, ACCESSORIES 3.1 USING THE TAIL-FLICK RS-232 INTERFACE OPTION The serial port on the rear panel of the Tail-Flick must be connected to the computer's serial port with a 9 pin to a 25 pin serial cable. The RS-232 software must be running for the RS-232 option to work. -
Page 18: Tail-Flick Animal Restrainer Options
The data will be displayed in the following format: Time of Day – Animal ID# - Time (Secs) – Light intensity setting 3.2 TAIL-FLICK ANIMAL RESTRAINER OPTIONS The restrainers are clear plastic, cylindrical, Broome style enclosures. The animal is placed tail first into the cage with his tail exiting through a slot provided in the rear of the tube. - Page 19 Appendix I The recommended range of use (light intensity setting) for the Tail Flick is from 3 to 15. Anything higher than 15 is very hot! Care should be taken not to damage an anesthetized or otherwise altered animal. Higher settings may be used however; the unit should only be on for 2 to 3 seconds at the most without causing damage to the subject.
Need help?
Do you have a question about the Tail-Flick Analgesia Meter and is the answer not in the manual?
Questions and answers