Advertisement
Quick Links
Advertisement

Related Manuals for PicoBrew Zymatic


Summary of Contents for PicoBrew Zymatic
- Page 1 Zymatic® User Manual...
-
Page 2: Important Safety Information
Make sure all hoses are connected before starting a recipe, rinse or cleaning cycle. There are no user serviceable parts inside. To avoid risk of electric shock hazard do not disassemble the Zymatic. Various surfaces can get extremely hot during the brewing cycle, use caution when handling the keg, hoses and components. - Page 3 Unpack the Zymatic Unpack the Zymatic ® ® P. 1 Foam Trap T. 1 Bottle of Antifoam A. Zymatic® J. 1 Step Filter Lid A. Zymatic® J. 1 Step Filter Lid Q. 2 Needle-less Syringes B. 1 6’ Power Cord K.
- Page 4 Gather Materials Anti-Foam (T) Before You Brew Deep Clean Keg Cozy (T) Zymatic (A) Zymatic (assembled with Power Cord (B), In Hose (F), Out Hose (G), plastic 5-gallon Corny Keg Step Filter (N) hose wrench and 2 white cone seat seals)
- Page 5 The Zymatic has been calibrated to keep the water level in the bottom of the step filter below the grain and hops, so they are only incorporated when the recipe calls for it.
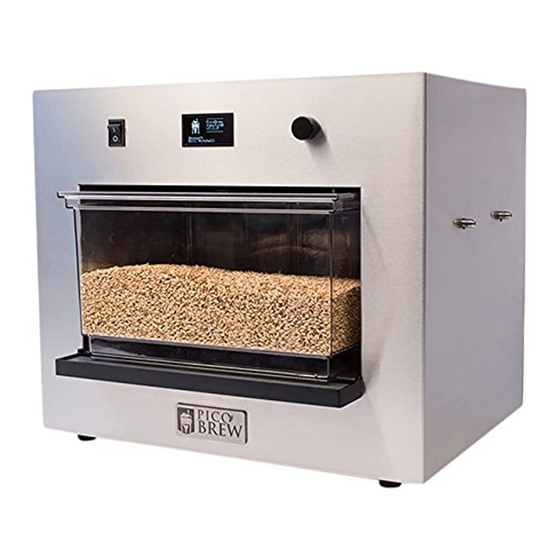
- Page 6 Operating the Zymatic® Selector Knob OLED Display twist to scroll press to select On/Off Switch Step Filter Inline Filter Drip Tray IN Hose OUT Hose connects to IN post of keg connects to OUT post of keg controls flow into keg...
- Page 7 Will run the keg and drain pump while displaying the current temperatures. Do not select this option if you do not Select to see the list of recipes synced to your Zymatic, then have a Step Filter inserted and a keg or tubes connected to your select one to brew.
- Page 8 Drain Flow from the keg will stop, and the Zymatic® will drain the step filter until you press Continue. Exit Brew Exits brew immediately and goes to the main menu. Use caution as this will also skip all programmed drains and will not continue...
- Page 9 OUT hose the back of the Zymatic®. c. Hand tighten first by screwing the flare nut onto the Zymatic® and then use the black plastic wrench to tighten it further. d. Keep the black plastic wrench and extra nylon washers with this manual...
- Page 10 3) Plug the power cord into the back of the machine and into an outlet. The Zymatic® requires at least a 15 amp outlet (standard in most houses.) Do not overload an outlet with appliances that will use more than 15 amps.
- Page 11 . There should be a little resistance as the drain slides into ® place and the step filter presses against the back of the Zymatic®. The step filter will stick out of the machine by about an inch to allow for easy removal.
- Page 12 Select “Rinse” and the Zymatic will begin the initial rinse cycle. ® 8) Once you have finished the rinse cycle, the Zymatic will return to the main menu. ® Remove your step filter and dump out any remaining water. Give it a quick dry with a towel and it is ready for loading ingredients.
- Page 13 Prepare Ingredients 1) Fill your keg with the amount of water listed on your recipe. Use a gallon jug and measuring cup or a scale (8.3 lbs water = 1 gallon of water) to measure your water. 2) Place the black Keg Seal on the keg. 3) Assemble the foam trap by dropping a few drops of antifoam on the disk and placing the foam washer between the spindle and trap.
- Page 14 8) Put the lid on the step filter, ensuring the holes are aligned correctly. 9) Slide the step filter into the Zymatic until it is ® pushed up against the back wall. The step filter will protrude slightly over the drip tray.
- Page 15 While your Zymatic brews, you can watch its process online. A chart with the current temperature of the wort and ®...
- Page 16 ® 5) Monitor the ice bath, as the keg will quickly melt the ice as it chills. 6) The temperature will continue to be monitored by the Zymatic as it chills to the pitching ®...
- Page 17 Pitch Yeast There are two different kinds of yeast that are sold: dry and liquid. Either type of yeast can be used to ferment your wort. If you are using liquid yeast, make sure to take it out of refrigeration when you start your brew to give the yeast time to warm up.
- Page 18 (IN) ball lock’s cleaning tube into an empty container for the dirty water. 5) On the Zymatic®, chose the Rinse cycle. This will cycle the clean water through the hoses in the machine, through the step filter, and into the empty container.
- Page 19 Fermentation For best results, ensure your keg stays in a temperature controlled area where it can stay undisturbed for a few weeks. The exact temperature range depends on what yeast you’ve selected. While your keg ferments, you will likely see the water in your airlock bubbling for the first few days.
- Page 20 If beer is left on the yeast cake for too long after it finishes fermenting, it will cause off flavors. To rack your beer via the transfer tube included with your Zymatic®, you will need a CO tank and regulator to pressurize your keg, as well as either a 2.5-gallon keg or a separate 5-gallon keg.
- Page 21 7) Allow the keg to fill until it is full or you run out of beer. The bottom few inches of beer in the fermenter keg will be full of trub and yeast. The diptube of the keg included with your Zymatic® is cut shorter as to avoid the majority of the yeast and trub.
- Page 22 Carbonate To carbonate your beer, you can either keg condition or hook your keg up to a CO tank. Forced Carbonation 1) Using a carbonation chart or calculator, set your CO tank to the appropriate psi setting. 2) Hook up a CO tank to your keg’s IN post.
- Page 23 Deep Clean Every 5 brews, you will need to run a deep cleaning on your Zymatic®. The deep clean removes any buildup on the hoses, pumps, and heat exchanger from the wort and will keep your Zymatic® running smoothly and efficiently.
-
Page 24: Care And Maintenance
Cleaning the Inline Filter: On the Zymatic®, there is an inline filter that catches any stray pieces of grain or hops that escape to help keep the pumps and heat exchanger clean. This filter should be cleaned before every brew. Unscrew the filter and remove the screen. Rinse off the screen and scrub off any debris if necessary. -
Page 25: Advanced Techniques
Sample port Your Zymatic® comes equipped with a sampling port on the IN hose. Standard size needleless syringes, such as the one that came with your kit, will fit into the sample port. You can use the sample port to draw a small sample of the beer for refractometer readings, tasting or using to proof yeast. - Page 26 Adding Clarifiers If you wish to add any clarifiers to your beer that are typically added during the brew (such as whirlfloc, irish moss, or yeast nutrient) you can either place into a hops cage, dissolve it into a liquid and inject it using the syringe and sample port, or drop it directly into the keg.
-
Page 27: Troubleshooting
If your Zymatic® does not leave the Overflow state on its own, you may have to remove the step filter. If you are removing the step filter, exit the brew first. Never remove the step filter while it is actively brewing. In this case, the step filter may be full of very hot fluid, so use extreme caution! Your step filter itself may be the cause of the clog that is causing the “Overflow”... - Page 28 If you suspect the spilling was caused by the nozzle missing the holes in the lid (in this case, there will be a large puddle of wort on the lid), please dry off all surfaces and check to see if the nozzle aligns with the mash hole in front upon restart. If not, please contact PicoBrew Product Support.
- Page 29 My display went black, but the Zymatic is still running. Check the back of your Zymatic® and look at the fan in the top center. If the Zymatic® is on, the fan should be running. If it is not running, your display was likely overheated and shut off.
Need help?
Do you have a question about the Zymatic and is the answer not in the manual?
Questions and answers