Table of Contents
Advertisement
FCC Certification
THIS DEVICE COMPLIES WITH PART 15 OF THE FCC RULES. OPERATION IS SUBJECT TO THE
FOLLOWING TWO CONDITIONS:
(1)
THIS DEVICE MAY NOT CAUSE HARMFUL INTERFERENCE, AND
(2)
THIS DEVICE MUST ACCEPT ANY INTERFERENCE, RECEIVED, INCLUDING
INTERFERENCE THAT MAY CAUSE UNDESIRED OPERATION.
This equipment has been tested and found to comply with the limits for a Class B digital
device, pursuant to part 15 of the FCC Rules. These limits are designed to provide
reasonable protection against harmful interference in a residential installation.
This equipment generates, uses and can radiate radio frequency energy and, if not
installed and used in accordance with the instructions, may cause harmful interference to
radio communications. However, there is no guarantee that interference will not occur in a
particular installation. If this equipment does cause harmful interference to radio or
television reception, which can be determined by turning the equipment off and on, the
user is encouraged to try to correct the interference by one or more of the following
measures :
-
Reorient or relocate the receiving antenna.
-
Increase the separation between the equipment and receiver.
-
Connect the equipment into an outlet on a circuit different from that to which the receiver is
connected.
Consult the dealer or an experienced radio/TV technician for help.
-
THE MANUFACTURER IS NOT RESPONSIBLE FOR ANY RADIO OR TV
INTERFERENCE CAUSED BY UNAUTHORIZED MODIFICATIONS TO THIS EQUIPMENT.
SUCH MODIFICATIONS COULD VOID THE USER'S AUTHORITY TO OPERATE THE
EQUIPMENT.
Advertisement
Table of Contents

Related Manuals for IRiver PMC-120


Summary of Contents for IRiver PMC-120
-
Page 1: Fcc Certification
FCC Certification THIS DEVICE COMPLIES WITH PART 15 OF THE FCC RULES. OPERATION IS SUBJECT TO THE FOLLOWING TWO CONDITIONS: THIS DEVICE MAY NOT CAUSE HARMFUL INTERFERENCE, AND THIS DEVICE MUST ACCEPT ANY INTERFERENCE, RECEIVED, INCLUDING INTERFERENCE THAT MAY CAUSE UNDESIRED OPERATION. This equipment has been tested and found to comply with the limits for a Class B digital device, pursuant to part 15 of the FCC Rules. -
Page 2: Table Of Contents
Contents INTRODUCTION ... 1 Locating the Controls... 2 Control Buttons on your Portable Media Center ... 4 Common Tasks... 5 Controls and menus... 7 Menu Screen... 7 Screen Icons... 30 Controls ... 32 Getting Started... 37 Running the Setup Disc ... 41 Hardware Connection... - Page 3 Contents Updating the Software Running on Your Portable Media Center ... 70 Digital Media File Types You Can Play on Your Portable Media Center... 75 Protected Content ... 76 Protected and Non-Protected Content ... 76 The Licensing Process and Your Portable Media Center ...
- Page 4 Contents USING PORTABLE MEDIA CENTER ... 85 Playing and Viewing Digital Media Content... 86 Browsing For New Content... 86 Browsing For and Playing TV Shows ... 86 Music on Your Portable Media Center ... 88 Pictures on Your Portable Media Center ... 99 Using the Bookmark Feature...
- Page 5 Contents III. CUSTOMIZING PORTABLE MEDIA CENTER 120 Setting the Equalizer Option ... 120 To set the Equalizer option ... 120 Setting Display Options... 122 To set the Backlight option... 123 To set the Brightness option ... 124 To set the TV Out option ... 125 Setting Effects Options...
- Page 6 Contents THIS MANUAL COVERS THE INSTALLATION AND USE OF THE PLAYER HARDWARE. FOR DETAILS REGARDING THE SOFTWARE OPERATION INCLUDING TRANSFERRING MUSIC TO THE PLAYER, PLEASE SEE THE SOFTWARE INSTRUCTION MANUAL.
- Page 7 Limited in the Republic of Korea and /or other countries and is used under license. Microsoft Windows Media and the Windows Logo are trademarks or registered trademarks of Microsoft Corporation in the United States and /or other countries.
-
Page 8: Introduction
INTRODUCTION I. INTRODUCTION Congratulation on your purchase of the Microsoft® Windows Mobile™-based Portable Media Center. Your Microsoft® Windows Mobile™-based Portable Media Center is a portable media device that runs Windows Mobile Software for Portable Media Centers. You can use your Portable Media Center to enjoy digital media files anytime and anywhere. -
Page 9: Locating The Controls
Common Tasks Locating the Controls - 2 -... - Page 10 Common Tasks - 3 -...
-
Page 11: Control Buttons On Your Portable Media Center
Common Tasks Control Buttons on your Portable Media Center - 4 -... -
Page 12: Common Tasks
Common Tasks Common Tasks To help you get started quickly, this section highlights common activities with your Portable Media Center. Play music. Use your Portable Media Center to store and play your favorite music. Watch videos and TV shows. With your Portable Media Center you can store many hours of videos or recorded TV shows, and watch them anytime, anywhere. - Page 13 Common Tasks Watch or listen at home or on the road. With an audio-video or audio cable you can connect your Portable Media Center to a home or car stereo. Using the TV Out option and an audio-video cable, you can connect your Portable Media Center to a TV.
-
Page 14: Controls And Menus
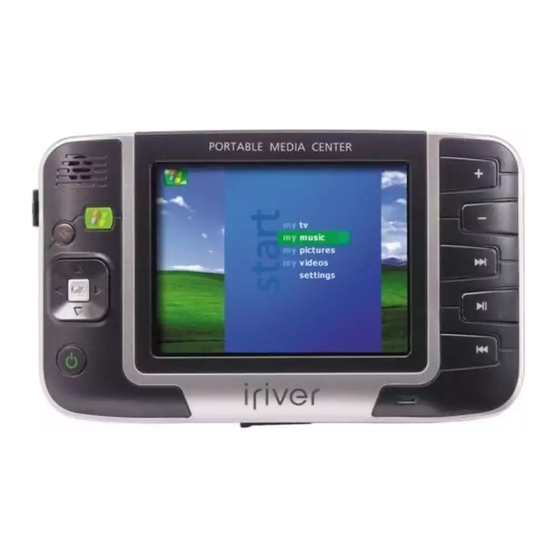
Screen and Controls Controls and menus The iRiver Portable Media Center has a series of easy to navigate menus to help you find the music, pictures, or videos you want to play. There are also menus to help you set various options and to troubleshoot any issues encountered during use. - Page 15 Screen and Controls Library Screens After selecting one of the top level functions, you will be taken set of “Library Screens”. These Library screens allow you to use your content in different ways depending on the type (TV, Music, etc.). My Music You can use the Right and Left buttons to select the screen view on the top (New, Albums, Artists, Playlists, Songs, Genres.)
- Page 16 Screen and Controls Screen View Alphabetically lists all albums most recently copied to your Portable Media Center. The Play All selection is at the top of the list. No Items Available appears if no content is available. Albums Alphabetically lists all albums in the music collection stored on your Portable Media Center.
- Page 17 Screen and Controls My Pictures You can use the Right and Left buttons to select the screen view on the top (New, Sort by name, Sort by date.) - 10 -...
- Page 18 Screen and Controls Screen View Lists all pictures most recently copied to your Portable Media Center, sorted alphabetically by name. The Play Slide Show option is at the top of the list. No Items Available appears if no content is available. Sort By Name Lists all pictures, sorted alphabetically by name.
- Page 19 Screen and Controls My TV Screen View Lists TV shows most recently copied to your Portable Media Center, sorted alphabetically. No Items Available appears if no content is available. Lists all TV content, sorted by recording date (most recent Sort by Date content first).
- Page 20 Screen and Controls My Videos You can use the Right and Left buttons to select the screen view on the top (New, Sort by name, Sort by date.) - 13 -...
- Page 21 Screen and Controls Screen View Lists all videos most recently copied to your Portable Media Center. Sorted alphabetically by name. Sort By Name Lists all videos in your collection, sorted alphabetically by video name or file name. Sort by Date Lists all videos, sorted by recording date (oldest content first).
- Page 22 Screen and Controls Music Screen View Default Shows track number, song name, elapsed/remaining time for the current track, an elapsed time status bar, artist name, album name, play/pause indicator, and battery status indicator. Press OK button to switch between elapsed time and remaining time.
- Page 23 Screen and Controls Big Album Cover Displays large-size album art, track number, elapsed/remaining time for the current track, play/pause indicator, and battery status indicator. Press OK button to switch between elapsed time and remaining time. A default cover art image is used for albums that are missing album cover art.
- Page 24 Screen and Controls Music Settings Displays a portion of the album art, elapsed time of the current track, play/pause indicator, battery status indicator, the album's star rating, and a list with check boxes for the Shuffle, Repeat, Equalizer, and Purchase Info settings. Selecting or clearing the Equalizer check box enables or disables the selection on the Equalizer Settings screen.
- Page 25 Screen and Controls Pictures and Slide Shows Screen View Full Screen Picture Displays current picture and briefly displays the slide show play/pause indicator and battery status indicator. Picture Overlay Displays picture name and date across the top of the picture, slide show play/pause indicator, and battery status indicator.
- Page 26 Screen and Controls Screen View Full Screen TV Displays the show on the screen with no other information. Displays the show on the screen; also displays the show File Info name and date across the bottom of the video image, the play/pause indicator, and the battery status indicator.
- Page 27 Screen and Controls Settings Use the Settings screens to customize your player, adjust language and player settings, reset to default settings, and view information about the PMC player. - 20 -...
- Page 28 Screen and Controls Screen View Settings Description Displays the following: • Equalizer. Optimizes audio playback on your Portable Media Center for different music genres, such as Classical, Hip Hop, or Jazz. • Display. Settings for screen backlighting, screen brightness, and using the TV Out plug.
- Page 29 Screen and Controls Equalizer Display Displays the following options: • Acoustic • Classical • Electronic • Hip Hop • Jazz • • Rock Displays the following options: • Backlight • Brightness • TV Out - 22 -...
- Page 30 Screen and Controls Backlight Brightness TV Out Displays the following options: • • 1 second • 5 seconds • 15 seconds • 1 minutes • Always on Set the amount of time that the backlight will remain on. This setting is ignored when playing video or pictures.
- Page 31 Screen and Controls Effects Screen Effects Sounds Displays the following options: • Screen Effects • Sounds Displays the following options: • • Turn On or Off the fading effect as you move among the different menus. Displays the following options: •...
- Page 32 Screen and Controls International Languages Standards Restore Original Settings Displays the following options: • Language • Standards Lists the languages in which information is displayed on your Portable Media Center screens. Lists the available formats your Portable Media Center uses to display dates, times, and numbers.
- Page 33 Screen and Controls Information About Portable Media Center About Contents Displays the following items: • About Portable Media Center • About Contents You cannot set any options on this screen. Displays version and copyright information about the Windows Mobile Software for Portable Media Centers.
- Page 34 Screen and Controls Recovery Screens The Portable Media Center may display some recovery screens in the rare event of a software or hardware malfunction. Screen View Screen 1 Description Once connected, a picture with a large numeral 1 in one corner of the screen directs you to connect your Portable Media Center to the computer using the docking cradle or connecting cable supplied by the manufacturer.
- Page 35 Screen and Controls Screen View Screen 2 Screen 3 Description Once connected, a picture with a large numeral 2 in one corner of the screen and verifies your Portable Media Center is successfully connected to the computer. Follow on-screen instructions to run any necessary recovery utility program.
- Page 36 Portable Media Center could not fix the disk errors. A picture with a large numeral 5 in one corner of the screen appears when a problem with the hard disk occurs that your Portable Media Center could not fix. Please contact iRiver Customer Support. - 29 -...
-
Page 37: Screen Icons
Screen and Controls Screen Icons The following table lists the icons displayed on your Portable Media Center screens. Icon Name Battery Status indicator Elapsed Time bar Folder Left arrow Description Indicates the remaining amount of battery life by showing a number of horizontal bars inside the battery icon. - Page 38 Screen and Controls Lock indicator Play indicator Play/Pause indicator Repeat Play indicator Right arrow Shuffle Play indicator Star Rating indicator Wait indicator Displayed when the controls are locked. Displayed at the left of Play on a Song Title screen, and at the left of Play All on New, Albums, Artists, Songs, Playlists, Genres, Album Songlist, Artist Name, Playlist Name, and Play Slide Show screens.
-
Page 39: Controls
Screen and Controls Controls Your Portable Media Center has a set of controls used for the following: Turning power on or off Temporarily locking controls Playing or viewing content Navigating The following basic buttons and controls are found on your Portable Media Center. -
Page 40: Playback Controls
Screen and Controls Power and Lock Controls Control Audio/Video Function Pressing or switching this control turns a Portable Media Center On/Off on or off. Lock or Hold Slide the switch to lock all the controls to prevent accidental button engagement. Slide back to unlock the controls. Playback Controls Control Audio Function... - Page 41 Screen and Controls Pressing this control skips to the end of a music track. Pressing and holding this control skips forward through a music track. At the end of a music track, pressing this control skips to the next track. Using this control adjusts the Volume headphone or internal speaker...
-
Page 42: Navigation Controls
Screen and Controls Navigation Controls Control Audio/Video Function Pressing this control selects the previous item in a list. When a picture is displayed, pressing this control selects the previous picture in a folder. When viewing a slide show, pressing this control skips to the previous picture in the slide show. - Page 43 Screen and Controls Pressing this control moves the user to the screen at the right of Right the screen being viewed, as if moving through a horizontal band of screens. Back Pressing this control moves the user to the previous screen or to the previous band of screens.
-
Page 44: Getting Started
Digital Media File Types Getting Started To use your Portable Media Center with your favorite music, TV shows, videos, and pictures, you must first have certain files installed on your computer, and then add the digital media files to your Portable Media Center from the computer. - 37 -... - Page 45 Digital Media File Types Requirements - 38 -...
-
Page 46: Important Information
Digital Media File Types To use your Portable Media Center, you must have the following: A computer running Windows XP (Home or Professional), Windows XP Media Center Edition, or Windows XP Tablet PC Edition A USB 2.0 port on your desktop or laptop computer to physically connect with your Portable Media Center (strongly recommended) A USB cable (included) Windows Media Player 10 (installed with the Setup disc) - Page 47 Digital Media File Types What is in the Box When you purchase your Portable Media Center, the box should contain at least the following: Quick Start Guide Setup disc Portable Media Center Power adaptor USB cable Carrying Case TV Out Cable What is on the Setup Disc The Portable Media Center Setup disc includes the following: A program that installs essential files on your computer...
-
Page 48: Running The Setup Disc
Digital Media File Types What is on the Portable Media Center Your Portable Media Center uses Windows Mobile™ software to find and display or play digital media stored on its hard drive, and to help add music, pictures, and video from your computer. Running the Setup Disc Before you connect your Portable Media Center for the first time to a computer, you must run the Portable Media Center Setup disc on the computer. - Page 49 Digital Media File Types Installation: Insert the installation CD into the CD-ROM drive. Double-click the Setup icon. Click Next to start. - 42 -...
- Page 50 Digital Media File Types Select I accept the terms in the License Agreement - 43 -...
- Page 51 Digital Media File Types Click Next to continue. - 44 -...
- Page 52 Digital Media File Types Select Copy sample content to the media library and click Next. - 45 -...
- Page 53 Digital Media File Types Click Install to start the installation. - 46 -...
- Page 54 Digital Media File Types The system will start the installation process as the following screen. - 47 -...
- Page 55 Digital Media File Types When you are prompted the Agreement screen, click I Accept. - 48 -...
- Page 56 Digital Media File Types When the Setup Complete screen appears, you will need to restart your computer to complete the installation. Click Restart - 49 -...
- Page 57 Digital Media File Types After restarting the computer, click Finish and you can now use the mini USB cable to connect your Portable Media Center to the computer. - 50 -...
- Page 58 Digital Media File Types Once you plug the player, the system will detect the player. Select Install the software automatically (Recommended). Click Next to continue. - 51 -...
- Page 59 Digital Media File Types The system will automatically search for the driver and install, select Synchronize media files to this device using Windows Media Player. - 52 -...
- Page 60 Digital Media File Types Click Next to continue. - 53 -...
- Page 61 Digital Media File Types You can select your privacy options in this screen by checking the items in this screen. - 54 -...
- Page 62 Digital Media File Types You can customize the installation options in this screen also by checking the item you need to enable the functions. - 55 -...
- Page 63 Digital Media File Types Before opening the Windows Media Player program, you will need to select your private option and customize the installation options. After finishing the two setups, you can select Automatic or Manual synchronization with the device. The Setup disc installs several programs on your computer, including Windows Media Player 10.
- Page 64 Digital Media File Types When you run the Setup disc, you can establish a device partnership between the computer and your Portable Media Center. This partnership makes the desktop or laptop computer the primary computer for your Portable Media Center. You can use the automatic update feature of Windows Media Player to quickly add digital media content to your Portable Media Center from your primary computer.
-
Page 65: Hardware Connection
Digital Media File Types Hardware Connection 1. Plug the power adapter into a wall outlet then into the DC IN 5V jack on the player. 2. Power on the player. 3. Attach the USB cable to the player then to an open USB port on the computer. - 58 -... -
Page 66: Turning Your Portable Media Center On And Off
Digital Media File Types Turning Your Portable Media Center On and Off Turn your Portable Media Center on to play or view digital media content, and to update its content from a desktop computer that has Windows Media Player 10. Turn it off when you're finished. -
Page 67: Add Digital Media Content To Your Portable Media Center
Digital Media File Types Add Digital Media Content to Your Portable Media Center After you run the Setup disc you can add digital media content to your Portable Media Center. When you have done so for the first time, you can add content in two ways: Automatic Update. - Page 68 Digital Media File Types The device setup wizard appears on the primary computer, click Next to continue (For complete Setup wizard, please see the Installation part on P.42). - 61 -...
- Page 69 Digital Media File Types If You Have Not Previously Used Windows Media Player 10 on the Computer If you have not previously used Windows Media Player 10 on the computer, you must scan the computer for digital media content before the computer can copy the media to your Portable Media Center.
- Page 70 Digital Media File Types When prompted to select Automatic or manual synchronization, select Automatic and click Finish. Windows Media Player will automatically scan the computer for digital media content and adds it to its Media Library. For more information, see Windows Media Player Help on this computer. After you finish copying content, disconnect your Portable Media Center from the computer.
- Page 71 Digital Media File Types Manually. To manually copy content from the primary computer to your Portable Media Center, do the following: Plug the power adapter into a wall outlet then into the DC IN 5V jack on the player. Power on the player. Attach the USB cable to the player then to an open USB port on the computer.
- Page 72 Digital Media File Types You can copy files from your computer by dragging source files to Windows Media Player. To add files to your Portable Media Center, select the check box next to the file name. Click the Start Sync button at the upper left corner of the navigation bar to start synchronization.
- Page 73 Digital Media File Types You can use Windows Media Player 10 to switch to the automatic copy option. See Windows Media Player Help on this computer. If You Have Previously Used Windows Media Player 10 on the Computer If you have already used Windows Media Player 10 on the primary computer, content is already listed in its Media Library.
- Page 74 Digital Media File Types Manually. If you want to use Windows Media Player 10 to manually copy content from the primary computer to your Portable Media Center. Select the check box Manual for the option to manually copy items, then click Finish.
- Page 75 Digital Media File Types To create a partnership with a different computer 1. Start your Portable Media Center and connect it to a non-primary computer. 2. On the device setup wizard, select the option to make the computer the new primary computer, from which you can automatically copy items from this computer;...
-
Page 76: Charging The Battery In Your Portable Media Center
Digital Media File Types Charging the Battery in Your Portable Media Center The battery in your Portable Media Center device provides you with many hours of playback time for videos, TV shows, and music. The battery indicator or icon in the lower right corner of a screen begins blinking when the battery must be recharged. -
Page 77: Updating The Software Running On Your Portable Media Center
Digital Media File Types Updating the Software Running on Your Portable Media Center Periodic updates might be available for the software than runs on your Portable Media Center. These updates may contain improvements and new features. To check for updates to the software running on your Portable Media Center Visit www.iriveramerica.com... - Page 78 Digital Media File Types To update the software running on your Portable Media Center a. Use the USB cable to connect your Portable Media Center to the computer. When the following figure appears, click OK to continue. b. The Media Player 10 will appear on your PC screen, just minimize it and run the update program download from www.iriveramerica.com.
- Page 79 Digital Media File Types Click the File tab. Select “Connect to Device”. - 72 -...
- Page 80 Digital Media File Types Click the OK button. Select Update OS Image. - 73 -...
- Page 81 Digital Media File Types Select the .bin file which you want to update Select the NK*.bin file and open it, you will see the process of updating. When the updating process is complete, close the the mini USB cable which connects the Portable Media Center and the computer.
-
Page 82: Digital Media File Types You Can Play On Your Portable Media Center
Digital Media File Types Digital Media File Types You Can Play on Your Portable Media Center Your Portable Media Center plays .wma, .wmv, and .mp3 audio and visual files. When you connect your Portable Media Center to a computer with Windows Media Player 10, Windows Media Player converts many other file types (formats) into these supported file types. -
Page 83: Protected Content
Protected Content Protected Content Your Portable Media Center plays digital media content transferred from the Windows Media Player library on a Windows XP-based computer. Your Windows Media Player library then becomes completely mobile. You can take it with you wherever you go, whenever you wish. You can store and play both non-protected and protected digital media files;... -
Page 84: The Licensing Process And Your Portable Media Center
Protected Content The Licensing Process and Your Portable Media Center The licensing process for protected digital media content takes place on your computer, not on your Portable Media Center. You can acquire licensed files in several ways. The most common way is to download licensed files to your computer from content providers such as record or video companies. -
Page 85: Non-Protected Digital Media Content And Your Portable Media Center
Protected Content You cannot copy and share licenses among different computers using your Portable Media Center. If your Portable Media Center contains a protected file that is not licensed, an error message appears on the screen if you try to play it. You must download or otherwise acquire a licensed copy of the file and then transfer the licensed copy to your Portable Media Center before you can play it. -
Page 86: Finding Information About Your Portable Media Center
Finding Information Finding Information About Your Portable Media Center From the Information screen you can find basic facts about your Portable Media Center and how much content you have stored on it. You can find the Information screen from the Settings screen. To open the Information screen On the Start screen, click Settings and then Information. -
Page 87: To Open The About Portable Media Center Screen
Finding Information To open the About Portable Media Center screen On the Information screen, use the Up and Down buttons to select About Portable Media Center and press the OK button. The About Portable Media Center screen opens and displays essential information about your Portable Media Center. -
Page 88: To Open The About Content Screen
Finding Information To open the About Content screen On the Information screen, use the Up and Down buttons to select About Contents and press the OK button The About Contents screen opens and lists the following information about the amount of content on your Portable Media Center: Number of TV programs Number of songs Number of albums... - Page 89 Finding Information Amount of hard disk space remaining on your Portable Media Center - 82 -...
-
Page 90: Portable Media Center Help
Portable Media Center Help Portable Media Center Help In addition to this Help document, you have other sources for help when using your Portable Media Center: The Setup disc. A copy of this Help document is on the Setup disc. The Quick Start Guide. - Page 91 Portable Media Center Help Troubleshoot problems you might encounter using your Portable Media Center Learn more about an error message The latest information from Microsoft about Portable Media In the Portable Media Center Help Table of Contents, click Troubleshooting Portable Media Center. In the right pane under In This Section, click the appropriate Troubleshooting title to view that topic.
-
Page 92: Ii. Using Portable Media Center
USING PORTABLE MEDIA CENTER II. USING PORTABLE MEDIA CENTER With Portable Media Center, you can do the following, alone or with your friends and family, and do all of this anywhere, anytime: Watch videos you recorded using a computer with Windows Media Player 10 Watch TV shows you recorded using a computer with Microsoft®... -
Page 93: Playing And Viewing Digital Media Content
Playing and Viewing Digital Media Content Playing and Viewing Digital Media Content Browsing For New Content When you add music, TV shows, pictures, or videos to your Portable Media Center, they are listed on the New screens. To browse for content recently added to your Portable Media Center 1. - Page 94 Playing and Viewing Digital Media Content To browse for and play a TV show On the Start screen, highlight My TV and press OK. Using the Left and Right buttons, select the New, Sort by Name, Sort by Date, or Sort by Genre screen. Using the Up or Down buttons, scroll through the list and select a TV show.
-
Page 95: Music On Your Portable Media Center
Playing and Viewing Digital Media Content Music on Your Portable Media Center You can store and play thousands of songs on your Portable Media Center using the .wma and .mp3 file formats. Browsing For and Playing Music You can browse for and play music in the following ways: •... - Page 96 Playing and Viewing Digital Media Content Press the OK button to open the Album Songlist screen for the selected album, listing all songs on that album. To play an album, choose from the following: • On the Album Songlist screen, use the Up and Down buttons to select Play All and then click the OK button.
- Page 97 Playing and Viewing Digital Media Content To browse for and play a song from the Songs screen On the Start screen, highlight My Music and press OK. Use the Left and Right buttons to select the Songs screen. Use the Up and Down buttons to select a song from the list; then press the OK button.
- Page 98 Playing and Viewing Digital Media Content Creating and Playing the Portable Playlist You can create and play a portable playlist of songs on your Portable Media Center. To create the portable playlist 1. On the Start screen, highlight My Music and press OK. 2.
- Page 99 Playing and Viewing Digital Media Content To play the portable playlist 1. On the Start screen, highlight My Music and press OK. Then use the Left and Right buttons to select the Playlists screen. 2. Use the Up and Down buttons to select Portable Playlist; then press the OK button.
- Page 100 Playing and Viewing Digital Media Content Playing Playlists Created with Windows Media Player You can play playlists you create on a computer using Windows Media Player and add to your Portable Media Center. To play a playlist created with Windows Media Player On the Start screen, highlight My Music and press OK.
-
Page 101: Using The Equalizer
Playing and Viewing Digital Media Content Using the Equalizer You can apply a value selected from the Equalizer settings screen to songs or albums. The Equalizer setting optimizes audio playback on your Portable Media Center for different music genres, such as Classical, Hip Hop, or Jazz. Use the Equalizer settings screen to select the type of equalizer you want. - Page 102 Playing and Viewing Digital Media Content Using Shuffle Play Shuffle Play takes a list of songs or albums and plays the songs in a random order without repeating a song, beginning with a song you choose. Shuffle Play continues until you clear its check box on the Music Settings screen.
- Page 103 Playing and Viewing Digital Media Content Using Repeat Play Repeat Play replays a selected song or set of songs, including an album, artist, genre, or playlist. The song or set of songs continues to play until Repeat Play is turned off. To turn on Repeat Play 1.
- Page 104 Playing and Viewing Digital Media Content Rating Your Music As in Windows Media Player 10, you can give a song a rating of one to five stars, five being the highest. You can also change the ratings of songs you previously rated using Windows Media Player.
- Page 105 Playing and Viewing Digital Media Content Displaying Purchase Information for an Album If you want information on purchasing music stored on your Portable Media Center, you can have that information displayed in Windows Media Player 10 on the primary computer. To request information about purchasing music 1.
-
Page 106: Pictures On Your Portable Media Center
Playing and Viewing Digital Media Content Pictures on Your Portable Media Center Browsing For and Viewing Pictures You can store and view thousands of digital photos on your Portable Media Center. To browse for and view pictures On the Start screen, highlight My Pictures and press OK. Use the Left and Right buttons to select the New, Sort by Name, or Sort by Date screen. - Page 107 Playing and Viewing Digital Media Content Displaying Pictures in a Slide Show You can display pictures on your Portable Media Center as a slide show. You can set the amount of time a picture is displayed during a slide show by using the Transitions option on the Pictures Settings screen.
- Page 108 Playing and Viewing Digital Media Content To set the transition time 1. While a slide show is running, use the Left and Right buttons to select the Pictures Settings screen. 2. Use the Up and Down buttons to select Transitions; then press the OK button to select the amount of time each picture is displayed on the screen.
- Page 109 Playing and Viewing Digital Media Content Playing Music During a Slide Show You can play music while a slide show is running on your Portable Media Center. To play music during a slide show 1. On the Start screen, highlight My Music and press OK. Then use the Left or Right buttons to select the New, Albums, Artists, Songs, Playlists, or Genre screen.
- Page 110 Playing and Viewing Digital Media Content Choose one of the following: • Select Play Slide Show from the list at the top of the New, Sort by Name, or Sort by Date screen and then press the OK button. All pictures stored on your Portable Media Center, including all pictures stored in folders, display as a slide show.
- Page 111 Playing and Viewing Digital Media Content To browse for and play a video On the Start screen, highlight My Videos and press OK. Use the Left and Right buttons to select the New, Sort by Name, or Sort by Date screen. Use the Up and Down buttons to scroll through the list and select a video.
-
Page 112: Using The Bookmark Feature
Playing and Viewing Digital Media Content Using the Bookmark Feature The Bookmark feature of your Portable Media Center allows you to pause the playback of a video or TV show and resume playing it where you left off. To use the Bookmark feature While playing a video or TV show on your Portable Media Center, use the Back or Start buttons and other Navigation controls to select and play pictures, songs, or other TV shows or videos. -
Page 113: Connecting Your Portable Media Center To A Tv Or Stereo
Playing and Viewing Digital Media Content Connecting Your Portable Media Center to a TV or Stereo You can listen to music stored on your Portable Media Center on a stereo, or watch videos and TV shows using a TV. To connect your Portable Media Center to a stereo Do the following: •... - Page 114 Playing and Viewing Digital Media Content A: Power on your Portable Media center. B. On the Start Screen, highlight Settings and press OK. C. On the Settings Menu select Display and press OK. D. On the Display Menu select TV Out and press OK. E.
- Page 115 Playing and Viewing Digital Media Content To disconnect your Portable Media Center from a TV • Press the On/Off button to the power off and then on. - or - On the TV Out Display Settings screen, select Device Display and press the OK button.
-
Page 116: Changing The Volume
Playing and Viewing Digital Media Content Changing the Volume Use the volume control buttons on your Portable Media Center to change the volume of sound or music coming from the internal speaker or from attached headphones. When your Portable Media Center is connected to a stereo or a TV, the volume is controlled from the stereo or TV. - Page 117 Playing and Viewing Digital Media Content To lock the controls and buttons The Play/Pause indicator on the bottom right of the screen becomes a lock icon to indicate that the controls are locked. You can lock the buttons and controls even if your Portable Media Center is playing - 110 -...
-
Page 118: Tips And Tricks
Tips and Tricks Tips and Tricks This section contains tips and tricks to help you get the most enjoyment from your Portable Media Center. Adding Digital Media Content Use these methods to quickly add pictures, videos, and music to your Portable Media Center. - Page 119 Tips and Tricks Manually copy digital media content With your primary computer: Open Windows Media Player on your computer. Click the Sync button, then click the Set up Sync option and clear the setting to Synchronize device automatically. Connect your Portable Media Center to the computer, and then manually copy files to it.
- Page 120 Tips and Tricks Copy digital media content from someone else's computer On the device setup wizard, select the option to use the computer and Windows Media Player 10 as a Guest; click OK. Digital media content can only be added to your Portable Media Center from someone else's computer if that computer has Windows Media Player 10.
-
Page 121: Changing Screen Brightness And Readability
Tips and Tricks Changing Screen Brightness and Readability Use these methods to make the screen of your Portable Media Center easier to read by changing its backlighting and brightness levels. Change backlighting duration Change screen brightness Do This On the Settings screen, click Display and then click Backlight. -
Page 122: Fine -Tuning Sound Quality
Tips and Tricks Fine -Tuning Sound Quality Use these methods to optimize the audio playback of different musical genres. Select an Equalizer value Change an Equalizer value while a song is playing Do This From the Start screen, click Settings and then click Equalizer. -
Page 123: Rating Your Favorite Songs
Tips and Tricks Rating Your Favorite Songs Use these methods to rate songs stored on your Portable Media Center. The next time you connect your Portable Media Center to the primary computer, the ratings you give to songs are applied to the same songs in the Media Library of Windows Media Player 10. -
Page 124: Using Playlists
Tips and Tricks Using Playlists Use these methods to add or remove songs to playlists, and to copy playlists to your Portable Media Center. Add one song to the Portable Playlist Add an album of songs to the Portable Playlist Add all songs by an artist to the Portable Playlist Add all songs in a Genre to... - Page 125 Tips and Tricks Remove songs from a playlist copied from a computer. Remove a playlist copied from a computer Open Windows Media Player on your computer. Click the Sync button, then click the Set up Sync option and select Synchronize device automatically. Follow the directions for selecting a My Playlist or Auto Playlist.
-
Page 126: Using Sound And Visual Effects
Tips and Tricks Using Sound and Visual Effects Use these methods to enable or disable visual and sound effects on your Portable Media Center. Turn button sounds on or off Turn screen effects on or off Do This On the Settings screen, Click Effects and then Sounds. -
Page 127: Iii. Customizing Portable Media Center
Setting the Equalizer Option III. CUSTOMIZING PORTABLE MEDIA CENTER You can make your Portable Media Center experience uniquely your own by customizing various features. Setting the Equalizer Option You can set the Equalizer audio option on the Equalizer settings screen. The Equalizer value optimizes the playback on your Portable Media Center of different musical genres, such as Classical, Hip Hop, or Jazz. - Page 128 Setting the Equalizer Option If you set a value for the Equalizer while a song is playing, Equalizer is automatically enabled on the Music Settings screen. To return to the previous screen without making a selection, press the Back button. To return to the Start screen without making a selection, press the Start button.
-
Page 129: Setting Display Options
Setting Display Options Setting Display Options You can set the following display options on the Display settings screen: • Backlight • Brightness • TV Out - 122 -... -
Page 130: To Set The Backlight Option
Setting Display Options To set the Backlight option 1. On the Start screen, click Settings and then click Display. 2. On the Display screen, click Backlight. 3. Use the Up and Down buttons to select one of the following values; then press the OK button: •... -
Page 131: To Set The Brightness Option
Setting Display Options To set the Brightness option 1. On the Start screen, click Settings and then click Display. 2. On the Display screen, click Brightness. 3. Use the Up and Down buttons to select a value between 1 (Dim) and 5 (Bright);... -
Page 132: To Set The Tv Out Option
Setting Display Options To set the TV Out option 1. On the Start screen, click Settings; then click Display. 2. On the Display screen, click TV Out. 3. Use the Up and Down buttons to select TV display: NTSC, the display format most common in the United States, or TV display: PAL, the format most common outside the United States;... -
Page 133: Setting Effects Options
Setting Effects Options Setting Effects Options You can set the following sound and visual effects for your Portable Media Center on the Effects settings screen: • Screen Effects. These are fading, sliding, and zooming effects that happen as you navigate from screen to screen on your Portable Media Center. -
Page 134: To Set The Sounds Option
Setting Effects Options To set the Sounds option 1. On the Start screen, click Settings; then click Effects. 2. On the Effects screen, click Sounds. 3. Use the Up and Down buttons to select On or Off; then press the OK button. You can set the volume of sounds by using the Volume control. -
Page 135: Setting International Options
Restoring Original Settings Setting International Options You can set international options using the International settings screen. International options include the following: • Language. These are the languages in which information is displayed on your Portable Media Center screens. • Standards. These determine the format your Portable Media Center uses to display dates, times, and numbers. -
Page 136: To Set The Standards Option
Restoring Original Settings To set the Standards option 1. On the Start screen, click Settings; then click International and then Standards. 2. Use the Up and Down buttons to select the standard of your choice; then press the OK button. To return to the previous screen without making a selection, press the Back button. -
Page 137: Restoring Original Settings
Restoring Original Settings Restoring Original Settings You can restore all settings for your Portable Media Center to their original values by selecting the Restore Original Settings selection on the Settings screen. To restore all options to their original values On the Start screen, click Settings; then click Restore Original Settings. The following message appears at the bottom of the Settings screen: This action restores the original settings for your device.
Need help?
Do you have a question about the PMC-120 and is the answer not in the manual?
Questions and answers