Table of Contents
Advertisement
Quick Links
Advertisement
Table of Contents

Related Manuals for brondell REVIVE PR50-W


Summary of Contents for brondell REVIVE PR50-W
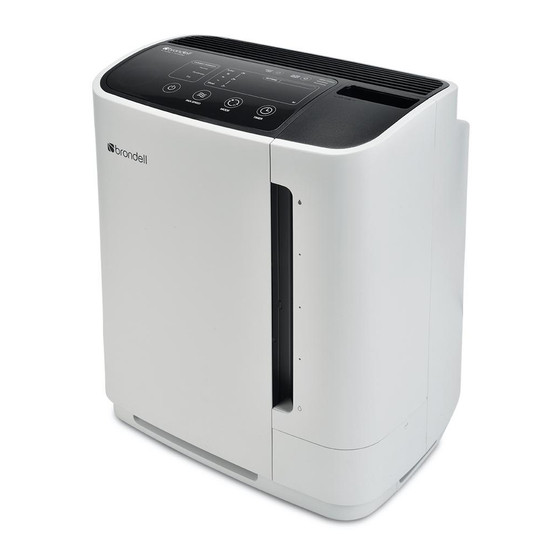
- Page 1 OWNER’S MANUAL Revive PR50-W, PR50-B True HEPA Air Purifier & Humidifier...
-
Page 2: Table Of Contents
CONTENTS Read this Owner’s Manual for correct installation, use, and maintenance of this product. After reading and completing installation, keep this manual in a place that is easily accessible. GENERAL INFORMATION MAINTENANCE 2 SAFETY INFORMATION 20 FILTER CHANGE INDICATOR 6 PRODUCT FEATURES 21 AIR FILTER MAINTENANCE Main Features Air Filter Care Overview... -
Page 3: Safety Information
• If the power cord is damaged – do not operate the product and do not attempt to repair, modify, or replace the cord yourself. Contact the Brondell Service Center toll free at 888- 542-3355 or email us through our website. - Page 4 • Do not disassemble, repair, or modify the product yourself. If repair is needed please contact the Brondell Service Center toll free at 888-542-3355 or email us through our website. • Clean the exterior with a damp cloth. Do not clean the product using benzene, thinner, or abrasives.
- Page 5 SAFETY INFORMATION (cont.) (IMPORTANT SAFEGUARDS) WARNING : To reduce the risk of fire, electric shock or injury, read and understand this user guide before operating this appliance. • To reduce the risk of fire, electric shock or injury, read and understand this user guide before operating this appliance.
- Page 6 SAFETY INFORMATION (cont.) (IMPORTANT SAFEGUARDS) CAUTION: If not observed, minor physical injury or property damage may occur as a result. • Do not install the product on a sloped or uneven surface. • Do not apply force or impact to the product. •...
-
Page 7: Product Features
PRODUCT FEATURES MAIN FEATURES Dual True HEPA Air Filtration Both of the Revive's True HEPA filters capture 99.97% of particles 0.3µ and larger. The filter system has been optimized to quickly remove pollutants from the air. Efficient Double Suction System The Revive utilizes a dual-filter system, with filters in the front and in the rear. -
Page 8: Evaporative Humidification
EVAPORATIVE HUMIDIFICATION Humidification Method Dry air The humidifying method used in the Revive is Humid air the Evaporative Humidification method. This method uses three parts: water tank, water tray and wick filter. The water tank supplies water to the water tray as the wick filter absorbs water. Air is drawn into the Revive and passes through the wick filter humidifying the air and expelling it back into the room. -
Page 9: Product Components
PRODUCT COMPONENTS FRONT VIEW 1. Front Cover 6. Water Tank 2. Mesh Pre-Filter 7. Humidifier Filter 3. Active Carbon Filter 8. Humidifier Filter Tray 4. True HEPA Filter 9. Water Tray 5. Control Panel TOP VIEW 1. Air Quality Indicator 2. -
Page 10: Rear View
REAR VIEW 1. Handle 4. Specialized Filter 2. Power Cord 5. Rear Cover 3. True HEPA Filter... -
Page 11: Air Filters
PRODUCT COMPONENTS (cont.) AIR FILTERS FRONT 1. Mesh Pre-Filter The Mesh Pre-Filter removes dust, mold, human hair, pet hair, and other large particles. 2. Active Carbon Filter This filter contains granulated carbon, which traps and removes odors, harmful gases, and VOCs. -
Page 12: Humidifier Components
HUMIDIFIER COMPONENTS 1. Water Tank Stores 3.5 Liters of water and supplies water to the Water Tray. 2. Water Tank Cap Secures water inside the Water Tank. 3. Humidifier Filter The Humidifier Filter absorbs water. As the purified air from the air outlet passes through the Humidifier Filter, naturally-humidified air is released. -
Page 13: Control Panel
CONTROL PANEL BUTTONS 1. Power Button Powers the Revive on and off. To turn off the power, press and hold the power button for approximately one second. 2. Fan Speed Button Use it to select the desired fan speed. When you touch the button, the fan speed indicator changes in ascending order from 1 to 5. -
Page 14: Indicators
INDICATORS 1. Air Quality Indicator Indicates the air quality in the room with three colors: Blue = Good air. Violet = Fair air. Red = Poor air. 2. Current Humidity Indicator Indicates the humidity level in the room. See pages 17–18 for more details. 3. -
Page 15: Preparing For First Use
PREPARING FOR FIRST USE INSTALLING THE FILTERS Be sure to remove the plastic wrapping from the filters in the front and back of the Revive before turning it on. This product is for indoor use only. When the unit is not in use, unplug it from the electrical outlet. 1. -
Page 16: Preparing The Humidifier
PREPARING THE HUMIDIFIER If you do not want to use the Humidifier function, do not perform the steps below. Instead, remove the Humidifier Filter and store it in a cool, dry location. If the Water Tank or Water Tray are not properly seated, the Revive will not power on. 1. -
Page 17: Product Operation
PRODUCT OPERATION POWERING THE REVIVE ON 1. To power the Revive on, press the Power Button. The Operating Mode and Fan Speed setting will automatically resume with the settings from when the unit was previously powered on. NOTE: If the Revive was previously in Auto Mode, it will begin sensing the air quality in the room when powered on. -
Page 18: Automatic Humidity Control
OPERATING MODES (cont.) Allergen Mode Allergen Mode is a three-step process by which the Revive’s fan speed is maximized and then throttled-down over a period of time in order to purify a large amount of air in the least amount of time. Below are the steps and their durations: Step 1: Ten minutes at Fan Speed 5 Step 2: Five minutes at Fan Speed 4... -
Page 19: Auto-Off Timer
PRODUCT OPERATION (cont.) AUTOMATIC HUMIDITY CONTROL (cont.) 2. When the Revive is actively evaluating the air quality and humidity levels, the “AIR” and “HUM” indicators will be illuminated. This is also an indication that the Water Tank has a Step 2 sufficient amount of water for the humidifier to function. -
Page 20: Adjusting The Seasonal Allergy Setting
ADJUSTING THE SEASONAL ALLERGY SETTING During “allergy season”, or periods when pollen and other allergens are more prevalent in your area, you may opt to increase the sensitivity of the Air Quality Sensor so that the Revive increases the fan speed more frequently in Auto or Eco Mode. Conversely, if you live in an area where allergens are not common, you can decrease the sensitivity of the air quality sensor so that the Revive stays at a low fan speed more often in Auto or Eco Mode. -
Page 21: Filter Change Indicator
FILTER CHANGE INDICATOR FILTER CHANGE INDICATOR When the filter replacement cycle has been reached for one or more of the filters, the Filter Change Indicator becomes illuminated. A light will come on next to the name of the filter (or filters) that needs to be replaced. 1. -
Page 22: Air Filter Maintenance
AIR FILTER MAINTENANCE AIR FILTER CARE OVERVIEW Below is a recommended cleaning and replacement schedule for all of the Revive’s air filters. This is only a guideline, however, as time of use and prevailing air quality will have the greatest effect on how often the filters need to be cleaned or replaced. -
Page 23: Cleaning The Air Filters
AIR FILTER MAINTENANCE (cont.) CLEANING THE AIR FILTERS The Revive uses several filters. Some of them should be cleaned on a regular basis, and others must be replaced. Please see page 21 for the complete air filter cleaning and replacement schedule. - Page 24 CLEANING THE AIR FILTERS (cont.) 2. Cleaning the Specialized Filter a. Remove the Back Cover by pulling down on the indentation at the top and lifting it away from the body of the machine. b. Pull out the Specialized Filter. c.
-
Page 25: Replacing The Air Filters
AIR FILTER MAINTENANCE (cont.) REPLACING THE AIR FILTERS 1. Remove the Front Cover by pulling the top of the cover towards you and then lifting up to disengage the bottom hinges. 2. Remove the Mesh Pre-Filter by pressing down on the two tabs at the top of the filter and pulling the filter out of the machine. -
Page 26: Humidifier Maintenance
Water Tank, the Water Tray, and the Humidifier Filter. The frequency of scale build-up depends on the hardness of the water put into the system. For maximum effectiveness, use a Brondell H2O+ Water Filtration unit in combination with the Revive. - Page 27 HUMIDIFIER MAINTENANCE (cont.) CLEANING THE HUMIDIFIER COMPONENTS (cont.) 2. Cleaning the Water Tray a. Remove the Water Tank and set it aside. If you also need to clean the tank, follow the steps on page 25. b. Remove the Humidifier Filter from the Water Tray and set it aside (see Step 3 below if you need to also clean the Humidifier Filter).
-
Page 28: Additional Maintenance
ADDITIONAL MAINTENANCE CLEANING THE EXTERIOR Below is a recommended cleaning schedule for the Revive’s exterior and Air Quality Sensor. This is only a guideline, however, as time of use and prevailing air quality will have the greatest effect on how often these components need to be cleaned. COMPONENT CLEANING CYCLE Back Cover... -
Page 29: Cleaning The Air Quality Sensor
ADDITIONAL MAINTENANCE (cont.) CLEANING THE EXTERIOR (cont.) 4. Cleaning the Air Quality Sensor a. As you are facing the unit, locate the Air Quality Sensor on the left side. Open the cover by pulling down on the indentation at the top and lowering it to a 90° angle. The cover is not removable, and will stay in place while opened. -
Page 30: Troubleshooting
The power cord is not plugged in or Plug the power cord into an electric properly inserted into the electrical outlet rated for 120V. outlet. Contact the Brondell Service Center Power plug or cord is damaged. The Revive is not powered on. Press the Power Button. CONDITION... - Page 31 Contact the Brondell Service Center Blockage at Air Inlet or Air Outlet. Filters are due for replacement. Replace with a new filter set. Ensure that there is clearance of 20...
-
Page 32: Product Specifications
PRODUCT SPECIFICATIONS Model Revive PR50-W, PR50-B Rated power source 120 V ~ 60 Hz Power consumption 65 W CADR Maximum recommended 350 sq. ft. room size Maximum airflow volume* 251 cu. ft./ min Water tank capacity 0.92 gal / 3.5 L... -
Page 33: Warranty
• Damage or loss resulting from acts which are not the fault of Brondell or which the Product is not specified to tolerate. 4. This warranty gives you specific legal rights. You may have other rights which vary from state to state.
Need help?
Do you have a question about the REVIVE PR50-W and is the answer not in the manual?
Questions and answers