Intermec PB42 Instructions Manual
4-bay charging dock
Hide thumbs
Also See for PB42:
- Installation manual (46 pages) ,
- User manual (42 pages) ,
- Quick start manual (10 pages)
Advertisement
Available languages
Available languages
Quick Links
Advertisement

Related Manuals for Intermec PB42


Summary of Contents for Intermec PB42
- Page 1 Instructions 说明 Instructions Anleitungen Instruções Инструкции Instrucciones AC10 4-Bay Charging Dock 四槽充电底座 Socle de charge à 4 logements AC10 Ladedock AC10 mit vier Ladesteckplätzen Carregador de 4 compartimentos AC10 4-гнездовая зарядная стойка AC10 Acoplador de carga de 4 compartimientos...
-
Page 2: Table Of Contents
Contents AC10 4-Bay Charging Dock Instructions ....1 AC10 四槽充电底座说明 ......5 Instructions pour le socle de charge à... -
Page 3: Ac10 4-Bay Charging Dock Instructions
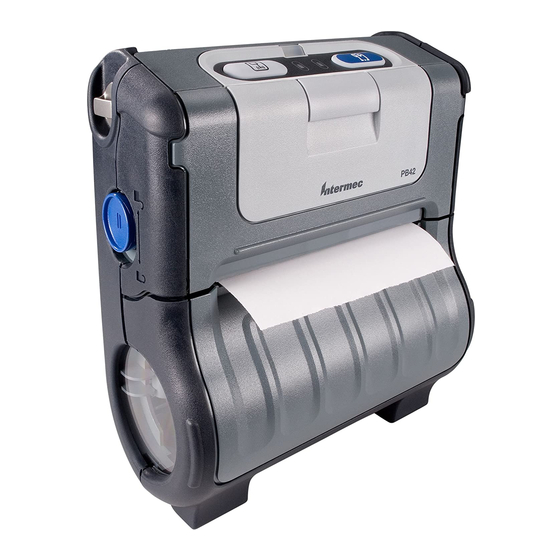
AC10 4-Bay Charging Dock Instructions The AC10 4-Bay Charging Dock (P/N 270-049-001) can charge the batteries in up to four PB42 printers at one time. It takes less than 8 hours to fully charge the batteries. Shipping Box Contents • AC10 4-Bay Charging Dock •... - Page 4 2 Secure the power supply cable to the AC10 with the retaining clip. Retaining clip 3 Connect one end of the power cord to the power supply and then plug the other end into an AC outlet. The green Power light turns on, showing that the charging dock is ready to charge.
-
Page 5: Charging The Batteries
Charging the Batteries • Insert the PB42 with batteries installed into any of the four bays on the charging dock. The printer makes the Power sound. If you do not hear the Power sound, make sure the printer is properly inserted into the bay of the charging dock. - Page 6 Where to Find More Information Visit the Intermec web site at www.intermec.com to download our current manuals (in PDF). To order printed versions of the Intermec manuals, contact your local Intermec representative or distributor. Visit the Intermec support services knowledge base (Knowledge Central) at intermec.custhelp.com to review technical...
-
Page 7: Ac10 四槽充电底座说明
AC10 四 槽 充 电 底 座 (P/N 270-049-001) 一 次 可 对 多 达 四 台 PB42 打印机进行充电。电池充满电的时长不超过 8 小时。 包装箱内容 • AC10 四槽充电底座 四槽充电底座说明 • AC10 • 遵守规定 • Intermec 12 VDC 电源 (P/N 851-082-003) 未提供的物件 • AC 电源线。 您需要根据您的所在地购买合适的电源线。 要寻求帮助,请与您的 Intermec 销售代表联系。 安装 AC10 1 将电源连接到充电底座上的 DC 电源连接器。... - Page 8 2 用固定夹将电缆固定到 AC10 上。 3 将电源线的尾端连接到电源,然后将另一端插入 AC 接 口。绿色的电源灯亮起,表明充电底座准备开始充电。...
- Page 9 电池充电 • 将已安装电池的 PB42 插入到充电底座上四槽中任意一 处。打印机将发出通电声音。 如果您没有听到通电声,请确保打印机已正确插入到充电 底座的槽位中。 上电池灯的含义 PB42 灯的状态 说明 稳定红色 电池正在充电。 稳定绿色 电池充电完成。 电池回收信息 本产品含锂离子电池。电池使用寿命结束后,请 将其交给合格的回收者或危险物材料处理者进 行处理。如果您不确定如何正确地处理电池,请 与当地 Intermec 销售代表联系获取处理信息。 注意:在美国,美国环保署 (EPA) 不认为用尽 的锂电池是有害废弃物。 PB42...
- Page 10 如何获取详细信息 访问 Intermec 网站 www.intermec.com 下载最新手册 (PDF 格式)。若想订购 Intermec 手册的印刷版本,请与当地 Intermec 代表或发行商联系。 访问 intermec.custhelp.com 上的 Intermec 支持服务知识库 (知识中心) ,查看技术信息或为您的 Intermec 产品申请 技术支持。您也可致电:1-800-755-5505。 请查看 “遵守规定”了解与本产品相关的使用 限制。 额定电压及电流:12 VDC 4A...
-
Page 11: Instructions Pour Le Socle De Charge À 4 Logements Ac10
Instructions pour le socle de charge à 4 logements AC10 • Déclaration de conformité • Bloc d’alimentation Intermec 12 V c.c. (n° de réf. : 851-082-003) Articles non compris • Cordon d’alimentation c.a. Vous devez acheter le cordon d’alimentation approprié pour votre emplacement. Communiquez avec votre représentant aux ventes Intermec pour obtenir de l’aide. - Page 12 2 Fixez le câble d’alimentation au AC10 à l’aide de la pince de retenue. Pince de retenue 3 Raccordez une extrémité du cordon d’alimentation au bloc d’alimentation puis branchez l’autre extrémité dans une prise électrique c.a. Le voyant vert d’alimentation s’allume, indiquant que le socle est prêt pour la charge.
- Page 13 Charge des piles • Insérez le PB42, avec les piles, dans n'importe quel logement du socle de charge. L’imprimante émet alors le son de mise en marche. Si aucun son ne se fait entendre, assurez-vous que l'imprimante est bien insérée dans le logement du socle.
- Page 14 (en format PDF). Pour en commander des versions imprimées, contactez votre représentant ou distributeur Intermec. Visitez la centrale Intermec de soutien (Knowledge Central) au intermec.custhelp.com pour examiner les informations techniques ou demander une assistance technique pour votre produit Intermec. Vous pouvez aussi leur téléphoner au 1-800-755-5505.
-
Page 15: Anleitung Für Das Ladedock Ac10 Mit Vier Ladesteckplätzen
Anleitung für das Ladedock AC10 mit vier Ladesteckplätzen Das Ladedock AC10 mit vier Ladesteckplätzen (Bestellnr. 270-049- 001) kann gleichzeitig die Akkus in bis zu vier Druckern des Modells PB42 laden. Die Akkus werden in maximal 8 Stunden vollständig aufgeladen. Der Versandkarton enthält: •... - Page 16 2 Schließen Sie das Netzkabel mit dem Sicherungsclip am Modell AC10 an. Sicherungsclip 3 Schließen Sie ein Ende des Netzkabels am Netzteil und dann das andere Ende an eine Wechselstromsteckdose an. Die grüne Netzleuchte leuchtet auf und weist dadurch aus, dass das Ladedock bereit zum Laden ist.
- Page 17 Laden der Akkus • Setzen Sie das Modell PB42 mit eingebautem Akkusatz in einen der vier Ladesteckplätze des Ladedocks ein. Der Drucker gibt das Stromversorgungssignal ab. Falls dies nicht der Fall ist, vergewissern Sie sich, dass der Drucker korrekt in den Ladesteckplatz des Ladedocks eingesetzt ist.
- Page 18 Verweise zu weiteren Informationen Besuchen Sie die Intermec-Website unter www.intermec.com, um eines unserer aktuellen Handbücher im PDF-Format herunterzuladen. Zur Bestellung gedruckter Versionen von Intermec-Handbüchern wenden Sie sich an Ihren örtlichen Intermec-Vertreter oder -Vertrieb. Besuchen Sie die Bibliothek des technischen Kundendienstes von Intermec (Knowledge Central) unter intermec.custhelp.com, um...
-
Page 19: Instruções De Uso Do Carregador De 4 Compartimentos Ac10
Instruções de uso do carregador de 4 compartimentos AC10 • Encarte sobre conformidade • Fonte de alimentação de 12 V CC da Intermec (N/P 851-082-003) Componentes não fornecidos • Cabo de alimentação de CA. O usuário deve adquirir o cabo de alimentação apropriado ao local onde se encontra. - Page 20 Presilha de retenção 3 Conecte uma extremidade do cabo de alimentação à fonte de alimentação e a outra em uma tomada de CA. A luz verde indicadora de potência se acenderá, indicando que o carregador está pronto para ser usado. Luz indicadora de potência...
- Page 21 Como carregar as baterias • Insira a PB42 com as baterias instaladas em um dos quatro compartimentos do carregador. A impressora emitirá um som de ativação. Se não ouvir o som, assegure-se de que a impressora esteja inserida corretamente no compartimento do carregador.
- Page 22 Visite o site da Intermec no endereço http://www.intermec.com para baixar os manuais atualizados em formato PDF. Para solicitar versões impressas dos manuais da Intermec, entre em contato com o representante ou distribuidor local da Intermec. Visite a base de conhecimento do departamento de serviços de suporte da Intermec (Knowledge Central) no site http://intermec.custhelp.com...
-
Page 23: Инструкции По Эксплуатации 4-Гнездовой Зарядной Стойки Ac10
Инструкции по эксплуатации 4-гнездовой зарядной стойки AC10 4-гнездовая зарядная стойка AC10 (изд. № 270-049-001) позволяет одновременно заряжать до четырех батареек принтеров PB42. Полная зарядка батареек производится меньше чем за 8 часов. Содержимое упаковочной коробки • 4-гнездовая зарядная стойка AC10 •... - Page 24 2 Закрепите кабель питания на AC10 при помощи держателя. Держатель 3 Подсоедините один конец шнура питания к блоку питания, а затем вставьте вилку на втором конце в розетку переменного тока. Загорится зеленый индикатор питания, показывая, что зарядная стойка готова к зарядке. Индикатор...
- Page 25 Зарядка батареек • Вставьте PB42 с установленными в него батарейками в любое из четырех гнезд зарядной стойки. Принтер подаст звуковой сигнал «Питание». Если вы не услышите сигнал «Питание», проверьте, правильно ли вставлен принтер в секцию зарядного устройства. Что означают световые индикаторы батареек на PB42 Состояние...
- Page 26 Посетите базу знаний технической помощи Intermec (Knowledge Central) на сайте intermec.custhelp.com, где вы можете просмотреть техническую информацию или обратиться за технической помощью в отношении изделия Intermec, с которым вы работаете. Вы можете также связаться с ними по телефону 1-800-755-5505. Ограничения, связанные с использованием...
-
Page 27: Instrucciones Para El Acoplador De Carga De 4 Compartimientos Ac10
4 compartimientos AC10 El acoplador de carga de 4 compartimientos AC10 (P/N 270-049-001) puede cargar las baterías de hasta cuatro impresoras PB42 al mismo tiempo. Tarda menos de 8 horas en cargar totalmente las baterías. Contenido de la caja de envío •... - Page 28 2 Asegure el cable de la fuente de alimentación al AC10 con la presilla de retención. Presilla de retención 3 Conecte un extremo del cable de alimentación a la fuente de alimentación y luego enchufe el otro extremo en un tomacorriente de CA.
- Page 29 Carga de las baterías • Inserte la PB42 con baterías instaladas en cualquiera de los cuatro compartimientos del acoplador de carga. La impresora hace el sonido de encendido. Si no se oye el sonido de encendido, revise que la impresora esté bien insertada en el compartimiento del acoplador de carga.
- Page 30 Intermec, diríjase a su representante o distribuidor local de Intermec. Visite la base de conocimientos de servicios de asistencia de Intermec (Knowledge Central) en intermec.custhelp.com para evaluar información técnica o para pedir asistencia técnica para su producto Intermec.
- Page 32 Worldwide Headquarters 6001 36th Avenue West Everett, Washington 98203 U.S.A. tel 425.348.2600 fax 425.355.9551 www.intermec.com © 2006 Intermec Technologies Corporation. All rights reserved. AC10 4-Bay Charging Dock Instructions *930-118-001* P/N 930-118-001...
Need help?
Do you have a question about the PB42 and is the answer not in the manual?
Questions and answers