Table of Contents

Related Manuals for Boyo VTC703AHD


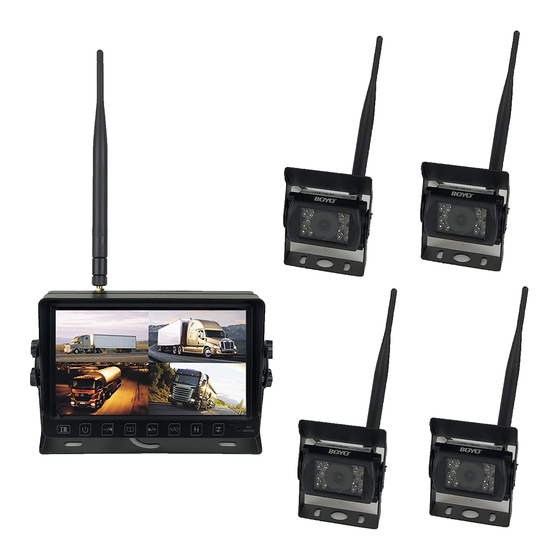
Summary of Contents for Boyo VTC703AHD
- Page 1 VTC703AHD VTC703AHD-Q2 VTC703AHD-Q4 7” 1080P Full HD Digital Wireless 2/4 Channel Monitor and Camera System with Digital Video Recorder USER MANUAL Please read the instructional complete before use and keep it for future reference.
-
Page 2: Product Features
Product Features • 1080P Full HD Image Quality System • 7” All View Angle IPS TFT LCD Panel • 4 Channel Wireless Monitor with Single, Dual, or Quad View • Waterproofed, Heavy Duty Wireless Camera • Reliable Wireless Operational Range up to 300 ft •... -
Page 3: Monitor Installation
Wiring a. Monitor wiring: Use 12V Adapter. Use a power chord. Power cord RED: to ACC+ BLACK: to ground / chassis b. Camera wiring: Use a power chord. Power cord RED: to ACC+ BLACK: to ground / chassis Monitor Installation a. -
Page 4: Operation
b. Install the monitor using 2 bolts on each sided. * Do not tighten bolts. c. Adjust the monitor angle. * Tighten all bolts. Operation The wireless camera system is operated using the buttons on the front face of the monitor. These are 7 buttons. Each button has different function in three different modes. - Page 5 1. Monitor Button Functions Split Screen Multi-Channel Display Mode Function Button Screen Display On / Off Audio Channel - Audio Channel + Display Mode: Display Channel 1 Flip Screen Display Vertically Flip Screen Display Horizontally Single Channel Screen Display Mode Function Button Screen Display On / Off...
- Page 6 Menu Mode Button Function Screen Display On / Off ‘- Decrease Previous Menu Item Exit Menu Next Menu Item + Increase Select Submenu Confirm...
- Page 7 2. Menu Button – Single Channel Screen Display Mode Pairing: By pairing assign a camera to each channel Picture Setting: Brightness, Contrast, Saturation, Audio Volume Picture Orientation: Flip L/R, Flip U/D Screen Display Settings: Dual, or Quad split screen on/off Camera Settings: Camera on/off, Display Scan time System Settings:...
- Page 8 3. Pairing: For a wireless camera to transmit video to a monitor, each camera must be paired with specific monitor channel (or screen division). In the following example, Ch 1 has been selected (Ch 1 single screen display mode). Menu button is pressed. ‘Pairing’...
- Page 9 4. Picture Settings: Decrease Increase Brightness Contrast Volume...
- Page 10 5. Picture Orientation: Normal Camera pointing forward: An object at the front-right side of the vehicle is displayed on the right side of the screen. Normal Camera pointing backward - installed as a rearview camera: Flip image horizontally. An object at the rear- right side of the vehicle is displayed on the right side of the screen.
- Page 11 Other 2-screen divisions ( ) will be disabled (greyed-out). VTC703AHD-Q4: If Camera 2 is turned off in the camera setting menu ( ), the screen divisions, ( ) will be disabled from selection and grayed out.
- Page 12 Auto Scan ON or OFF. Display a camera for the specified auto scan time and display next camera for the specified auto scan time. And so Defaults: VTC703AHD-Q2: Camera 1 and Camera 2 are turned on from the factory. VTC703AHD-Q4: All cameras are turned on from the factory.
- Page 13 8. System Settings: Set System Time Select UI Language Auto Dim On or Off. The setting dims the display when it becomes dark Trigger off display – Not available in this version Parking guidelines on/Off Reset system to the factory defaults...
- Page 14 9. Playback Recording: The recorded video can be played on the monitor. Here are steps: a. From the main menu, select ‘Play’ and the available storage media will be displayed. b. Select a storage media (by clicking the button) and the recording list will be displayed.
- Page 15 10. Record Settings: ON: Overwrite the oldest recording when storage is full. OFF: Stop recording when storage is full. ON: Format SD card. Support up to 128GB Class 10...
- Page 16 Monitor, Camera and Wireless Specifications 1. Monitor Specification Panel: 7” Digital Panel TFT IPS panel View Angle: Full Angle of View Resolution: 1024*600 Display Ratio: 16:9 Audio: Built-in Speaker with Volume Control Buttons Image Control: Reverse / Non-Reverse (Horizontal Flip) Parking Guidelines: Display / No-Display (Selectable) Operating Voltage:...
- Page 17 4. DVR Specification Recording: Per channel Resolution: 640x480 or 1024x608 Frame per Second 30fps Memory Card SD Class 10 or above Storage Size Max. 128GB...
-
Page 18: Warranty Information
BOYO®- brand parts. This warranty is VOID if you purchased this product as used, floor model sample, or refurbished;...
Need help?
Do you have a question about the VTC703AHD and is the answer not in the manual?
Questions and answers