Advertisement
Available languages
Available languages
Quick Links
StudSensor
i
60 OneStep
Multifunction Stud Finder
Congratulations on purchasing one of the most technologically
advanced stud finders ever created! Zircon introduced the
StudSensor
™
in 1980 and has put over 25 years of research into
developing OneStep
, the advanced technology at the core of
™
StudSensor
i
60. OneStep technology senses, processes, and adapts
to wall surfaces to provide visibility into walls, floors, and ceilings.
i
StudSensor
60 is one of the fastest, most accurate, and easiest-to-use
stud finders on the market today.
REGISTER YOUR PRODUCT TO WIN!
Register your product today and be automatically entered in our monthly drawings
to win free Zircon products. To quickly and easily register your Zircon product, please
visit www.zircon.com
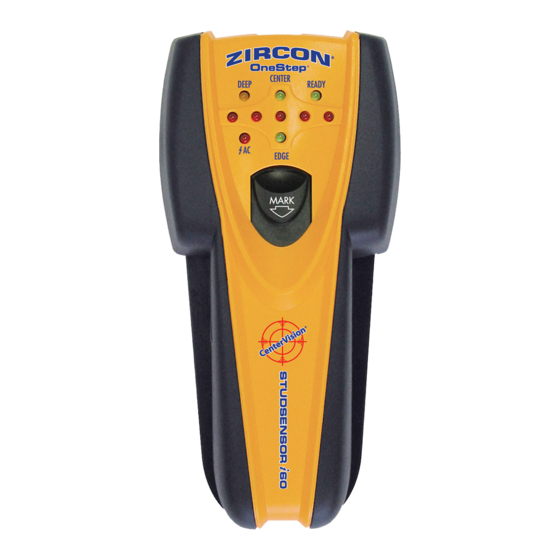
Deep Target
SpotLite
®
Indication
Pointing System
WireWarning
™
Indication
Erasable Marker
MARK
Power Button
Running Board
Battery (back of unit)
1. OPERATING TIPS
Hold the tool straight up and down, parallel
to the stud. Do not rotate the tool.
Keep tool flat against the wall and do not
rock or tilt the tool when scanning.
If StudSensor i60 beeps and all of the LEDs
blink repeatedly, the unit needs to be placed
back onto the wall and recalibrated.
2. FINDING A STUD
™
Always start with the scanner placed against the wall, then
press the power button. Wait for beep to confirm calibration
™
has completed before moving tool.
Slowly slide tool across
surface. EDGE LED will
illuminate, indicating
location of the stud edge.
Continue sliding tool. When
the center of the stud is located,
the buzzer will sound, and
both the CENTER LED and the
SpotLite will illuminate.
In cases of deeper studs (or
thicker walls) only the three
middle and CENTER LEDs will
illuminate. If you still can't
Center
locate a stud, try the next step.
Indication
Quickly (within one second)
release and re-press the power
button. The scanner will enter the
Ready to Scan
Indication
High Sensitivity Mode and the
DEEP LED will flash continuously.
Center of a very deep stud will
be indicated by the three middle
Edge
LEDs illuminating.
Indication
3. MARKING THE LOCATION
Once an object is located, mark the
location by gently pulling down the
MARK button with your fingertip.
A pencil point will extend from the
Extra Marker Tips
front of the handle, placing a short,
(behind battery)
erasable line on the wall.
4. AC WIREWARNING
Zircon's AC WireWarning feature
works continuously. When AC
voltage is detected, the AC Alert
warning icon will illuminate.
5. SCANNING DIFFERENT SURFACES
Wallpaper: The StudSensor
with wallpaper or fabric, unless the materials are metallic foil, contain
metallic fibers, or are still wet after application.
Textured walls, acoustic ceilings, or uneven surfaces: Place thin
cardboard on the surface to be scanned. Calibrate with the cardboard
in place, then begin scanning.
Wood flooring, subflooring, or gypsum
over plywood sheathing: Auto Depth Sensing
automatically corrects for target depth in both
normal and high sensitivity modes.
Note: Sensing depth and accuracy can vary due to moisture
content of materials, wall texture, and paint.
6. CHANGING MARKER TIPS
Removal: Pull and hold the MARK button to
fully extend the marker tip. Grasp the marker
and pull it off the marker post.
Replace: Pull and hold the MARK button
to fully extend the marker post. Push the
new marker onto the marker post.
Note: Two spare markers are stored in the battery compartment. Additional
marker tips can be ordered from customer service at 1-800-245-9265.
FCC Part 15 Class B Registration Warning
This equipment has been tested and found to comply with the limits for a Class B
digital device, pursuant to Part 15 of FCC Rules.
LIMITED 1 YEAR WARRANTY
Zircon Corporation, ("Zircon") warrants this product to
be free from defects in materials and workmanship for
one year from the date of purchase. Any in-warranty
defective product returned to Zircon*, freight prepaid
with proof of purchase date and $5.00 to cover postage
and handling, will be repaired or replaced at Zircon's
™
option. This warranty is limited to the electronic circuitry
and original case of the product and specifically excludes
damage caused by abuse, unreasonable use or neglect.
This warranty is in lieu of all other warranties, express
or implied, and no other representations or claims of
any nature shall bind or obligate Zircon. Any implied
warranties applicable to this product are limited to the
one year period following its purchase. IN NO EVENT
WILL ZIRCON BE LIABLE FOR ANY SPECIAL, INCIDENTAL
OR CONSEQUENTIAL DAMAGES RESULTING FROM
POSSESSION, USE OR MALFUNCTION OF THIS PRODUCT.
In accordance with government regulations, you are
advised that: (i) some states do not allow limitations on
how long an implied warranty lasts and/or the exclusion
or limitation of incidental or consequential damages,
so the above limitations and/or exclusions may not apply
i
60 functions normally on walls covered
to you, and further (ii) this warranty gives you specific
legal rights and you may also have other rights which
vary from state to state.
Return product freight prepaid with proof of purchase
date (dated sales receipt) and $5.00 to cover postage
and handling, to:
Zircon Corporation
*Attn: Returns Department
1600 Dell Avenue, Unit K
Campbell, CA 95008-6992 USA
Be sure to include your name and return address. Out of
warranty service and repair, where proof of purchase
is not provided, shall be returned with repairs charged
C.O.D. Allow 4 to 6 weeks for delivery.
Customer Service, 1-800-245-9265 or 1-408-963-4550
Monday–Friday, 8:00 a.m. to 5:00 p.m. PST
E-mail: info@zircon.com
U.S. Patents 6259241, 6291970, Canada Patents
2341385, 2353156, Japan Patent 3581851,
and Patents Pending
©2005 Zircon Corporation • P/N 60327 • Rev A 08/05
Advertisement

Related Manuals for Zircon StudSensor i60 OneStep


Summary of Contents for Zircon StudSensor i60 OneStep
- Page 1 Register your product today and be automatically entered in our monthly drawings 6. CHANGING MARKER TIPS thicker walls) only the three to win free Zircon products. To quickly and easily register your Zircon product, please Removal: Pull and hold the MARK button to middle and CENTER LEDs will visit www.zircon.com...
- Page 2 Sostenga la herramienta recta, paralela devolverá reparado y el pago será contra entrega. Deje partir de la fecha de su compra. EN NINGÚN CASO ZIRCON transcurrir de 4 a 6 semanas para el envío. a la viga. No gire la herramienta.
- Page 3 Enregistrer son produit dès aujourd’hui pour participer automatiquement à notre loterie Dans le cas de montants plus 6. CHANGEMENT DES EMBOUTS DE MARQUEUR mensuelle où l’on peut gagner des produits Zircon. Pour enregistrer rapidement et profonds (ou de murs plus épais), facilement son produit Zircon, visiter www.zircon.com Enlèvement : Tirer et tenir le bouton...
Need help?
Do you have a question about the StudSensor i60 OneStep and is the answer not in the manual?
Questions and answers