Table of Contents
Advertisement
Advertisement
Table of Contents

Related Manuals for Carestream CS 8100


Summary of Contents for Carestream CS 8100
- Page 1 User Guide...
- Page 2 The Cephalometric Modality User guide includes information on the Cephalometric modality for the CS 8100 and CS 8100 3D Families. For Panoramic or 3D modalities, see the Panoramic Modality User guide for the CS 8100 Family or the Panoramic and 3D Modality User guide for the CS 8100 3D Family.
-
Page 3: Table Of Contents
Head and Chin Rest......8 CS 8100 Family - Head and Chin Rest ... . 8 CS 8100 3D Family - Head and Chin Rest . - Page 4 Launching the X-ray ..... . 36 X-ray Dose Emission Information....37 Acquiring a Submento-Vertex Image for the Adult and Pediatric Patient .
-
Page 5: Conventions In This Guide
CAUTION: Alerts you to a condition that might cause serious damage. Important: Alerts you to a condition that might cause problems. Note: Emphasizes important information. Tip: Provides extra information and hints. Cephalometric Modality User guide for CS 8100 Family and CS 8100 3D Family_SM987_Ed02... -
Page 6: Conventions In This Guide
Chapter 1 Conventions in This Guide... - Page 7 26x24 FoV with licence upgrade. For Panoramic and 3D Modalities, see the Panoramic Modality User guide for the CS 8100 Family or the Panoramic and 3D Modality User guide for the CS 8100 3D Family.
-
Page 8: Mobile Components
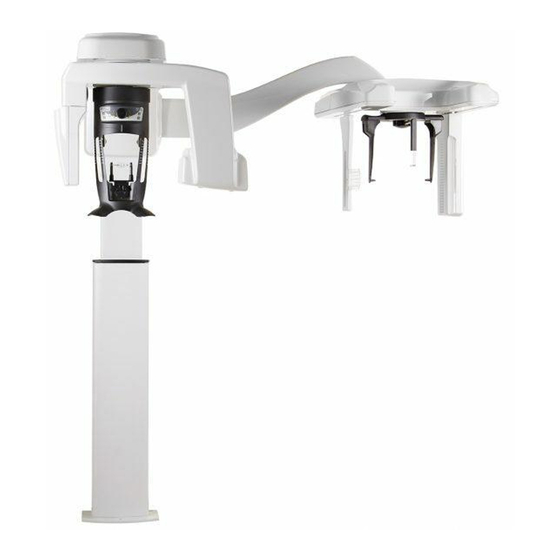
Mobile Components Figure 1 illustrates the: • Up and down movement of the unit mobile components • Rotation and translation movement of the rotative arm and the cephalostat Figure 1 CS 8100SC Unit Mobile Components Figure 2 CS 8100SC 3D Unit Mobile Components The patient can enter either the left side or the right Important: side of the unit. -
Page 9: General Functional Components
17 X-ray remote control Head and chin rest 18 Carpus panel (optional) Chin rest and bite block 19 Computer hosting the imaging and the acquisition software 10 Panoramic digital sensor Cephalometric Modality User guide for CS 8100 Family and CS 8100 3D Family_SM987_Ed02... - Page 10 Figure 4 CS 8100SC 3D Functional Components Unit rotative arm 11 Unit column Unit head 12 Frankfort positioning indicator Emergency stop knob 13 Secondary collimator ON/OFF button 14 Nasion support Cephalostat arm 15 Head clamps and ear cones Cephalostat head 16 Cephalometric digital sensor X-ray source assembly 17 X-ray remote control...
-
Page 11: Digital Sensor Locations
The following figures illustrates the locations of the digital sensors and cepahometric sensors of the units. Figure 5 CS 8100SC digital sensor and cephalometric sensor locations Figure 6 CS 8100SC 3D digital sensor and cephalometric sensor locations Cephalometric Modality User guide for CS 8100 Family and CS 8100 3D Family_SM987_Ed02... -
Page 12: Head And Chin Rest
Head and Chin Rest CS 8100 Family - Head and Chin Rest Figure 7 illustrates the functional components of the CS 8100 Family head and chin rest. Figure 7 CS 8100 Family Head and Chin Rest - Functional Components Positioning Panel... -
Page 13: Cs 8100 3D Family - Head And Chin Rest
CS 8100 3D Family - Head and Chin Rest Figure 8 illustrates the functional components of the CS 8100 3D Family head and chin rest. Figure 8 CS 8100 3D Family Head and Chin Rest - Functional Components Positioning Panel... -
Page 14: Positioning Panel
Ready Indicator LED: Green indicates that the unit is ready for acquisition. Frontal head rest adjustment knob (CS 8100 Family only): Positions the up or down inclination of the patient head by turning the knob. -
Page 15: Cephalometric Modality Positioning Accessories
The following accessories are used when positioning a patient using the Cephalometric Modality. Table 1 Cephalometric Modality Positioning Accessories Accessory Description Single use sheaths for ear cones Carpus panel (optional) Frankfort positioning indicator Cephalometric Modality User guide for CS 8100 Family and CS 8100 3D Family_SM987_Ed02... -
Page 16: X-Ray Remote Control Overview
X-ray Remote Control Overview The X-ray remote control enables you to launch a radiological image acquisition via the exposure button from outside the X-ray room. You must press and hold the exposure button until the end of acquisition. Premature release of the exposure button interrupts the acquisition. -
Page 17: Computer System Requirements
The unit MUST be connected to the computer via a point-to-point Ethernet link and not via a LAN. General Software Overview The CS 8100 Family and CS 8100 3D Family Cephalometric Modality operates with the following software: • CS Imaging Software •... -
Page 18: Cephalometric Acquisition Interface Overview
Cephalometric Acquisition Interface Overview The Acquisition interface provides you with imaging acquisition functions. Figure 1 Cephalometric Acquisition Interface Information button: • Show versions: Identifies Software and Firmware versions. • Resetting Anatomy setting: Resets to the manufacturing parameter settings. • Memorize Anatomy setting: Memorizes the user preference settings for each patient type (kV, mA and seconds). - Page 19 Acquisition at a higher resolution for more precision. exam. Note: The above list of exam types are only a sample of exam options of the Program pane. Cephalometric Modality User guide for CS 8100 Family and CS 8100 3D Family_SM987_Ed02...
- Page 20 Click if the patient is large. Important: See the CS 8100 Family and CS 8100 3D Family Safety, Regulatory and Technical Specifications User Guides for information on radiation protection and recommendations when you select a patient type, especially the pediatric patient.
- Page 21 To save a parameter setting for a specific patient type, click and select Memorize Anatomy setting. Figure 4 Parameter Pane Exposure setting options: kV: Kilovolt mA: Milliampere Fine-tuning buttons: Click to fine-tune the kV and the mA. Cephalometric Modality User guide for CS 8100 Family and CS 8100 3D Family_SM987_Ed02...
- Page 22 18 Chapter 3 Imaging Software Overview...
-
Page 23: Switching On The Unit
Repeat Steps 2 to 4 for the following parameters: • 80 kV - 10 mA • 85 kV - 10 mA The unit is now ready to be used for acquisition. Cephalometric Modality User guide for CS 8100 Family and CS 8100 3D Family_SM987_Ed02 19... -
Page 24: Firewall Or Network Settings
Firewall or Network Settings You will not be able to access the Cephalometric Acquisition interface if you have not configured the firewall or network settings. To configure the firewall or network settings, follow these steps: On your desktop, double-click to open the CS Imaging Software. The Windows Security Alert dialog box displays. -
Page 25: Accessing The Cephalometric Acquisition Interface
Cephalometric Acquisition Interface. The Cephalometric Acquisition interface is displayed. Chapter 5—Acquiring Images using the Cephalometric Modality for information on how to launch an acquisition. Cephalometric Modality User guide for CS 8100 Family and CS 8100 3D Family_SM987_Ed02 21... - Page 26 22 Chapter 4 Getting Started...
-
Page 27: Acquiring A Lateral Image For The Adult And Pediatric Patient
Program pane exam options. When you position the head clamps manually, the relevant exam option icon becomes active. the Cephalometric Acquisition Interface, select the appropriate FoV option. Cephalometric Modality User guide for CS 8100 Family and CS 8100 3D Family_SM987_Ed02... - Page 28 Child • Adult: Small, Medium, Large Important: See the CS 8100 Family and CS 8100 3D Family Safety, Regulatory and Technical Specifications User Guides for information on radiation protection and recommendations when you select a patient type especially the pediatric patient.
-
Page 29: Preparing And Positioning The Adult And Pediatric Patient
Place both ears in between the head clamps. 5. On the positioning panel, press and hold until you get the ear cones to the same height of ear auditory canals. Cephalometric Modality User guide for CS 8100 Family and CS 8100 3D Family_SM987_Ed02... - Page 30 6. Gently push in at the top part of a head clamp bar to retract both head clamp bars and to fit the ear cones into the ear auditory canals. Lower the nasion support to a vertical position. 8. Use the Frankfort positioning indicator as a visual aid to adjust the up or down inclination of the patient head for a Frankfort plane horizontal alignment.
-
Page 31: Launching The X-Ray
The radiation emission dose is expressed in mGy.cm . This dose is measured at the primary collimator outlet. The dose is accurate to +/-30%. Cephalometric Modality User guide for CS 8100 Family and CS 8100 3D Family_SM987_Ed02... -
Page 32: Acquiring A Frontal Ap And Pa Image For The Adult And Pediatric Patient
Acquiring a Frontal AP and PA Image for the Adult and Pediatric Patient Before acquiring an image, check that you have: • Selected the patient record. • Accessed the CS Imaging Software. • Accessed the Cephalometric Acquisition Interface. Preparing the Unit and Setting the Acquisition Parameters To set the acquisition parameters, follow these steps: 1. - Page 33 5. (Optional) If the default parameter setting is not adapted to your patient type, click the Parameter button: • Select the appropriate parameters. • Click and select Memorize Anatomy setting if you want to save the new parameter settings as future default settings. Cephalometric Modality User guide for CS 8100 Family and CS 8100 3D Family_SM987_Ed02...
-
Page 34: Preparing And Positioning The Adult And Pediatric Patient
Preparing and Positioning the Adult and Pediatric Patient To prepare and position the patient, follow these steps: 1. Ask the patient to remove all metal objects. 2. Ask the patient to wear a lead apron. Ensure that the apron lays flat across the patient’s shoulders. 3. - Page 35 6. Gently push in at the top part of a head clamp bar to retract both head clamp bars and to fit the ear cones into the ear auditory canals. Figure 5–1 Frontal AP Figure 5–2 Frontal PA Figure 5–3 Frontal AP Figure 5–4 Frontal PA Cephalometric Modality User guide for CS 8100 Family and CS 8100 3D Family_SM987_Ed02...
-
Page 36: Launching The X-Ray
Launching the X-ray To launch the X-ray, follow these steps: 1. Leave the X-ray room and close the door. You must keep visual contact with the patient during acquisition. Important: If you have a problem that requires you to stop the acquisition, release the exposure button of the remote control or press the red emergency stop button. -
Page 37: X-Ray Dose Emission Information
The radiation emission dose is expressed in mGy.cm . This dose is measured at the primary collimator outlet. The dose is accurate to +/-30%. Cephalometric Modality User guide for CS 8100 Family and CS 8100 3D Family_SM987_Ed02... -
Page 38: Acquiring An Oblique Image For The Adult And Pediatric Patient
Acquiring an Oblique Image for the Adult and Pediatric Patient Before acquiring an image, check that you have: • Selected the patient record. • Accessed the CS Imaging Software. • Accessed the Cephalometric Acquisition Interface. Preparing the Unit and Setting the Acquisition Parameters To set the acquisition parameters, follow these steps: 1. -
Page 39: Preparing And Positioning The Adult And Pediatric Patient
4. Ask the patient to do the following: • Move forward. • Sit or stand up straight. • Place both ears in between the head clamps. Cephalometric Modality User guide for CS 8100 Family and CS 8100 3D Family_SM987_Ed02... -
Page 40: Launching The X-Ray
5. On the control panel, press and hold to level the ear cones to the patient’s auditory canals. 6. Gently push in at the top part of a head clamp bar to retract both head clamp bars and to fit the ear cones into the ear auditory canals. -
Page 41: X-Ray Dose Emission Information
The radiation emission dose is expressed in mGy.cm . This dose is measured at the primary collimator outlet. The dose is accurate to +/-30%. Cephalometric Modality User guide for CS 8100 Family and CS 8100 3D Family_SM987_Ed02... -
Page 42: Acquiring A Submento-Vertex Image For The Adult And Pediatric Patient
Acquiring a Submento-Vertex Image for the Adult and Pediatric Patient Before acquiring an image, check that you have: • Selected the patient record. • Accessed the CS Imaging Software. • Accessed the Cephalometric Acquisition Interface. Preparing the Unit and Setting the Acquisition Parameters To set the acquisition parameters, follow these steps: 1. -
Page 43: Preparing And Positioning The Adult And Pediatric Patient
4. Ask the patient to do the following: • Move forward. • Sit or stand up straight. • Place both ears in between the head clamps. Cephalometric Modality User guide for CS 8100 Family and CS 8100 3D Family_SM987_Ed02... - Page 44 5. On the control panel, press and hold to level the ear cones to the patient’s auditory canals. 6. Gently push in at the top part of a head clamp bar to retract both head clamp bars and to fit the ear cones into the ear auditory canals.
-
Page 45: Launching The X-Ray
Important: If you have a problem that requires you to stop the acquisition, release the exposure button of the remote control or press the red emergency stop button. Cephalometric Modality User guide for CS 8100 Family and CS 8100 3D Family_SM987_Ed02... -
Page 46: X-Ray Dose Emission Information
2. Launch the X-ray with the remote control. Press and hold the exposure button until the end of the acquisition is indicated by the on-screen “Release Handswitch” message. The turns yellow and a warning sound is heard, indicating X-ray emission. When the acquisition ends, the Acquisition interface disappears and the acquired image is automatically transferred to the CS Imaging Software. -
Page 47: Acquiring A Carpus Image For The Adult And Pediatric Patient (Available As An Option)
When the carpus panel is connected to the unit, the acquisition interface is set automatically in the and the Cephalometric Acquisition Interface carpus exam option becomes active. Cephalometric Modality User guide for CS 8100 Family and CS 8100 3D Family_SM987_Ed02... -
Page 48: Preparing And Positioning The Adult And Pediatric Patient
Child • Adult: Small, Medium, Large Important: See the CS 8100 Family and CS 8100 3D Family Safety, Regulatory and Technical Specifications User Guides for information on radiation protection and recommendations when you select a patient type especially the pediatric patient. -
Page 49: Launching The X-Ray
To launch the X-ray, follow these steps: 1. Leave the X-ray room and close the door. You must keep visual contact with the patient during acquisition. Cephalometric Modality User guide for CS 8100 Family and CS 8100 3D Family_SM987_Ed02... -
Page 50: X-Ray Dose Emission Information
Important: If you have a problem that requires you to stop the acquisition, release the exposure button of the remote control or press the red emergency stop button. 2. Launch the X-ray with the remote control. Press and hold the exposure button until the end of the acquisition is indicated by the on-screen “Release Handswitch”... -
Page 51: Maintenance Actions
1. On your desktop, double-click . The Service Tools window is displayed. 2. In the left pane, double-click Image Quality Tool. The Image Quality Control window is displayed. Cephalometric Modality User guide for CS 8100 Family and CS 8100 3D Family_SM987_Ed02... - Page 52 3. Select the desired test and follow the on-screen instructions. 48 Chapter 6 Maintenance...
-
Page 53: Quick Troubleshooting
I 17 The sensor is in the positioning Wait for the end of the positioning process. process for either panoramic, 3D or Ceph mode. Cephalometric Modality User guide for CS 8100 Family and CS 8100 3D Family_SM987_Ed02... - Page 54 50 Chapter 7 Troubleshooting...
-
Page 55: Manufacturer's Address
European Authorized Representative for CS 8100 and CS 8100 Access EC REP TROPHY 4, Rue F. Pelloutier, Croissy-Beaubourg 77435 Marne la Vallée Cedex 2, France European Authorized Representative for CS 8100 3D Family, CS 8100SC and CS 8100SC Access EC REP Carestream Health France 1, rue Galilée 93192 Noisy-Le-Grand Cedex, France Representante no Brasil Carestream do Brasil Comércio e Serviços de Produtos Médicos Ltda. - Page 56 Carestream Dental A Division of Carestream Health, Inc. 150 Verona St. Rochester, NY 14608 For more information: Dental professionals visit www.carestreamdental.com Medical professionals visit www.carestream.com ©Carestream Health, Inc., 2016. SM987 Ed02 2016-10...
Need help?
Do you have a question about the CS 8100 and is the answer not in the manual?
Questions and answers