Advertisement
Advertisement
Table of Contents

Related Manuals for Apollo AIR


Summary of Contents for Apollo AIR
- Page 1 USER MANUAL...
-
Page 2: Introduction
INTRODUCTION Hello World How to get help? Warning Thank you for purchasing the Apollo Air™. We’re here to help regardless of the problem Incorrect assembly, maintenance, or use of The electric scooter industry is still young and you are facing. You can get in touch with us in... -
Page 3: Table Of Contents
Contents Introduction ... 2 Important Info ..4 Specifications ..8 Parts Diagram ..9 General Safety . -
Page 4: Important Info
Keep the packaging of your Incorrect assembly, mainte- relating to the proper use, adjustments and Apollo Air. As stated by our return policy, the nance, or use of your Apollo scooter can cause compo- maintenance of your scooter. You are respon- original packaging will be needed. - Page 5 Take time to familiarise yourself with tions. Apollo is in no way liable or responsible the scooter to avoid accidents during your WARNING! It takes longer to break in wet for any files or legal action due to scooters first outings.
- Page 6 Apollo Scooters declines all responsibility night and during the day. if the user of the electric scooter does not comply with existing regulations.
-
Page 8: Specifications
SPECIFICATIONS CONTENTS APOLLO AIR APOLLO AIR PRO Net weight 16 kg 16 kg Dimensions 116 x 53.5 x 114 cm 116 x 53.5 x 114 cm Maximum load 100 kg 100 kg Minimum load 20 kg 20 kg User height... -
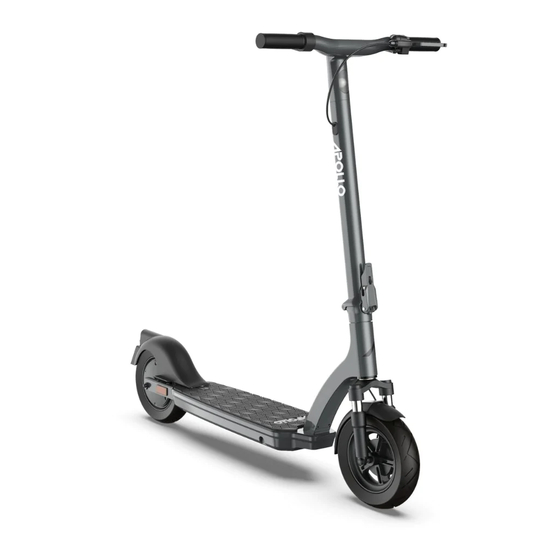
Page 9: Parts Diagram
PARTS DIAGRAM PART NUMBER PART NAME PART NUMBER PART NAME Handles Side reflector Throttle lever Disc Handlebar Rear position light M4 Front position light C2 Rear fender Brake cable Caliper Front stem Locking ring Collar clamp Anti-slip surface Folding hinge Folding latch screw Goose neck Locking hook... -
Page 10: General Safety
We always recom- stand the entire manual and to injury or death. By purchasing an Apollo mend starting slow and getting used to the any documentation provid- ed for subcomponents or scooter, you assume the responsibility for scooter before riding for longer distances. - Page 11 Legislation IMPORTANT Apollo Scooters are designed to be used and It is the responsibility of the customer to operated by adults and should not be used by familiarize themselves with local regulation Do NOT ride under the influence of any anyone younger than 18 years of age.
-
Page 12: First Start-Up
FIRST START-UP To do before using the scooter WARNING: Incorrect assembly, mainte- nance, or use of your Apollo Make sure to follow recommen- components: the scooter and contact the scooter can cause compo- nent or performance failure, dations regarding tire inflation •... - Page 13 resistance of the scooter. Anti-theft protection: Make sure you never leave your electric • Other aesthetics: Check for scooter unattended, and always any cracks and damaged or protect it from theft with a loose components, in which suitable padlock. Use a bicycle case you must contact the lock to lock the scooter’s folding dealer before use.
- Page 15 Safety Requirements Safety instructions LIGHTING WARNING! This electric scooter is intended for users aged 16 and over (due to its maximum speed), up to a height of 190 cm and a max- The scooter is equipped with lighting, consisting of a front posi- imum weight of 100 kg.
-
Page 16: Assembly
ASSEMBLY To do before using the scooter WARNING: Incorrect assembly, mainte- nance, or use of your Apollo Remove the electric scooter and all the various Take the scooter out of its Connect the male connec- scooter can cause compo- parts from the box (keep the packaging, you... -
Page 18: Folding
To fold the scooter: WARNING: Incorrect assembly, mainte- Loosen the quick-release lever to unlock, then lift the clamp. nance, or use of your Apollo scooter can cause compo- If the clamp is blocked and cannot be lifted: nent or performance failure, 1. - Page 19 To unfold the scooter: IF THE CLAMP IS BLOCKED AND Proceed in reverse: push the front stem down to unlock the hook from the CANNOT BE LOWERED: locking ring. Then lift the front stem up to a 1. Lightly push the front stem forward to re- vertical position.
-
Page 20: Operation
OPERATION How to operate the Apollo Air How to stop WARNING: Incorrect assembly, mainte- nance, or use of your Apollo Check that the silicone You must reach a speed To stop the scooter, press the scooter can cause compo- cap is in place covering... - Page 21 Check the alignment of the pads by spinning The Apollo Air has a rear disc brake which The pads exert pressure on the disc attached the wheel, then you’re ready to go.
- Page 22 How to use the charger with damaged power cords or plugs. Make sure the charger plug is properly connected to the mains for charging. Do not short circuit Follow the instructions on the battery charger the charger pins by using a metal object. Turn label.
- Page 23 Do not leave your Apollo Air scooter plugged into the charger overnight. Make sure to charge your Apollo Air battery to 100% at the first charge and at each charge thereafter in order to prolong its lifespan.
-
Page 24: Battery
"Battery specifications" below. Do Incorrect assembly, mainte- tures: the ambient temperature for this battery nance, or use of your Apollo not use the battery if it emits an unusual smell, scooter can cause compo- should range from -10 to +40 ° C. The battery or gets unusually hot. - Page 25 75%-85%. Apollo Air scooter must be recharged. Do not leave the scooter in a discharged state for too • The frequency with which you help the long;...
- Page 26 How to remove the battery Before you do this: The device must be disconnected from the mains power supply to remove the battery. Put the scooter on its side in order to unscrew the 6 screws connecting the deck to the frame as well as the 2 screws fixing the kickstand.
- Page 27 End of life Check that the power supply and the charging The symbol shown here and on the cable of the Apollo Air scooter have been scooter means that this scooter is disconnected. Stabilise the scooter to prevent it classified as an electrical or electronic from falling.
-
Page 28: Display
WARNING: shows you the speed, the battery charge, Incorrect assembly, mainte- whether the front and rear lights are on as nance, or use of your Apollo scooter can cause compo- well as any failure displays. nent or performance failure, loss of control, serious injury, or death. - Page 29 Failure displays: If a malfunction occurs while using your Apollo Air, then one of the following failure display codes will appear on the screen: FAILURE DISPLAY CODE WHAT IT MEANS WHAT TO DO ABOUT IT Check the connection between the brake lever and the LCD controller. Replace the brake lever or the LCD controller. Quick Brake module failure solution: replace the whole handlebar.
-
Page 30: Warranty & Support
WARRANTY & SUPPORT Warranty Structure Apollo Scooters are covered under two types The following are covered under the of warranty coverage: 12-month warranty: • 12-month limited warranty coverage • Apollo Air + Air Pro against manufacturing defects • Apollo Light •... - Page 31 12 Month Limited Warranty Warranty Scope & Eligi- º Scooter stem the Apollo engineering team validates the bility existence of the defect, Apollo will, in its sole º Controller discretion, either: º Handlebar All Apollo Scooters (“scooters”), are covered • Repair the defective component at an º...
- Page 32 Apollo will not replace the scoot- use, unauthorized accessories, upgrades SHOWING THE CLAIMED DEFECT FIRST. er with a new unit. Rest assured that Apollo not sold by Apollo will cover the parts and provide instructions In order to effectively help you get the repair •...
- Page 33 All Apollo Scooters ("scooters”) are covered to reach out to Apollo immediately. tion plan period is terminated when the by the Apollo Protection Plan against wear product exceeds the 24 month period, is & tear issues for a period of two years (24...
Need help?
Do you have a question about the AIR and is the answer not in the manual?
Questions and answers