Advertisement
Quick Links
Advertisement

Related Manuals for Filippi 1971 VITTER DESIGN SMART WORKING


Summary of Contents for Filippi 1971 VITTER DESIGN SMART WORKING
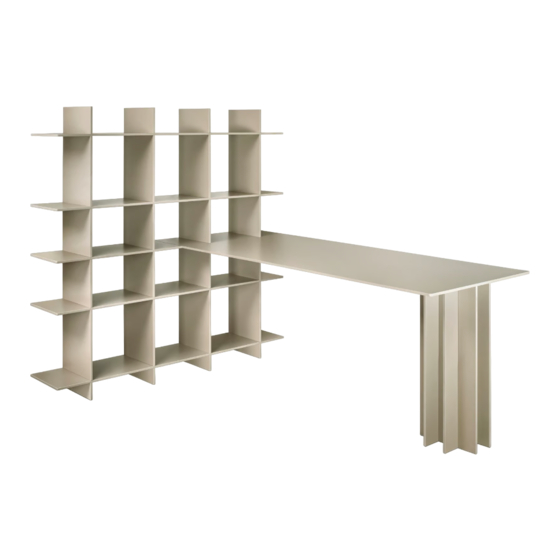
- Page 1 SMART WORKING...
- Page 2 ITALIANO Informazioni importanti. Leggere attentamente le istruzioni prima di iniziare l’installazione. Conserva queste informazioni per ulteriori consultazioni. AVVERTENZA Verificare che gli oggetti, nella loro posizione definitiva, abbiano una configurazione stabile e che non ci siano rischi di ribaltamento. Se l’oggetto si ribalta può causare lesioni gravi o mortali. Non permettere ai bambini di avvicinarsi durante la fase di montaggio, i componenti possono essere pericolosi.
- Page 3 +39 035861611 www.vitterdesign.com...
- Page 4 VITI FLETTATE A CROCE RONDELLE Screws Washers RIPIANO PICCOLO LONGHERONE Small VittEr support Spar SPALLE TAVOLO SPALLA TAVOLO SPALLA TAVOLO Table leg Table legs Table leg PIASTRA FISSAGGIO SPALLE PIASTRE FISSAGGIO LIBRERIA TAVOLO Bookcase fixing plate Table leg fixing plate RIPIANO ORIZZONTALE CON SPALLE VERTICALI RIPIANI ORIZZONTALI SENZA...
- Page 5 POSIZIONARE ORIZZONTALMENTE SUL PAVIMENTO LE QUATTRO SPALLE VERTICALI Place the four VittEr vertical supports horizontally on the floor SPALLE VERTICALI VittEr vertical supports VITTER DESIGN SMART WORKING -...
- Page 6 INSERIRE IL RIPIANO ORIZZONTALE CON AGGANCI NELL’ULTIMO INCASTRO DELLA SPALLA VERTICALE E FISSARE IL RIPIANO TRAMITE LE PIASTRE FISSAGGIO LIBRERIA NEI PUNTI INDICATI Insert the VittEr horizontal support with hooks into the last recess of the VitteEr vertical supports and fix the VittEr horizontal support by means of the bookcase fixing plates as shown PIASTRE FISSAGGIO LIBRERIA...
- Page 7 INSERIRE IL RIPIANO PICCOLO NELL’INCASTRO INTERMEDIO DELLE SPALLE VERTICALI E FISSARLO TRAMITE PIASTRE FISSAGIO LIBRERIA Insert the small VittEr support into the middle recess of the VittEr vertical support and fix it through the bookcase fixing plates PIASTRE FISSAGGIO LIBRERIA Bookcase fixing plate VITTER DESIGN SMART WORKING -...
- Page 8 DISPORRE LA STRUTTURA FORMATASI IN VERTICALE Place the structure vertically VITTER DESIGN SMART WORKING -...
- Page 9 A SEGUIRE, INSERIRE I TRE RIPIANI ORIZZONTALI SENZA AGGANCI NEGLI INCASTRI DELLE SPALLE IN VITTER Then, insert the three VittEr horizontal supports without hooks into the recess of the VittEr vertical supports VITTER DESIGN SMART WORKING -...
- Page 10 LA STRUTTURA DELLA LIBRERIA È PRONTA. A QUESTO PUNTO INIZIARE A MONTARE LE SPALLE DEL TAVOLO. POSIZIONARE PARALLELAMENTE LE DUE SPALLE TAVOLO COME IN FIGURA. The structure of the bookcase is ready. Now start assembling the table legs. Position the two table legs as in the figure below. VITTER DESIGN SMART WORKING -...
- Page 11 INSERIRE NEL LATO ESTERNO LA SPALLA TAVOLO IN FIGURA 1 MENTRE INTERNAMENTE LA SPALLA TAVOLO IN FIGURA 2 Insert the table leg shown in figure 1 on the external side and the table leg shown in figure 2 on the internal side. Figura 2 Figure 2 Figura 1...
- Page 12 PRENDERE IL PIANO TAVOLO E FISSARE LA PIASTRA FISSAGGIO SPALLE TAVOLO SOTTO IL PIANO TAVOLO COME INDICATO IN FIGURA. Take the VittEr top and fix the table leg fixing plate under the VittEr top as shown below. VITTER DESIGN SMART WORKING -...
- Page 13 A SEGUIRE, INSERIRE IL PIANO TAVOLO NEGLI FISSARE LA PIASTRA FISSAGGIO TAVOLO - INCASTRI, FISSARLO ALLA PIASTRA SOTTOSTANTE LIBRERIA NEGLI APPOSITI INCASTRI DELLA TRAMITE VITI E APPOGGIARLO SULLE SPALLE LIBRERIA. TAVOLO. Fix the table-bookcase fixing plate into the bookcase recesses. Then, insert the VittEr top into the recess, fix it with screws to the fixing plate and place it on the table legs.
- Page 14 INSERIRE IL LONGHERONE SOPRA LE SPALLE TAVOLO E FISSARLO NELLA PIASTRA FISSAGGIO TAVOLO - LIBRERIA E NELLA PIASTRA FISSAGGIO SPALLE TAVOLO TRAMITE APPOSITI BULLONI. Insert the spar over the table legs and fix it in the table - bookcase fixing plate and in the table leg fixing plate with bolts. LONGHERONE Spar VITTER DESIGN...
- Page 15 ASSICURARSI DI AVER FISSATO TUTTE LE PIASTRE MONTATE. LA POSTAZIONE SMART WORKING È ORA COMPLETA. Ensure that all plates are fixed in place. The smart working station is ready. VITTER DESIGN SMART WORKING -...
- Page 16 CONSIGLI UTILI Useful tips ✓ In caso le parti in VittEr® si sporchino, pulire con un comune sgrassatore. ✓ Per ravvivare il colore delle parti in VittEr®, versare un leggero strato di olio di vaselina sul lato interessato e strofinare con un panno. ✓...
Need help?
Do you have a question about the VITTER DESIGN SMART WORKING and is the answer not in the manual?
Questions and answers