Advertisement
Quick Links
Installation Manual
Chevrolet Tahoe 2012-2014
Must be equipped with factory rear view camera
Interface with HDMI Input
Part #: NAVTOOL6.0-AR2-HDMI
NOTICE: Navtool recommends having this installation performed by a certified technician.
Logos and trademarks used here in are the properties of their respective owners.
1
Chevrolet Tahoe 2012-2014
Advertisement

Subscribe to Our Youtube Channel
Related Manuals for NAV TOOL NAVTOOL6.0-AR2-HDMI

Summary of Contents for NAV TOOL NAVTOOL6.0-AR2-HDMI
- Page 1 Chevrolet Tahoe 2012-2014 Must be equipped with factory rear view camera Interface with HDMI Input Part #: NAVTOOL6.0-AR2-HDMI NOTICE: Navtool recommends having this installation performed by a certified technician. Logos and trademarks used here in are the properties of their respective owners.
- Page 2 WELCOME Table of Contents IMPORTANT WARNING Installation Instructions This product includes instructions for Precautions installation, which must be carefully followed. The instructions are worded in such a manner to assume that What’s In The Box the installer is capable of completing these types of electronic installations.
- Page 3 Precautions PLEASE READ BEFORE YOU START THE INSTALLATION • Please study these instructions carefully before installing NavTool interface. • Many new vehicles use low-voltage or data-bus systems that can be damaged by test lights and logic probes. Test all circuits with a digital multi-meter before making connections. •...
- Page 4 What’s In The Box? NavTool Interface USB Configuration Cable Push Button (Part # NAVTOOL6.0-AR2-NBT) (Part # NT-USB-CNG) (Part # NT-PUSH-BTN) Vehicle Specific NavTool Interface Harness Plug and Play Harness (Part # NT-WHNT6) (Part # NT-GMQUAD1) Chevrolet Tahoe 2012-2014...
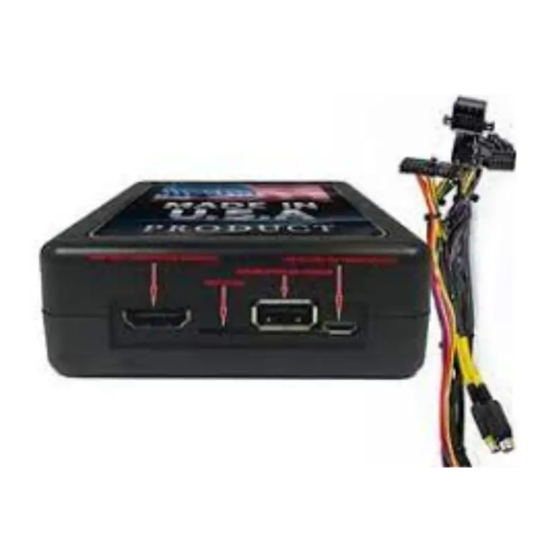
- Page 5 Interface Connectors Description Not Used Main Connector for Universal Interface Harness Configuration Port HDMI Port NavTool Interface (Part # NAVTOOL6.0-AR2-NBT) Data LED HDMI LED Power LED Main Connector for Universal Interface Harness- This port is dedicated for a connection of a universal wiring harness. Configuration Port- This USB port is dedicated for the interface configuration only.
- Page 6 Universal Harness Description Rear Camera Input/ Video Input 1 Front Camera Input/ Video Input 2 Left Camera Input/ Video Input 3 Right Camera Input/ Video Input 4 NavTool Interface Harness Right Audio Output (Part # NT-WHNT6) Left Audio Output Connector for Vehicle Specific Harness Connector for Controller (Not Used)
- Page 7 Quick Connection Guide NavTool Interface (Part # NAVTOOL6.0-AR2-HDMI) Click NavTool Interface Harness (Part # NT-WHNT6) Click AUX Input depends on the type of jack installed in your car from the factory Vehicle Specific Factory Radio Harness Plug and Play Harness...
- Page 8 Installation Instructions STEP 1 NO APPLICATION OR SOFTWARE DOWNLOAD IS REQUIRED TO CONFIGURE THE INTERFACE. To configure the interface, you must use Windows, Mac, or Google computer. Windows computers must use the latest version of Google Chrome or Microsoft Edge browser. Mac computers must use the latest version of the Google Chrome browser.
- Page 9 Installation Instructions STEP 2 Continued Step 1: Step 2: • Use a flat-bladed plastic trim tool in order to release the • Instrument Panel Accessory Switch Screw (Qty: 2) retainer clips securing the trim plate to the instrument panel. • Disconnect the electrical connections. •...
- Page 10 Installation Instructions STEP 3 Step 1: Connect supplied plug and play harness (Part # NT-GMQUAD1) to the back of the radio. Continued on Step 4 Back View of Car Navigation Vehicle Specific Factory Radio Harness Plug and Play Harness (Part # NT-GMQUAD1) (For complete image, see Quick Connection Guide on page 7) Step 2: Reconnect previously removed radio connectors into the back of the radio.
- Page 11 Installation Instructions STEP 5 • Connect audio output on the universal wiring harness (Part # NT-WHNT6) RCA plugs into the vehicle’s AUX input using appropriate cables. See quick connection guide on page 7. • Connect Push Button wires. Connect red wire to white wire and isolate with electrical tape. Connect black wire to green wire and isolate with eletrical tape.
- Page 12 Installation Instructions STEP 6 Plug in main interface (Part # NAVTOOL6.0-AR2-HDMI) into the universal wiring harness (Part # NT-WHNT6). See quick connection guide on page 7. NavTool Interface (Part # NAVTOOL6.0-AR2-HDMI) Click NavTool Interface Harness (Part # NT-WHNT6) AUX Input depends on the type of jack...
- Page 13 Testing and Settings STEP 1 • Start the car, observe NavTool LED lights should be one blinking blue and two steady lit green LED lights. HDMI LED Data LED Power LED • At this time, your car radio should boot up into its initial state, and the radio should be working. Please check that the radio operates appropriately.
- Page 14 Testing and Settings STEP 4 • Test HDMI input if you are connecting any HDMI video source. • Press and hold supplied push button for 3-5 seconds. The interface will activate on the screen. • Single press of the push button will cycle through the available video inputs. •...
- Page 15 Vehicle Reassembly Checklist When performing vehicle reassembly, please make sure to go over the list and checkoff check mark boxes: Check to see if all connectors behind the screen, radio, HVAC etc. were reconnected. Check that LCD screen shuts off with the key off, and turns back on with the key on. Check touchscreen operation.
- Page 16 How to Connect Rear Screens to Car With AV Input Car Monitor NavTool Interface HDMI to AV Adaptor 1 in 2 Out HDMI Splitter HDMI Sources Chevrolet Tahoe 2012-2014...
- Page 17 How to Connect Rear Screens to Car With HDMI Input Car Monitor NavTool Interface Car HDMI Input 1 in 2 Out HDMI Splitter HDMI Sources Chevrolet Tahoe 2012-2014...
- Page 18 User Manual For Consumer Thank you for purchasing NavTool. If you have any questions, please call toll-free at 877-628-8665. The color/navigation screen will display a factory image when you first start your vehicle. • Set the radio to AUX input to hear the HDMI audio. See page C2 for details. Fig.
- Page 19 Setting Radio to Auxiliary AUX Input Set Radio to AUX Audio Input: • SRCE Button: Press the SRCE button to display the audio screen. Press to switch between AM, FM, or XM, if equipped, Disc, or AUX (Auxiliary). Must set a radio to auxiliary/AUX before activating NavTool to hear audio from car speakers.
Need help?
Do you have a question about the NAVTOOL6.0-AR2-HDMI and is the answer not in the manual?
Questions and answers