
Related Manuals for Insignia IS-DVD040924


Summary of Contents for Insignia IS-DVD040924
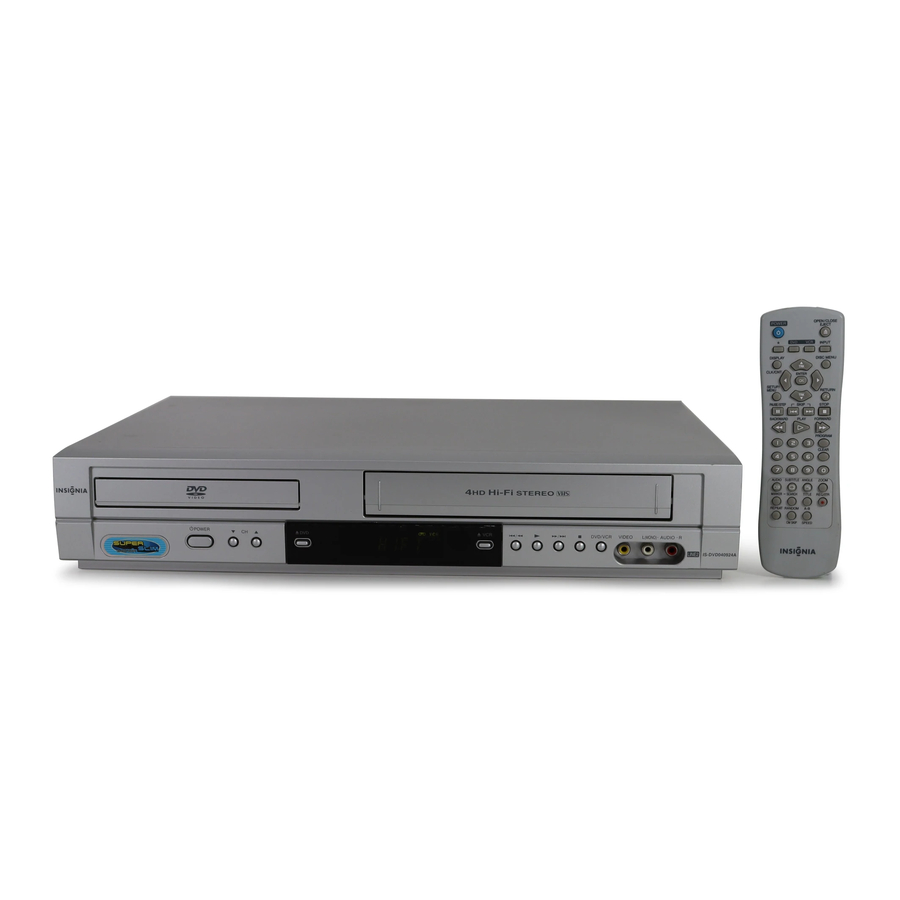
- Page 1 V9510MZ.NA1ULI_RV0016Q_ENG Installation and Operating Guide | Warranty Model Number | IS-DVD040924 | DVD Player + Video Cassette Recorder...
- Page 2 CAUTION RISK OF ELECTRIC SHOCK DO NOT OPEN CAUTION: TO REDUCE THE RISK OF ELECTRIC SHOCK DO NOT REMOVE COVER (OR BACK) NO USER-SERVICEABLE PARTS INSIDE REFER SERVICING TO QUALIFIED SERVICE PERSONNEL. This lightning flash with arrowhead symbol within an equilateral triangle is intended to alert the user to the presence of uninsulated dangerous voltage within the product’s enclosure that may be of sufficient magnitude to constitute a risk of...
-
Page 3: Important Safety Instructions
IMPORTANT SAFETY INSTRUCTIONS CAUTION: PLEASE READ AND OBSERVE ALL WARNINGS AND INSTRUCTIONS IN THIS OWNER’S MANUAL. AND THOSE MARKED ON THE PRODUCT. RETAIN THIS BOOKLET FOR FUTURE REFERENCE. This product has been designed and manufactured to assure personal safety. Improper use can result in electric shock or fire hazard. -
Page 4: Table Of Contents
Contents Introduction ..... .5 Moisture Condensation ....5 Symbol Used in this Manual About the Symbol Display... -
Page 5: Introduction
Introduction To ensure proper use of this product, please read this owner’s manual carefully and retain for future refer- ence. This manual provides information on the operation and maintenance of your DVD+VCR. Should the unit require service, contact an authorized service loca- tion. -
Page 6: Types Of Playable Discs
Types of Playable Discs (8 cm / 12 cm disc) Audio CD (8 cm / 12 cm disc) In addition, this unit plays DVD-R, DVD+R, DVD-RW, DVD+RW, and CD-R / CD-RW that contains audio titles, MP3, WMA, and/or JPEG files. Notes: •... -
Page 7: Regional Code
Regional code This DVD+VCR is designed and manufactured for playback of region “1” encoded DVD soft- ware. This unit can play only DVD discs labeled “1” or “ALL”. Notes on Regional Codes • Most DVD discs have a globe with one or more numbers in it clearly visible on the cover. -
Page 8: Front Panel
Front Panel Disc Tray (DVD deck) Insert a disc here. Cassette Compartment (VCR deck) Insert a video cassette here. 1 POWER Switches the DVD+VCR ON and OFF. CH (V V /v v ) To scan up or down through memorized channels. Z Z OPEN/CLOSE Opens or closes the disc tray. -
Page 9: Remote Control
Remote Control POWER Switches DVD+VCR ON and OFF. OPEN/CLOSE Opens and closes the disc tray. EJECT Ejects the tape in the VCR deck. TV/VCR To view channels selected by the VCR tuner or by the TV tuner. Select the DVD+VCR function mode to DVD. Select the DVD+VCR function mode to VCR. -
Page 10: Rear Panel
Rear Panel Caution Do not touch the inner pins of the jacks on the rear panel. Electrostatic discharge may cause permanent damage to the unit. b c d e ANT.IN Connect the VHF/UHF/CATV antenna to this terminal. VCR IN LINE 1 (VIDEO/AUDIO (Left/Right)) Connect the audio/video output of an external source (Audio system, TV/Monitor, VCR, Camcorder). -
Page 11: Connecting An Antenna Or Cable Tv
Connecting an Antenna Connecting an Antenna or Cable TV or Cable TV a Antenna Disconnect the antenna from the rear of the TV and identify the antenna cable. If it is a round 75 ohm coaxial cable connect it directly to the jack marked ANT.IN on your DVD+VCR. -
Page 12: Optional Tv Connections
RF coaxial connection Connect the RF.OUT jack on the DVD+VCR to the antenna in jack on the TV using the supplied 75-ohm Coaxial Cable (R). How to set the DVD+VCR’s RF output channel 1. When the DVD+VCR is turned off, press and hold CH (V/v) on the front panel for more than five seconds. - Page 13 Connecting to an amplifier equipped with two channel digital stereo (PCM) or to an Audio/Video receiver equipped with a multi-channel decoder (Dolby Digital™, MPEG 2, or DTS) 1. Connect one of the DVD+VCR’s DIGITAL AUDIO OUT jacks (COAXIAL X) to the corresponding in jack on your amplifier.
-
Page 14: Initial Settings - Vcr
Initial Settings - VCR Initial Settings - VCR By using the VCR Setup menu, you can make various adjustments to items such as clock setting, and timer recordings. Your DVD+VCR allows remote control adjustment of several features. General Operation 1. Press VCR on the remote control. 2. -
Page 15: Tuning
TUNING This DVD+VCR is equipped with a frequency synthe- sized tuner capable of receiving up to 181 channels. These include VHF channels 2-13, UHF channels 14-69 and CATV channels 1-125. Auto Channel Programming 1. Choose the SOURCE SELECT option, then use b / B to select TUNER. -
Page 16: Initial Settings - Dvd
Initial Settings - DVD Initial Settings - DVD By using the DVD Setup menu, you can make vari- ous adjustments to items such as picture and sound. You can also set a language for the subtitles and the Setup menu, among other things. For details on each Setup menu item, see pages 16 to 19. -
Page 17: Display
DISPLAY TV Aspect 4:3 : Select when a standard 4:3 TV is connected. 16:9 : Select when a 16:9 wide TV is connected. Display Mode Display Mode setting works only when the TV Aspect mode is set to “4:3”. Letterbox: Displays a wide picture with bands on the upper and lower portions of the screen. -
Page 18: Audio
AUDIO Each DVD disc has a variety of audio output options. Set this unit’s AUDIO options according to the type of audio system you use. Dolby Digital / DTS / MPEG Bitstream: Select “Bitstream” if you connect the DVD+VCR’s DIGITAL AUDIO OUT jack to an amplifier or other equipment with a Dolby Digital, DTS or MPEG decoder. -
Page 19: Lock (Parental Control)
LOCK (Parental Control) Rating Some movies contain scenes that may not be suitable for children to view. Many of these discs contain parental control information that applies to the complete disc or to certain scenes on the disc. Movies and scenes are rated from 1 to 8, depending on the area. -
Page 20: Operation
Operation This chapter describes how to operate the VCR and DVD. VCR T ape Playback VCR T ape Playback Press the VCR button to select the device to be oper- ated. Basic Instructions 1. Turn on the TV. 2. Tune the TV to the DVD+VCR output channel (CH 3 or 4) or if a direct VIDEO/AUDIO connection is made between the DVD+VCR and the TV, set the TV’s source selector to VIDEO. -
Page 21: Slow Motion
Slow Motion 1. While in still mode, press FORWARD (M). The tape is played at a speed 1/19 times slower than the normal speed. 2. Use CH/TRK (v/V) on the Remote Control if necessary to adjust the tracking. 3. To return to the normal speed, press PLAY (H). -
Page 22: Vcr Tape Recording
VCR T ape Recording VCR T ape Recording Basic Instructions 1. Turn on the DVD+VCR and TV. 2. Tune the TV to the DVD+VCR output channel (CH 3 or 4) or if a direct VIDEO/AUDIO connec- tion is made between the DVD+VCR and the TV, set the TV’s source selector to VIDEO. -
Page 23: Timer Recording
Channel: Select a TV channel, LINE1 or LINE2. If you have CABLE TV and use a cable box (con- verter) you must set the channel to match the cable box output channel (usually CH 3 or 4). Change channels on the cable box instead of with the DVD+VCR. -
Page 24: Instant Timer Recording
Instant Timer Recording With this feature you can record for a preset length without using the program timer. 1. Turn on DVD+VCR and the TV. 2. Be sure the TV is tuned to the DVD+VCR output channel (CH 3 or 4). If a direct VIDEO/AUDIO connection is made between the DVD+VCR and the TV, set the TV’s source selector to VIDEO. -
Page 25: Copying From Dvd To Vcr
Copying from DVD to VCR You can copy the contents of a DVD to a VHS tape. 1. Insert the disc you wish to copy into the DVD deck and close the disc tray. 2. Insert a blank VHS video tape into the VCR deck. 3. -
Page 26: Additional Vcr Information
Additional VCR Information Additional VCR Information • During manual recording, timer recording, Instant Timer Recording, playback, or fast forward modes, the DVD+VCR automatically starts rewinding the tape at the end of the tape. The cassette stops at the beginning of the tape and is ejected. -
Page 27: Playing A Dvd
Playing a DVD Playing a DVD Playback Setup 1. Turn on the TV and select the video input source connected to the DVD+VCR. 2. Turn on the audio system (if applicable) and select the input source connected to the DVD+VCR. 3. -
Page 28: Still Picture And Frame-By-Frame Playback
Still Picture and Frame-by-Frame Playback 1. Press PAUSE/STEP (X) during playback. Advance the picture frame-by-frame by pressing PAUSE/STEP (X) repeatedly. 2. To exit still motion mode, press PLAY (H). Search 1. Press BACKWARD ( ) or FORWARD ( during playback. 2. -
Page 29: Last Scene Memory
Last Scene Memory This player memorizes last scene from the last disc that is viewed. The last scene remains in memory even if you remove the disc from the player or switch off the player. If you load a disc that has the scene memorized, the scene is automatically recalled. -
Page 30: On-Screen Display - Dvd
On-Screen Display - DVD On-Screen Display - DVD You can display the general playback status on the TV screen. Some items can be changed using the menu. To use the on-screen display: 1. Press DISPLAY during playback. 2. Press v / V to select an item. The selected item is highlighted. -
Page 31: Playing An Audio Cd Or Mp3/Wma Disc
Playing an Audio CD or Playing an Audio CD or MP3/WMA Disc MP3/WMA Disc The DVD+VCR can play MP3/WMA formatted record- ings on CD-ROM, CD-R, or CD-RW discs. Audio CD Once you insert an audio CD a menu appears on the TV screen. -
Page 32: Audio Cd And Mp3/Wma Disc Features
Audio CD and MP3/WMA Audio CD and MP3/WMA Disc Features Disc Features Pause 1. Press PAUSE/STEP (X) during playback. 2. To return to playback, press PLAY (H) or press PAUSE/STEP (X) again. Moving to another Track 1. Press SKIP (> or .) briefly during playback to go to the next track or to return to the begin- ning of the current track. -
Page 33: Programmed Playback
Programmed Playback Programmed Playback The program function enables you to store your favourite tracks from any disc in the player memory. A program can contain 30 tracks. 1. Insert a disc. AUDIO CD or MUSIC menu appears. 2. Press PROGRAM. mark will appear to the right of the word “Program”... -
Page 34: Viewing A Jpeg Disc
iewing a JPEG Disc iewing a JPEG Disc Using this DVD+VCR you can view discs with JPEG files. 1. Insert a disc and close the tray. The PHOTO menu appears on the TV screen. 2. Press v / V to select a folder, and press ENTER/OK. -
Page 35: Reference
Reference Language Codes List Use this list to input your desired language for the following initial settings: Disc Audio, Disc Subtitle, Disc Menu. Language Code Language Abkhazian 6566 Fiji Afar 6565 Finnish Afrikaans 6570 French Albanian 8381 Frisian Ameharic 6577 Galician Arabic 6582... -
Page 36: Troubleshooting
roubleshooting roubleshooting Check the following guide for the possible cause of a problem before contacting service. Symptom The power cord is disconnected. No power. The power is on, but DVD or VCR button is not switched the DVD+VCR does properly. not work. - Page 37 Symptom An unplayable disc is inserted. The DVD+VCR does not start playback. The disc is placed upside down. The disc is not placed within the guide. The disc is dirty. The Rating level is set. Is the cassette compartment empty? Video tape cannot be inserted.
-
Page 38: Specifications
Specifications Specifications General Power requirements Power consumption Dimensions (approx.) Weight (approx.) Operating temperature Operating humidity Signal system Inputs ANTENNA IN VHS VIDEO IN(LINE1, 2) VHS AUDIO IN(LINE1, 2) Outputs VIDEO OUT COMPONENT VIDEO OUT (PROGRESSIVE SCAN) Audio output (digital audio) Audio output (analog audio) RF OUT VCR Specifications... - Page 39 Note Note...
- Page 40 Insignia Products warrants to you, the original purchaser of this Product, that this product shall be free of defects in material or workmanship for a period of three hundred sixty five (365) days from the date of purchase as follows: LABOR: During the Warranty Period if this Product is determined to be defective, Insignia will repair or replace the Product, at its option at no charge, or pay the labor charges to any Insignia authorized service facility.
Need help?
Do you have a question about the IS-DVD040924 and is the answer not in the manual?
Questions and answers