Table of Contents
Advertisement
Quick Links
Advertisement
Table of Contents

Related Manuals for Howard Wright M9 TRANSFER


Summary of Contents for Howard Wright M9 TRANSFER
- Page 2 Instructions For Use Purpose These instructions contain helpful information and important safety instructions for safe and proper operation and servicing of the M9 Transfer stretcher. Read it carefully and fully understand before operating or servicing the stretcher. Standard Warranty Thank you for purchasing your product from Howard Wright Limited.
-
Page 3: Table Of Contents
9. PACKING FOR TRANSPORT OR STORAGE ........................29 10. ELECTRIC CONTROL PROBLEM SOLVER ......................... 30 11. MAINTENANCE & SERVICING ............................31 12. SPECIFICATIONS ................................. 34 13. ELECTROMAGNETIC COMPATIBILITY .........................37 14. CONFORMITY ..................................38 15. INDEX ....................................... 39 M9 Transfer Instructions For Use (M999-19, Version 10, 2021-12) -
Page 4: Introduction
Nylon, ABS, TPR & Polypropylene are also used. M9 Transfer stretchers have a LINAK control box. This uses mains power at 220-240 V AC (50-60 Hz) to operate LINAK actuators at 24 V DC. An onboard sealed lead-acid battery provides power when mains power is not available (e.g. - Page 5 SWL - 30 kg MAXIMUM SWL 220 kg 220kg 250kg Figure 1. Safe Working Load NOTE: This is an indicative list. Other accessories can be used and the weight of these must be deducted. M9 Transfer Instructions For Use (M999-19, Version 10, 2021-12)
-
Page 6: Precautions
Do not allow people to sit on the backrest or legraise when it is in the raised position. WARNING: Follow the cleaning and disinfection instructions. WARNING: Only connect the stretcher to a mains supply with protective earth. WARNING: Before using a mobile patient hoist, check underbed clearance. M9 Transfer Instructions For Use (M999-19, Version 10, 2021-12) - Page 7 WARNING: Do not use in an oxygen rich environment or any flammable gas environment. WARNING: Do not modify any component or accessory without prior authorisation from Howard Wright Limited. WARNING: Do not transport patients where the stretcher may become unstable For example, inclines over 10 degrees.
-
Page 8: Abbreviations, Symbols & Terminology
Mode: Max. 2min/20min Mode: Max. 2min/20min ended Howard Wright Limited, 17 Paraite Road, Bell Block, New Plymouth, New Zealand. Do not use in oxygen rich environments atform Australia: 1800 120 727 New Zealand: 0508 751 751 UK: 0845 094 9894 Figure 3. - Page 9 European Authorised Representative. 3.4 OTHER SYMBOLS & TERMINOLOGY Maximum patient weight, kg. 220kg 250kg Maximum safe working load (SWL), kg. 220kg 250kg Warning: potential squeezing/shearing point. Equipotentiality (potential equalisation). Do not sit. M9 Transfer Instructions For Use (M999-19, Version 10, 2021-12)
-
Page 10: Part Identification
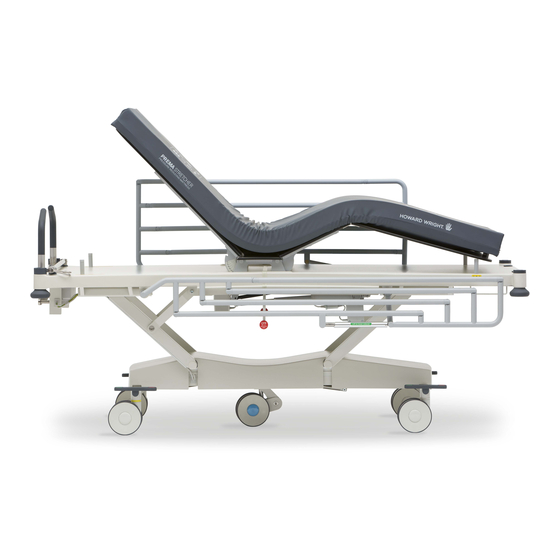
Castor wheel Siderail Siderail Control release Steer castor Bogie Castor Corner buffer & pedal corner socket Area of applied part Figure 4. Part Identification - M9 Transfer stretcher M9 Transfer Instructions For Use (M999-19, Version 10, 2021-12) -
Page 11: Unpacking & Commissioning
6. Check that the stretcher is operating correctly (see section 11.5 User Maintenance Checklist). NOTE: To manoeuvre the stretcher, release the brakes by setting the castor pedal into the neutral or steer position. M9 Transfer Instructions For Use (M999-19, Version 10, 2021-12) -
Page 12: Operation
Material: Part # 1: ELRM9700 ARTWORK 13/11/13 New Artwork: P1285 Adhesive: Tooling: New Artwork Description: M9 Transfer Instructions For Use (M999-19, Version 10, 2021-12) Colours: Pantone 637 RAL7035 RAL7015 Drawing Size: Drawing Scale: 1:1 Parent Product: M9 Howard Wright Limited, Paraite Road, New Plymouth, NEW ZEALAND... - Page 13 13/11/13 New Artwork: P1285 Adhesive: Tooling: New Artwork Description: Colours: Pantone 637 RAL7035 RAL7015 Drawing Size: Drawing Scale: 1:1 Parent Product: M9 Howard Wright Limited, Paraite Road, New Plymouth, NEW ZEALAND M9 Transfer Instructions For Use (M999-19, Version 10, 2021-12)
- Page 14 100% RAL7015 BACKGROUND: RAL7035 LOGOS + BORDERS: RAL7015 HW HAND LOGO: Blue is 100% Pantone 637U Figure 7. Lockout key M9 Transfer Instructions For Use (M999-19, Version 10, 2021-12) Date New Artwork: Drawn Chkd Material: ELRM9700 ARTWORK Part # 1:...
- Page 15 Allowing the battery to fully discharge will greatly reduce the batteries life. 6.3.4 UNDERBED LIGHT The underbed light is located beneath the deck. The light can be turned on and off by pressing the underbed light button on the ACH. M9 Transfer Instructions For Use (M999-19, Version 10, 2021-12)
- Page 16 POAG terminal to the equipotential node within the building structure. This does not rely on the functional earth connection of the mains plug. Figure 11. Potential equalisation terminal M9 Transfer Instructions For Use (M999-19, Version 10, 2021-12)
- Page 17 4. Continue to push the stretcher. An audible ‘click’ will be heard when Figure 13. Castor pedal in neutral position the steer castor locks into position. Foot end GREEN pedal Figure 14. Castor pedal in steer position M9 Transfer Instructions For Use (M999-19, Version 10, 2021-12)
- Page 18 Push the green pedal down. • Push the stretcher in the intended direction of travel and the 5 wheel will lock into position for steering. 5th wheel Figure 15. 5th wheel M9 Transfer Instructions For Use (M999-19, Version 10, 2021-12)
- Page 19 To remove: 1. Reverse the above actions. Fold down Lift Figure 16. Push handle in raised position Figure 17. Push handle in folded down position. Figure 18. Bed end M9 Transfer Instructions For Use (M999-19, Version 10, 2021-12)
- Page 20 WARNING: Check to ensure there is no risk of crushing or entrapment to the patient, other personnel, or other objects when lowering the siderails. WARNING: Use only Howard Wright Limited siderails with the stretcher. WARNING: Do not use aftermarket siderails. This will create a patient entrapment hazard.
- Page 21 The Universal Accessory Mount Rail is located at the head end of the stretcher. NOTE: Maximum torque to be applied to the Universal Accessory Mount Rail is 24 Nm Accessory Mount Rail Figure 22. Universal Accessory Mount Rail M9 Transfer Instructions For Use (M999-19, Version 10, 2021-12)
- Page 22 Drainage bag rail Figure 23. Drainage bag rail 6.13 CORNER SOCKETS Corner sockets are located at each corner of the deck where various Howard Wright Limited accessories can be plugged in. 6.14 POWER CORD STORAGE WARNING: Route the power cord on the outside area of the stretcher at all times to avoid cord damage.
-
Page 23: Accessories
7.2 MATTRESSES The mattress best suited to the M9 Transfer stretcher is the PREMA Stretcher. The recommended mattress size for the M9 Transfer stretcher is 2000mm long x 700mm wide x 100mm thick. The maximum mattress thickness is 160mm. NOTE: The mattress cover can be removed and machine washed (95°C max). - Page 24 WARNING: Ensure the strap is locked when the blue adjustment button is released. Figure 29. PH Pole WARNING: Ensure the PH pole is positioned over the stretcher and fully inserted into the accessory socket. M9 Transfer Instructions For Use (M999-19, Version 10, 2021-12)
- Page 25 (M799-59) for further information. NOTE: The HX/F and E size oxygen cylinder are a factory fitted op- tion located on the bogie. Figure 32. HX/F or E size Oxygen cylinder Carrier M9 Transfer Instructions For Use (M999-19, Version 10, 2021-12)
- Page 26 Using both hands, lift the tray up and fold backwards towards the foot end. NOTE: Please see Monitor Tray Instructions for use (M799-57) for further information. Figure 35. Monitor tray folded down M9 Transfer Instructions For Use (M999-19, Version 10, 2021-12)
- Page 27 To fit the basket: Hang the hooks of the basket over the foot end of the bogie. NOTE: Please see Storage Basket Instructions for use (M999-55) Figure 37. Storage basket for further information. M9 Transfer Instructions For Use (M999-19, Version 10, 2021-12)
- Page 28 2. Lower the legs into the sockets on the deck. 2. Place the bolster mattress on the extension. Figure 39. Plug in Stretcher extension To remove: 1. Remove the bolster mattress. Remove the extension from the sockets M9 Transfer Instructions For Use (M999-19, Version 10, 2021-12)
-
Page 29: Cleaning
4. Thoroughly rinse with fresh water using a soft cloth or sponge. 5. Thoroughly wipe the product with a soft cloth or dry sponge. M9 Transfer Instructions For Use (M999-19, Version 10, 2021-12) - Page 30 11. Wash the top half of the mattress. 12. Wipe over the deck surface. 13. Wipe dry both the deck surface and the mattress. 14. Make up the stretcher. 15. Return to normal height. M9 Transfer Instructions For Use (M999-19, Version 10, 2021-12)
-
Page 31: Packing For Transport Or Storage
The bogie to the deck (both the head end and the foot end). • The legraise to the deck. • The siderails (to hold in collapsed position). 6. Cover the stretcher to protect it from dust. M9 Transfer Instructions For Use (M999-19, Version 10, 2021-12) -
Page 32: Electric Control Problem Solver
10. ELECTRIC CONTROL PROBLEM SOLVER Use Table 1 below for assistance if the stretcher cannot be adjusted correctly using the electric controls. If further assistance is required, contact Howard Wright Limited or an authorised service dealer. Problem Possible cause To Resolve... -
Page 33: Maintenance & Servicing
WARNING: All replacement parts must be sourced through Howard Wright Limited. Howard Wright Limited’s products are supported by an extensive network of authorised service dealers. These service dealers are trained by Howard Wright Limited. For contact details of your nearest service dealer please contact Howard Wright Limited. - Page 34 Adjust the backrest fully up. Move the CPR lever to the emergency position. Check that the backrest lowers when force is applied to it. Check that the CPR lever automatically returns to the normal position when it is released. M9 Transfer Instructions For Use (M999-19, Version 10, 2021-12)
- Page 35 Check the monitor tray for damage. Check that the strap is free from cuts and abrasions and that the buckle is in working order. • Check the over bed table for damage. Check that the height of the table can be adjusted. • Check the orthopaedic frame for damage. M9 Transfer Instructions For Use (M999-19, Version 10, 2021-12)
-
Page 36: Specifications
• Actuator to floor: Deck low: 90mm (low height) 1300 • Bogie to floor: 185mm TESTING: • Developed in accordance with the requirements of IEC60601-1:2005 & IEC60601-2-52:2009 Figure 40. M9 Transfer specifications M9 Transfer Instructions For Use (M999-19, Version 10, 2021-12) - Page 37 30% to 75% • Atmospheric pressure range: 80 kPa to 106 kPa (Rated to operate at an altitude ≤ 2000m). 12.8 SOUND PRESSURE LEVEL • Sound pressure level: 51.0 dBA (MAX) M9 Transfer Instructions For Use (M999-19, Version 10, 2021-12)
- Page 38 M944-03 Bi-elastic • Storage basket M923-01 Powder coated steel & stainless steel. • Stretcher extension (plug in) M921-03 Compact laminate & powder coated steel • Urine bottle carrier M727-01 Stainless steel M9 Transfer Instructions For Use (M999-19, Version 10, 2021-12)
-
Page 39: Electromagnetic Compatibility
Connect the stretcher and the device to different mains power supply circuits. • Disconnect the stretcher from the mains supply and do not use the electric controls. If these measures are not successful, consult Howard Wright Limited for further assistance. M9 Transfer Instructions For Use (M999-19, Version 10, 2021-12) -
Page 40: Conformity
Batteries are of a sealed lead acid type and must be returned to a specialist battery disposal company. Please follow the WEEE (2012/19/EU) directive if within the European Community or environmental legislation in the country of use. Please visit the Environment section of the Howard Wright Limited web site for further information. -
Page 41: Index
Precautions................. 4 Electric Controls ............. 10 Push handles..............17 Electromagnetic compatibility ........37 Raising a siderail .............18 Expected Service Life ............38 Recycling ................38 Extension ................26 Residual Current Device (RCD) ........26 Fifth wheel ................16 M9 Transfer Instructions For Use (M999-19, Version 10, 2021-12) - Page 42 Trendelenburg ............10-13 Underbed light ..............13 Unpack the stretcher ............9 Urine bottle holder ............24 User Education and Training .......... 4 Warnings ................4 Table 1. Electric control problem solver ....30 M9 Transfer Instructions For Use (M999-19, Version 10, 2021-12)
- Page 43 Figure 39. Plug in Stretcher extension ......26 Stretchers ................6 Figure 40. M9 Transfer specifications ......34 Figure 4. Part Identification - M9 Transfer stretcher ... 8 Figure 5. Handset with lockout ........10 Figure 6. Handset (only available with Attendant Control Handset -ACH) ...............10...
Need help?
Do you have a question about the M9 TRANSFER and is the answer not in the manual?
Questions and answers