Advertisement
Advertisement
Table of Contents

Related Manuals for YFRobot Valon-I


Summary of Contents for YFRobot Valon-I
- Page 1 Valon-I for arduino V1.0...
-
Page 2: Warnings For Users
(Robot damage caused by unauthorized disassembly is man-made damage that cannot be guaranteed). ⚫ The Valon-I robot kit contains tiny components. Children should use it in the presence of a guardian. ⚫ Users who need to remove the wheels should notice: do not pull out the wheels by brute force, as this may damage the motor. -
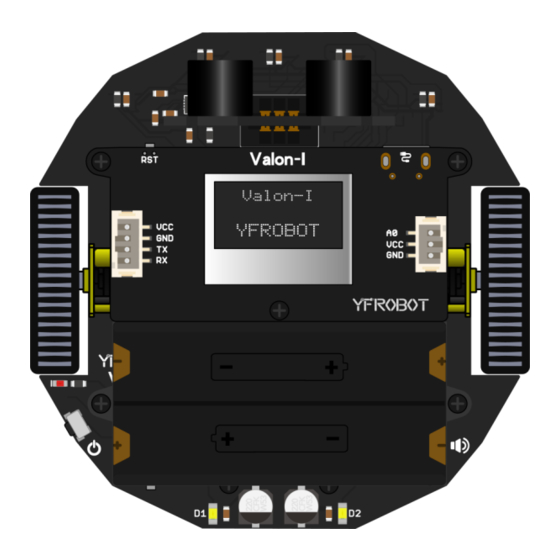
Page 3: Diagram Of Functions
1. Valon-I Introduction Valon-I is a programmable robot designed specifically for maker education. It supports not only the Arduino IDE programming environment, but also the Mixly graphical programming environment. It has the advantages of being flexible, simple to install and easy to get started. - Page 4 (Arduino Pin description:Annex 1) 超声波(D12,D13) 五路巡线传感器 Five-way line patrol Ultrasonic (D12, D13) sensor selective assembly 选配 主控复位按钮 主控 Master reset button Master control 显示屏 主控板 Display screen Master control panel 通信 Communication 1-way GVS expansion 1路GVS扩展口 port 右电机&轮子 1-way serial Right motor &...
-
Page 5: Relevant Parameters
b. Relevant Parameters ⚫ Power supply voltage: 7.4V DC (2 3.7V lithium batteries, note that dry batteries are not supported) ⚫ Anti-reverse connection, over discharge prevention, one-button activated lithium battery module ⚫ One-button start switch x1 ⚫ Power light x1 ⚫... -
Page 7: Parts List
3. Valon-I Hardware a. Parts List Valon-I 智能车套装清单 Valon-I Smart Car Kit List 配件 Parts b. First Use One: The car’s main body is shipped as a whole, so no installation is required. (Important reminder: do not pull the wheels by brute force) - Page 8 Three: Installation of batteries (please use 2 3.7V lithium batteries, and No. 5 dry batteries are not supported). Four: Press the activation button to activate the batteries (the batteries shall be activated after installation). Five: Connect to the computer download the program; press the power button to start.
Need help?
Do you have a question about the Valon-I and is the answer not in the manual?
Questions and answers