Advertisement
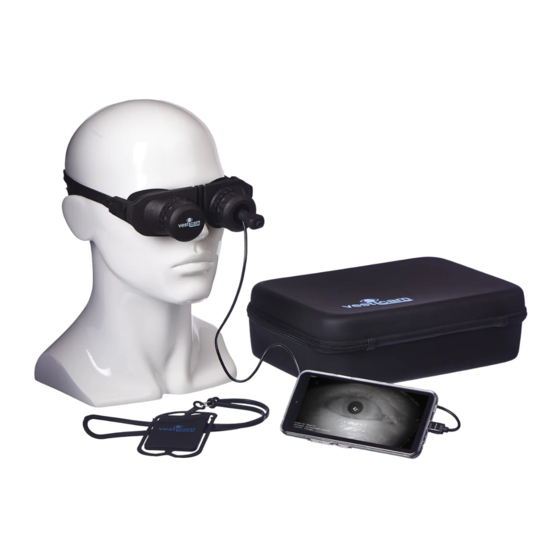
Vesticam2 IR video goggles
g
f
h
i
j
e
c
d
a
silicone head band
quick release side buttons
b
c
mounting plate - adjusts for interpupillary variation
d
locking ring
e
eye patch cylinder
f
flexible goggles frame
g
silicone eye cups - removeable and reusable
camera cylinder - with infra-red USB camera and
h
fixation light
i
joystick - for focus and fine adjustment
j
fixation light button
h
g
i
j
b
c
d
Setting up Vesticam2 IR video Goggles on your patient
1.
Start with the camera cylinder and eye patch cylinder off...not
1
attached to the goggles
2.
Follow your normal patient hygiene pathways when applying
2
the goggles. Use effective alcohol/anti-microbial wipes to clean
goggles face plate
before and after each patient. Do not use on patients with
a
infective disorders. (see also 3.1.2 "Cleaning and avoiding
contamination" and Appendix 1 full instruction manual)
3
The goggles are
comfortable, high quality
b
and flexible enough to fit
most face shapes and
sizes. Loosen the head
strap by squeezing the
quick release buttons
and the goggles flange
together
3.
Help your patient to position the goggles for comfort.
4
Most patients can do this themselves, like swimming goggles.
4.
To adjust for interpupil-
5
lary distance, loosen the
d
locking rings
at the front
of the mounting plate by
turning anti-clockwise.
Allow the mounting
plates
c
to slide into a
comfortable position on
your patient's face.
Your patient should be
able to see out of both
viewing holes.
5.
Pull rubber tags at each side of goggles gently to tighten the
6
headband, and then lock the mounting plates into place by
firmly tightening the locking rings in a clockwise direction.
6.
Hold the camera cylinder
7
cylinder at "5 o'clock". Insert the camera cylinder into the
mounting plate, and rotate it clockwise until the camera
a
cylinder "clicks" and locks into place (lead should be at
"6 o'clock" when locked).
g
f
, silicone eye cups
a
and head band
b
b
b
Squeeze button toward
flange to release
Locking ring
anti-clockwise to release and slide
slide
slide
clockwise to lock into correct position
h
so that the lead is exiting the
If you cannot see
8
Camera cylinder and eye patch cylinder
your patient's eye
anti-clockwise to unlock ("click")
completely on the
clockwise to lock ("click")
viewing screen,
simply loosen the
locking ring, realign
the camera, and
retighten the
locking ring.
7.
To focus and fine tune eye position use one hand to
9
stabilize the camera cylinder and the other hand to move
the camera joystick
up/down and side/side until the
i
eye image is central on screen. Firmly pull camera
joystick in/out to focus the image of the iris and edge of
the pupil. The camera cannot be pushed into the eye as
there is an end stop. It is important to focus the eye
to ensure that possible torsion is visible.
Joy-stick
fine adjustment
up/down, side/side
focus, in and out
10
8.
To deny vision, slip the eye patch cylinder
remaining mounting plate. Twist the cylinder clockwise
and "click" to lock into place.
FIXATION LIGHT:
9.
Press the small button
j
at the end of the joystick to
activate the fixation light. When the button is IN, the
fixation light is ON. When the button is OUT, the fixation
light is OFF.
NOTE: the fixation light will only work when the camera is
plugged into the external recording device (phone, tablet
or computer).
Vesticam2 goggles are designed to be light tight.
Adjust the goggles with your patient so they are
comfortable, secure, light tight, and firm.
If there is any light leaking into the goggles at this point,
check that the camera cylinder and eye patch cylinder are
correctly in place. If there is still light leakage, gently move
the goggles on your patient's face to eliminate any gaps
between face and goggles.
e
into the
Advertisement
Table of Contents

Related Manuals for Vesticam 2

Summary of Contents for Vesticam 2
- Page 1 Do not use on patients with retighten the infective disorders. (see also 3.1.2 “Cleaning and avoiding locking ring. contamination” and Appendix 1 full instruction manual) To focus and fine tune eye position use one hand to...
- Page 2 Use effective anti-microbial and antibacterial wipes (or alcohol wipes) to wipe over and clean Do not use the Vesticam IR goggle unit if it is the silicone eye cups, goggles mounting plate, showing any signs of damage. If you are unsure,...
Need help?
Do you have a question about the 2 and is the answer not in the manual?
Questions and answers