Table of Contents
Advertisement
Advertisement
Table of Contents

Subscribe to Our Youtube Channel
Related Manuals for HumminGuru HG01


Summary of Contents for HumminGuru HG01
- Page 1 HumminGuru Ultrasonic Vinyl Record Cleaner Owner’s Manual Model No. : HG01 Thank you for buying HumminGuru Ultrasonic Vinyl Record Cleaner. To apply this product safely and properly, please read the manual thoroughly and well understand before use. After reading, please keep...
- Page 2 Create a new standard of affordable luxury that every vinyl record enthusiasts can enjoy.
-
Page 3: Table Of Contents
Contents Safety Precaution ... . . 1 Cleaning Mode � � � � � � � � � � � � � � � � � � � � � 12 Drying Mode �... -
Page 4: Safety Precaution
IMPORTANT! Read all instructions carefully before use and keep it for future reference. HumminGuru ultrasonic vinyl record cleaner is limited to cleaning vinyl records that WARNING : The Power are made out of polyvinyl chloride only. This page is mainly referred to the safety Adapter precaution to prevent the property damage and the danger to the users and others. -
Page 5: Warning : The Machine
• DO clean the power plug and understand the hazards involved. Children the power adapter regularly with shall not play with the appliance. Cleaning dry cloth� and user maintenance shall not be made by • DO fully fit the power plug into children without supervision. -
Page 6: Overview
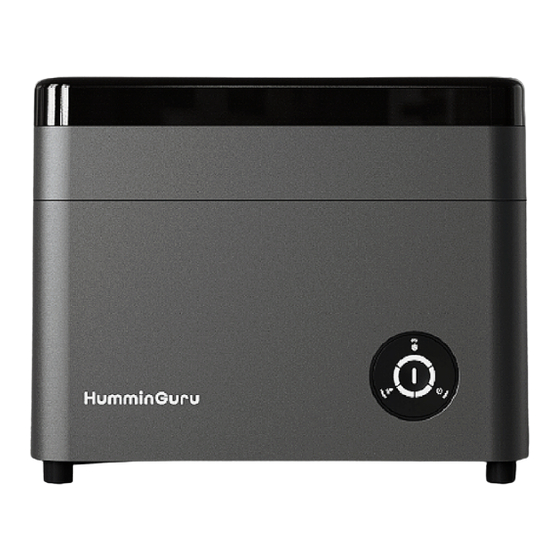
Overview Part Names Cleaner Lid Drying Time Setting Switch Power Button Detachable Air Filter Compartment Power Port Drying Fan Water Basin Rotation Wheels Water Basin Filter Control Panel Removable Water Tank ( Including a water tank lid, a detachable water filter slot This package includes: and a water filter ) Ultrasonic vinyl record cleaner... -
Page 7: Side Panel
Side Panel Power Drying Time Power Button Setting Switch Port 5 minutes 10 minutes The side panel has a power button, a drying time setting switch, drying time drying time and a power port. Connect the power adapter and cable to the power port and the wall power outlet and then press the power button to turn on the machine. -
Page 8: Control Panel
Control Panel Cleaning Mode Drying Mode 2 minutes of cleaning 5 or 10 minutes of drying 5 minutes of cleaning Auto Mode 2 minutes auto 5 minutes auto Start / Pause... -
Page 9: Removable Water Tank
Removable Water Tank The water level indication for 12” and 7” record (for reference only) The removable water tank is located on the left side of the The water level indication for 12” record machine. The capacity of the water tank is 400 ml. Four different also applies to 10”... -
Page 10: Maintenance Tool
Maintenance Tool The maintenance tool is designed to fulfill three main tasks. It can be used to replace the rotation wheel, remove the water basin filter and work as a water level indicator. Water Level Water Level Maximum & 7” record Indicator 12”... - Page 11 How to use the maintenance tool as a water level indicator Pour in water and check the Vertically place the tool CAUTION water level based on the size of into the water basin. your record. • DO NOT fill the water tank with water to a level exceeding 400ml.
-
Page 12: Machine Setup
Machine Setup Place on level surface Connect the power cable to Push the power button to turn the power adapter. on the machine Connect the power adapter to the machine. Plug the power plug to the wall power outlet. Fill the water tank with distilled Open the lid water and pour it into the water basin. - Page 13 • DO NOT fill the water basin directly from the faucet� • Gently insert the record with both hands into the Use HumminGuru record adapter **Go to page 14 to water basin� for 7” and 10” record. Visit understand the light indication humminguru.com for purchase.
-
Page 14: Using The Machine
Using the Machine SELECT THE MODE Auto Mode There are three modes options to select based on your preferences. The auto mode is an automatic cycle that cleans and drys your record in one step. There are two settings available. 1. -
Page 15: Cleaning Mode
Cleaning Mode CAUTION The cleaning mode allows the user to run the cleaning mode separately, without a • DO NOT move, pull, or drying cycle. There are two settings available. push the record during any operation� Setting 1: 2 Minutes Cleaning Setting 2: 5 Minutes Cleaning •... -
Page 16: Drying Mode
Cleaning Tips Drying Mode For user who would like to clean the record for a longer The drying mode allows the user to drain Press the “dry” button once and press water out from the water basin and run the “start/pause” button to start the time, select the 5 Minutes the drying mode separately, without a drying cycle. - Page 17 START/PAUSE Light Indication Blinking White Light Blinking Red Light Solid White Light Solid Red Light Solid Blue Light Standby Pause Operating Error Cycle Complete ( Indicating water tank not in place ) To Start To Cancel 3 seconds Select a mode and Pause the cycle and press the start/pause then long press the...
-
Page 18: Maintenance
Maintenance To extend the service life of the Clean the Water Tank Pour away the water in the water tank. cleaner, it is recommended to conduct preventive maintenance and cleaning of the facility on a regular basis. Select the “dry”mode and press start to drain water out from the water basin completely. -
Page 19: Clean The Water Basin Filter
Clean the Water Basin Filter Clean the Water Basin The water basin filter is located at the bottom of the water Wipe the water basin with a damp cloth. Tips: warp the basin. Insert the maintenance tool vertically into the water damp cloth around the maintenance tool and use it to basin filter slot and turn 45º... -
Page 20: Air Filter Replacement
Air Filter Replacement The washable and replaceable air filter is installed under the Check the wearing status. Replace it with a new filter when it side panel of the machine to trap external particles generated starts to wear out. To replace, take out the air filter housing during the drying cycle. -
Page 21: Water Filter Replacement
Water Filter Replacement The washable and replaceable water filter is installed in the Check the wearing status. Replace it with a new filter when it water tank to filter out large residue from the water during the starts to get dirty or wear out. To replace, fold the water filter cleaning cycle. -
Page 22: Rotation Wheels Replacement
Rotation Wheels Replacement Wheel 1 Wheel 2 See below to clarify each wheel and its location. The rotation wheel 1 is located on the left The rotation wheel 2 is located side of the machine. Simply hold the top on the right side of the machine. and the bottom edge of the wheel and The maintenance tool is required pull it out horizontally. -
Page 23: Machine Storage
Machine Storage To replace, take the new wheel with When storing HumminGuru record cleaner, do the following: the number 2 facing up and attach it to the maintenance tool. Then insert the Drain the water completely Unplug the power adapter and wheel 2 into the slot horizontally. -
Page 24: Trouble Shooting
Trouble Shooting Unable to turn on the machine or start the operation cycle. Check if your machine is properly connected to a power outlet. In addition, check if the water tank with the lid is set in place properly. The record is not turning. Check if the rotation wheels are rotating or not. - Page 25 There is water remaining in the water basin. I accidentally pull out the water tank during the operation cycle. The water basin filter is possibly clogged. Use the maintenance tool to take it out from the water Case 1: basin (refer to page 16 for guidance). Rinse the filter thoroughly and re-insert the filter.
-
Page 26: Product Specification
Product Specification Limited Warranty HumminGuru warrants this product Product Name HumminGuru Ultrasonic Vinyl Record Cleaner against defects in material or workmanship for the original owner and HG01 Model No. any subsequent end user owner(s) (“You” or “Your”) for one year from the original 5.0A... - Page 27 This Limited Warranty is non- LIMITATION ON DAMAGES: Repair/Replacement Warranty transferable. No other warranty, written or oral, is authorized by HumminGuru. HUMMINGURU SHALL NOT BE This Limited Warranty shall apply to any LIABLE FOR ANY INCIDENTAL OR repair, replacement part or replacement,...
- Page 28 Find out more at www.humminguru.com Contact For replacement parts, service, or questions, please contact customer support. support@happywell.com.hk www.humminguru.com Happy Well International Enterprise, Ltd. Rm. 1202. 12/F New Mandarin Plaza, Tower B, No. 14 Science Museum Road, Tsim Sha Tsui East, Kowloon, Hong Kong ©...
Need help?
Do you have a question about the HG01 and is the answer not in the manual?
Questions and answers