Table of Contents
Advertisement
Advertisement
Table of Contents

Related Manuals for Ananda D16


Summary of Contents for Ananda D16
- Page 1 USERS GUIDE - 1 -...
-
Page 2: Table Of Contents
Content Preface..............................- 3 - 1. Appearance, Size and material......................- 4 - 1.1 Main materials and colors........................- 4 - 2. Function Summary & Button definition....................- 4 - 2.1 Function Summary..........................- 4 - 2.2 Normal Display Figures........................- 5 - 2.3 Button definition..........................- 6 - 3. -
Page 3: Preface
Appendix 2:Detail contents of setting menu..................- 23 - Preface Dear Users, to ensure better performance of your e-bike, please read through the D16 product introduction carefully before using it. We will use the brief words to inform you of all the details (including hardware installation, setting and normal use of the display) when using our display. -
Page 4: Appearance, Size And Material
Physical drawing and dimensions: (Unit: mm) 2. Function Summary & Button definition 2.1 Function Summary D16 provides you with a variety of functions and displays to meet your riding needs. Display content list as follows: ◆ capacity of the battery ◆... -
Page 5: Normal Display Figures
(Standard Version) operation manual") ◆ Communication protocol: “Ananda new European standard display controller v11.0 protocol_ Version 1.3.4” and above, (The latest version from Ananda shall prevail and be compatible with previous versions) ◆ Match with wide voltage battery including 24V/36V/48V ◆... -
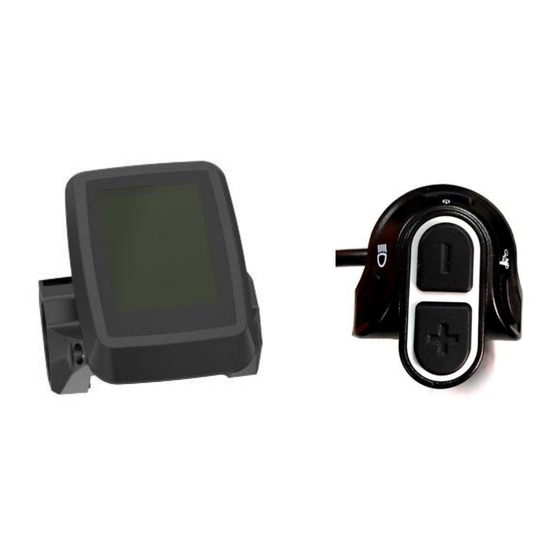
Page 6: Button Definition
D16 Normal display interface This area shows the current battery remaining power, including the power progress bar mode and grid mode , and the figure shows the progress bar mode. This area shows USB status indication This area shows fault status indication This area shows wireless status indication This area shows headlight status indication;... -
Page 7: Note For Users
◆ If the system has not been used for 30 minutes, the battery and the whole system will turn off automatically ◆ After the display is powered on, the "ANANDA" start-up interface is displayed first, and then the main interface is entered. In the main interface, the display can enter the locking interface through wireless control. -
Page 8: Real-Time Speed/Trip Mileage Display Interface
displayed first, and then the system will be shut down. Start-up interface Main interface Shut down interface Locking interface 5.2Real-time speed/Trip mileage display interface After the display is turned on, the current speed can be refreshed in real time on the main interface, and the mileage related data can be viewed at the same time. -
Page 9: 6Km/H Walk Assist Mode
Real-time speed and Odometer display 5.3 6km/h Walk assist mode You can enter the 6km/h walk assist mode in the main interface. Press and hold the "WALK" button to activate the walk mode and light up the walk mode sign. After pressing the "WALK"... -
Page 10: Pas Level
The display automatically controls the headlight on and off by sensing external light. The light will turn on when the exterior light is dark, and turn off when the exterior light is bright. Manual mode : In automatic mode, long press the "HEADLIGHT" button to switch to manual mode. - Page 11 TOUR level SPORT level TURBO level BOOST level WALK assist mode - 11 -...
-
Page 12: Battery Power Display
5.6 Battery Power display In the main interface, the battery power display is refreshed in real time. The battery content supports two display modes: progress battery power bar mode (in case of successful communication between battery and display) and battery power grid mode (in case of communication failure or no communication between battery and display). -
Page 13: Usb Charging
Wireless mode indicator 5.8 USB Charging Plug in the device that needs charging when display is off. After turn on the display, the battery will charge the device through the display, and the USB charging logo on the interface will be light up. After the device that needs USB charging is plugged in at the power on state, long press the "PLUS"... -
Page 14: User Settings
" " logo showed in the upper column will disappear synchronously. Please check the attached table 1 for detailed definition of error code Error code display interface 6. User Settings In the information interface, press and hold the "PLUS" and "MINUS" button at the same time to enter the setting interface. -
Page 15: Backlight Setting
Single trip clearance interface 6.2 Backlight Setting Short press the "MINUS" or "PLUS" button to switch and select the backlight level. Short press the "CONFIRM" button to confirm the currently selected backlight level. Short press the "CONFIRM" button on the "Return" option, to return to the previous interface. Long press "CONFIRM"... -
Page 16: Power Unit Setting
Speed unit setting interface 6.4 Power unit setting Short press the "MINUS" or "PLUS" button to select the power unit option. Short press the "CONFIRM" button to confirm the currently selected power unit. Short press the "CONFIRM" button on the "Return" option, to return to the previous interface. Long press "CONFIRM"... -
Page 17: Automatic Shutdown Time Setting
Factory reset setting interface 6.6 Automatic shutdown time setting Short press the "MINUS" or "PLUS" button to select the automatic shutdown time option. Short press the "CONFIRM" button to confirm the currently selected automatic shutdown time. Short press the "CONFIRM" button on the "Return" option, to return to the previous interface. Long press "CONFIRM"... -
Page 18: Wireless Setting
press "CONFIRM" button to return to the main interface. Default setting is shows all the options. Customized data showing setting interface 6.8 Wireless setting Short press the "MINUS" or "PLUS" button to select the wireless setting to check the status or name of the wireless. -
Page 19: Read-Only Information
7. Read-only information In order to make users know more about our walk assist E-bike system, the display supports to view the parameters of the walk assist E-bike system. 7.1 Motor read-only information Short press the "MINUS" or "PLUS" button to select the read-only information option of the motor to be viewed. -
Page 20: Display Read-Only Information
Battery read-only information interface 7.3 Display read-only information Short press the "MINUS" or "PLUS" button to select the read-only information option of the display to be viewed. Short press the "CONFIRM" button on the "Return" option, to return to the previous interface. Long press "CONFIRM"... -
Page 21: Faq
If the customer has no special requirements, the code printed according to the requirements of Ananda Drive Techniques (Shanghai) Co., Ltd. 9. FAQ Q: Why can’t turn on the display? A: Please check whether the battery is turned on or the leakage lead wire is broken Q: How to deal with the error code display? A: Contact the e-bike maintenance station in time. -
Page 22: Circuit Diagram And Wire Sequence
11. Circuit Diagram and wire sequence Standard connector wire sequence: Connecting end with controller Connecting end with buttons Standard connector wire sequence table Standard Wire Color of standard Wire Function Red (VCC) Display power wire Blue(K) Power control wire of controller Black(GND) Instrument Ground wire Green(RX) -
Page 23: Appendix 1: Error Code Definitions
Appendix 1: Error code definitions Error Code Definition Current abnormal Throttle fault Motor Hall signal fault Brake abnormal Other faults Communication failure Switch button sticky Display working voltage abnormal Display self-check failure 6km Walk assist button sticky Appendix 2:Detail contents of setting menu Level 1 menu Level 2 menu Level 3 menu... - Page 24 Name text 5min 10min 15min Auto-off 20min 25min 30min Available Function Firmware version value HW version value Motor Serial number value Wheel size value Odometer value Firmware version value HW version value Information Serial number value Battery Battery voltage value Cycle count value value...
Need help?
Do you have a question about the D16 and is the answer not in the manual?
Questions and answers
hoe de trapondersteuning activeren
To activate the stair support (6 km/h walk assist mode) on the Ananda D16:
1. Enter the main interface.
2. Press and hold the "WALK" button.
3. The walk mode sign will light up, and the 6 km/h assist function will begin.
4. Release the "WALK" button to exit the walk mode.
Note: Walk assist mode can only be used when pushing the E-bike, not while riding.
This answer is automatically generated