Table of Contents
Advertisement
Advertisement
Table of Contents

Related Manuals for Ananda D13


Summary of Contents for Ananda D13
- Page 1 D13 and D13/U Manual...
-
Page 2: Table Of Contents
Content A. About the Manual ............2 B. Appearance and size ............3 Material and Color ............3 Illustration ................ 3 Diagram ................4 C. Product Functions ............4 D. Bottom Definition............. 6 E. Installation ............... 7 F. Operation ................. 8 1. - Page 3 J. Quality commitment and warranty coverage ....19 Warranty ................ 19 Exception ..............20 Error Code ................. 20 Page of 20...
-
Page 4: About The Manual
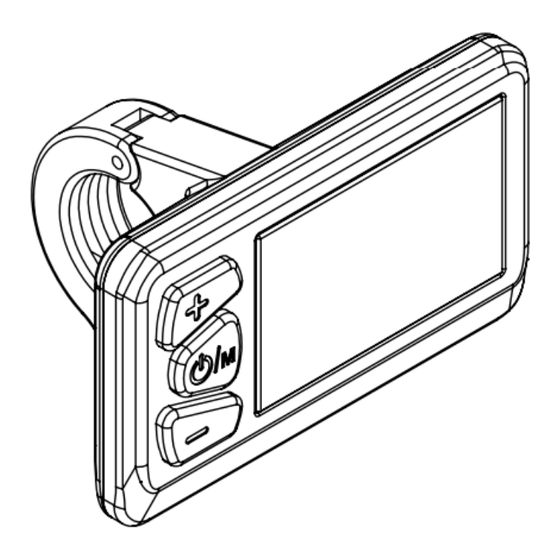
A. About the Manual This Manual aims to help you to learn about installing and operating D13 and D13/U display. B. Appearance and size Material and Color D13/U is 52.5mm*33.3mm, has 3 bottoms, compact size and simply UI. Including Double-layer PCB, nylon buckle inside, and ABS shell. The material of the shell allows normal using at temperatures between -20 ℃and 60 ℃,... -
Page 5: Diagram
D13/U LCD display integrates a 2.4” multi-function screen, which supports 24V / 36V / 48V battery. It also integrates the headlight switch function. The main functions of D13/ U are: (as shown in Pic 3-1 below) ◆ Total Mileage; ◆ Trip Mileage;... - Page 6 ◆ Current Speed ◆ Light Status ◆ Pas Level ◆ Battery Capacity ◆ Error Code ◆ Mile/ Kilo Meter ◆ Wheel Size ◆ Riding Time ◆ Walking Assistant ◆ USB Current Limit:1A (D13U only) Plus Battery Light; Error; Walking On/ off Mileage, Trip, AVG Speed, KMH and Minus...
-
Page 7: Bottom Definition
As shown in Pic 3-2 below: Pic 3-2 Correct Display Pic 3-3 D. Bottom Definition D13/U is equipped with 3 buttons. Including key, open key, minus key. Page of 20... -
Page 8: Installation
Plus On/ Off Minus Pic 4-1 E. Installation Fix the display and bolt on the handlebar, adjust the proper angle of view, and screw on the bolt in an easy-to-manipulate position. Tighten the screws to complete the installation. Insect bolt on the handlebar Page of 20... -
Page 9: Operation
Tighten the screws to complete the installation F. Operation 1. Switch on/off Press and hold the Switch on/off key for 1 second, turn on the display, and start the ebike system. In the working state, press and hold the Switch on/off key for 2 seconds to turn off the system. -
Page 10: Turning On/Off The Lights And Backlights
Long press 1s to star; long press 2 s to turn off Pic 6-1 2.Turning on/off the lights and backlights In the power-on state, long press the button for 2 seconds, the lamp will turn on, and the instrument backlight will be turned off; press and hold the button for 2 seconds, the lamp will be off and the instrument backlight will be turned on. -
Page 11: Pas Level And Walking Assistant Mode
During working, long press 2s to turn on light; long press 2 s to turn off Pic 6-2 3. Pas level and Walking Assistant Mode In the power-on state, click the plus or minus button to switch the electric vehicle power-assisted gear position and change the motor output power. The default output power range of the display is 0-5 pas or 0-9 pas (the pas range is adjustable). -
Page 12: Display Ui
During working, press Plus to add Pas, default is 0-5 Walking Assistant During working, press Minus to decrease pas, and long press to start Walking Assistant Mode Pic 6-3 4. Display UI When the ebike starts, the circuit board transmits the speed value monitored by the vehicle speed monitoring device to the display for display. - Page 13 mile display and kilometer display, which can be set in the settings. (See Chapter 7 for the setting method.) The actual instrument speed is displayed in only one unit. It is not possible to have two units at the same time. As shown in Pic 6-4: (Pic 6-4 is only for explanation) Current Speed, can switch between KMH and Pic 6-4...
-
Page 14: Battery Capacity
During working, short press on/off to show status of Mileage, Trip, AVG and Max Speed. i.e. “83km” is Pic 6-5 Battery Capacity (Full is 5 bar) as shown in Pic 6-6: Pic 6-6 5. Battery Capacity When the battery is fully charged, the 5 bar are fully illuminated; when the battery is under voltage, the last cell will flash and need to be charged Page of 20... -
Page 15: Error Code
immediately. As shown in Pic 6-7: Pic 6-7 Battery Capacity: 5%——25% 25%——45% 2 45%——65% 3 65%——85% 4 85%——100% 5 6. Error Code When the Ebike control system fails, the display will automatically show an error code and the error code will flash. And stop normal work, only when the fault is eliminated can exit the fault display interface (even if the display is turned off without troubleshooting, the display will not work normally after restarting the display), the error code list is detailed in the attached error code... -
Page 16: Reset
Error light flashing Showing Error Code Pic 6-8 7. Reset In the power-on state, press the plus and minus keys for more than 3 seconds on any interface, and the information in the TRIP, TIME, MAX, AVG interface will reset to zero. -
Page 17: Set Max Pas
immediately. interface. After entering the correct password every time, the power is turned on, the next time you enter the password input interface, the meter will display the password that was correctly entered last time. Unless the password entered last time is incorrect or the power is turned off, you need to re-enter the correct password. -
Page 18: Wheel Size
exit the maximum gear setting interface. If no operations are performed for up to 10 seconds, the dashboard will automatically return to the main interface. 3. Wheel Size First enter the wheel diameter setting interface, with the following wheel diameter selections 16, 18, 20, 22, 24, 26, 27.5, 28. The corresponding wheel diameter is selected by the plus and minus keys to ensure the accuracy of the meter speed display and mileage display. -
Page 19: Speed Limit
by the minus key, short press the key for 0.5 seconds, save and exit the unit switching setting interface of kilometers and miles. If no operation is performed within 10 seconds, the dashboard will automatically return to the main interface. The unit switching settings are shown in Pic 7-3: Switch choose between... -
Page 20: Wire Harness
Pic 7-4 H. Wire harness D13/U LCD display has a 5-pin cable that is powered by a 24V/36V/48V battery voltage, which in turn is the positive power supply, ground, weak electrical lock, communication R, and communication T. I. Q&A... - Page 21 under normal use, the company will be responsible for the limited warranty during the warranty period. The warranty period of the product is calculated within 30 months from the production date Exception: The following conditions are not covered by the warranty Unauthorized disassembly and modification.
- Page 22 Brake failed Communication Error Power bottom Error Walking assistant Error Microprocessor failure, voltage reference fault If the 5-core cable connected to the controller and the controller fails: The meter cannot be turned on, and the LCD screen is not displayed. Possible cause: The main power cord is not connected / the controller is out of phase.
Need help?
Do you have a question about the D13 and is the answer not in the manual?
Questions and answers
Guten Morgen ich kann **** die Einstellungen mit der + - Tasten machen.Ich muss ins Menü schauen warum geht das ****.
The menu settings for the Ananda D13 that can be adjusted using the + and - buttons include:
1. Maximum speed setting
2. Wheel diameter parameter
3. Unit switch between kilometers (KM) and miles (MPH)
4. Speed limit function adjustment
5. Current version number display
6. Maximum gear setting (e.g., 5th or 9th gear)
7. Resetting TRIP, TIME, MAX, AVG data (by pressing + and - for over 3 seconds)
8. Entering and confirming the 4-digit password (default: 6262) to access settings
These functions are accessed and adjusted through short or long presses of the + and - buttons.
This answer is automatically generated