Advertisement
Available languages
Available languages
L O G C AB I N
.
W
W
W
L
O
G
PARTS:
2
half logs (7.5 cm)
7
2 notched logs (7.5 cm)
10
1 notched logs (2.8 cm)
2
gables
1
chimney
1
window
2
ladder poles (6.7 cm)
25
railing posts (1.8 cm)
3
railings (6.7 cm)
6
railings (2.5 cm)
5
ladder rungs (1.8 cm)
Warning: CHOKING HAZARD – Small Parts. Not for children under 4 years.
Required tools: scissors, damp cloth, straight edge (square), sand paper
(optional), tweezers (optional).
Helpful tips: Read instructions, check all parts, and do a dry run before
gluing. Use only a small amount of glue. Glue one log and place before
gluing the next log. Keep each row of logs even and straight over the row
below (look from above for alignment). Periodically check that the door and
windows fit into the openings. Ensure the good side of the parts face out.
Tweezers may be useful for placing small parts. For the best fit and finish,
lightly sand the notches, the ends of the logs and other parts before gluing.
When finished enjoy your kit natural or paint some or all of it.
Building the Roof Panels
Step 1
•
With the ridges up, evenly glue two of the roof pieces together with the thin
edge of one against the wide edge of the other.
•
Repeat for the other roof panel. Carefully, set the roof panels aside and
clean any excess glue from the work surface.
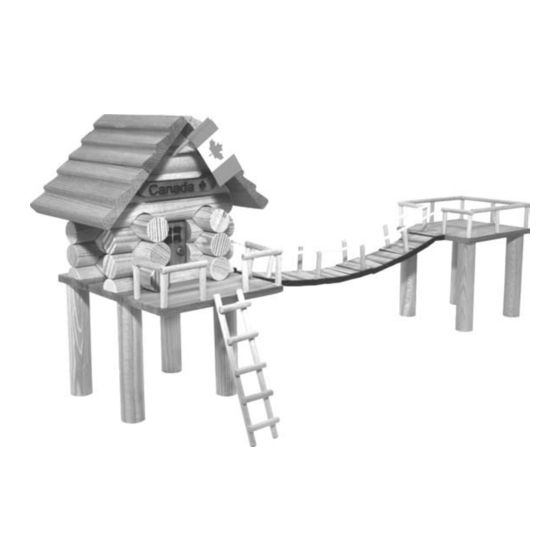
Building the Platforms and Bridge
Step 2
•
On a flat surface glue the edges of two floor planks together to form the
lookout platform. Glue three floor planks together to form the cabin plat-
form. Carefully, set the platforms aside and clean any excess glue from the
work surface. Allow to dry.
•
Arrange the platforms (cabin platform on right and lookout platform on left)
and bridge planks with good side down as shown. (Ensure the platforms
are in the correct position. The platform joints should run side to side (not
front to back).
•
Glue the edge of the end bridge plank to the cabin platform 2.5 cm from
the back of the platform.
•
Glue the edge of the other end bridge plank to the middle of the lookout
platform.
•
Put two dabs of glue on each bridge plank near the ends forming two lines
of glue dots down the length of the bridge. Continue with glue halfway
across both platforms as shown. Ensure that the bridge planks are straight
and even.
•
Lay the string over the glue.
•
For the lookout platform, glue four stilts onto the platform in the corners
as shown.
•
For the cabin platform, glue two stilts onto the corners of the back floor
plank. Glue two more stilts onto the front floor plank next to the joint as
shown. Allow to dry.
Making the Flag
Step 3
•
With scissors, snip the sharp ends of the toothpick.
•
With printing out, fold the flag in half. Unfold the flag.
•
Spread glue evenly on the inside of the flag.
•
Ensure hands are clean of glue and place the toothpick in the crease fold.
T OY S
.
C
A
B
I
N
T
O
Y
S
C
4
"3 ridge" roof pieces
1
bottle of glue
1
canoe
1
flag (flag & toothpick)
2
door
2
door knob
8
stilts
5
floor planks
4
strings
19
bridge planks
CANYON SUSPENSION
O
M
Ensure the top of the toothpick is even with the top of the flag.
•
Evenly refold the flag over the toothpick, pinching it around the toothpick.
Step 4
•
Lay the two ladder poles (6.7 cm) parallel to each other, about 1 cm apart.
•
Without glue evenly space the ladder rungs (1.8 cm) across the poles leav-
ing approximately 1 cm at each end of the poles.
•
Glue each rung onto the poles one at a time as shown.
Step 5 (front & back - row 1)
•
Arrange the two half logs (7.5 cm) on a flat surface as shown.
Step 6 (sides - row 1)
•
Glue the notches of:
o one 2 notched log (7.5 cm); and
o two 1 notched logs (2.8 cm).
•
Place the 2 notched log on the left and the 1 notched logs on the right
as shown. Ensure the short ends of the 1 notched logs are towards the
center, creating a doorway.
Step 7 (front & back - row 2)
•
Glue the notches of:
o one 2 notched log (7.5 cm); and
o two 1 notched logs (2.8 cm).
•
Place the 2 notched log at the back and the 1 notched logs in the front
as shown. Ensure the short ends of the 1 notched logs are towards the
center, creating a doorway.
Step 8 (sides - row 2)
•
Glue the notches of four 1 notched logs (2.8 cm)
•
Place the logs with notches down over the last row as shown. Ensure the
short ends of the 1 notched logs are towards the center, creating the win-
dow on the left and doorway on the right.
Step 9 (front & back - row 3)
•
Glue the notches of:
BRIDGE
INSTRUCTIONS
Building the Ladder
Building the Logs
Advertisement
Table of Contents

Related Manuals for LOG CABIN TOYS CANYON SUSPENSION BRIDGE


Summary of Contents for LOG CABIN TOYS CANYON SUSPENSION BRIDGE
- Page 1 CANYON SUSPENSION L O G C AB I N T OY S BRIDGE PARTS: half logs (7.5 cm) “3 ridge” roof pieces 2 notched logs (7.5 cm) bottle of glue 1 notched logs (2.8 cm) canoe gables flag (flag & toothpick) chimney door window...
- Page 2 o one 2 notched log (7.5 cm); and o the last two 1 notched logs (2.8 cm). • Place the logs with notches down over the last row as shown. Step 10 (sides - row 3) • Glue the notches of two 2 notched logs (7.5 cm). •...
- Page 3 PONT SUSPENDU L OG C AB I N T OY S DU CANYON MORCEAUX: demi-rondins de (7,5 cm) morceaux de toit à 3 rainures rondins à 2 encoches (6,7 cm) bouteille de colle 10 rondins à 1 encoche (2,8 cm) canot pignons drapeau (drapeau et cure-dents)
- Page 4 S’assurer que les extrémités des rondins à 1 encoche sont placées au centre afin de créer un espace pour la fenêtre à gauche et une entrée de porte à droite. Étape 9 (avant et arrière - rangée 3) • Coller les encoches tel que suit: o Un rondin à...
- Page 5 CANYON SUSPENSION BRIDGE L O G C AB I N T OY S PONT SUSPENDU DU CANYON...
Need help?
Do you have a question about the CANYON SUSPENSION BRIDGE and is the answer not in the manual?
Questions and answers