Advertisement
Available languages
Available languages
L O G C AB I N
.
W
W
W
L
O
G
PARTS:
2
steeple pieces (arrow shaped)
1
steeple piece (with holes)
2
cross pieces [half log (3.6 cm)]
& 1 notched log (5.1 cm)
4
half logs (10.5 cm)
10 2 notched logs (10.5 cm)
1
bell
4
floor planks
8
fence rails (3.5 cm)
18
pickets (2.3 cm)
Warning: CHOKING HAZARD – Small Parts. Not for children under 4 years.
Required tools: scissors, damp cloth, straight edge (square), sand paper
(optional), tweezers (optional).
Helpful tips: Read instructions, check all parts, and do a dry run before
gluing. Use only a small amount of glue. Glue one log and place before
gluing the next log. Keep each row of logs even and straight over the row
below (look from above for alignment). Periodically check that the door and
windows fit into the openings. Ensure the good side of the parts face out.
Tweezers may be useful for placing small parts. For the best fit and finish,
lightly sand the notches, the ends of the logs and other parts before gluing.
When finished enjoy your kit natural or paint some or all of it.
Building the Base
Step 1
•
On a flat surface, glue the edges of the floor planks together as shown.
Use a square or straight edge for alignment.
•
Glue two half logs (10.5 cm) across the floor planks 1 cm from the edges
of the base and evenly spaced from the ends as shown.
•
Keep the base square as you carefully slide the base to one side and
clean any excess glue from the work surface. Set aside to dry.
Building the Roof Panels
Step 2
•
Arrange three "3 ridge" roof pieces with the ridges up and the thin edges
facing the same direction against a straight edge (square) as shown (3
ridge, 3 ridge, 3 ridge).
•
Spread glue along the thin edge of two 3 ridge pieces.
•
Press them together against the square or straight edge in the order
shown to form the left roof panel (3 ridge, 3 ridge, 3 ridge).
•
Repeat for the other roof panel (3 ridge, 3 ridge, 3 ridge).
•
Keep the panels square as you carefully slide each panel to one side and
clean any excess glue from the work surface. Set aside to dry
Making the Door
Step 3
•
For the door hinge cut a (1 cm x 4.5 cm) flat piece of the paper bag
packaging.
•
Spread glue on the left edge of the door (do not glue hinge to the back of
the door).
•
Place the paper hinge on the glued edge as shown. Ensure the plastic
side is facing out and the hinge is even with the back side of the door.
•
When the glue has dried, fold the paper hinge back on itself.
•
Glue the door knob into the hole in the door so it sticks out equal dis-
tance front and back.
Building the Steeple
Step 4
•
Glue the cross piece [half log (3.6 cm)] evenly onto the cross piece [1
notched log (5.1 cm)]. Allow to dry.
T OY S
.
C
A
B
I
N
T
O
Y
S
C
16 1 notched logs (3.6 cm)
2
gables
6
"3 ridge" roof pieces (11.1 cm)
2
"3 ridge" roof pieces (4.4 cm)
1
bottle of glue
1
sign
1
piece of string
1
door
1
door knob
2
windows
COUNTRY CHAPEL
O
M
•
Lay the steeple piece (with holes) flat with the smaller holes down. Glue
the thin edge of two pickets (2.3 cm) along the short edges of the steeple
piece (with holes) as shown.
•
Lay one steeple piece (arrow shaped) with the good side down. Spread
glue straight across the steeple piece (arrow shaped) just above the top
of the arch. Attach the long edge of the steeple piece (with holes) with
the picket side toward the legs and the top side just below the corners of
the
steeple piece (with holes) as shown. The steeple piece (with
holes) and pickets should be straight up. Allow to dry.
•
Thread the string through the hole in the bell. From the bottom, thread
one end of the string through one of the holes in the steeple piece (with
holes) and the other end of the string through the other hole. Pull the
string tight from the top and tie a double knot. Snip the ends of the
string.
•
Glue the other steeple piece (arrow shaped) to the opposite long edge of
the steeple piece (with holes). Stand the steeple up straight ensuring all
four legs contact the table and then lay it on it's side as shown. Allow to
dry.
•
Spread glue onto the top edges of the steeple pieces (arrow shaped).
•
Center the two "3 ridge" roof pieces (4.4 cm) evenly over the gables so
the thin edges meet at the top.
•
Glue the bottom of the cross and insert it into the hole at the top of the
steeple. Ensure it is straight up.
Step 5
•
On a flat surface, arrange two fence rails (3.5 cm) parallel, with a 1.2 cm
space between as shown.
•
Evenly space four pickets across the rails. The bottom rail should be at
the bottom of the picket and the top rail should be approximately 0.2 cm
from the top of the pickets. One at a time, remove a picket and glue it to
the rails.
•
Repeat for the other three fence panels.
Step 6 (sides - row 1)
•
On a flat surface, arrange two half logs (10.5 cm) as shown.
INSTRUCTIONS
Building the Fence Panels
Building the Logs
Advertisement
Table of Contents

Related Manuals for LOG CABIN TOYS COUNTRY CHAPEL


Summary of Contents for LOG CABIN TOYS COUNTRY CHAPEL
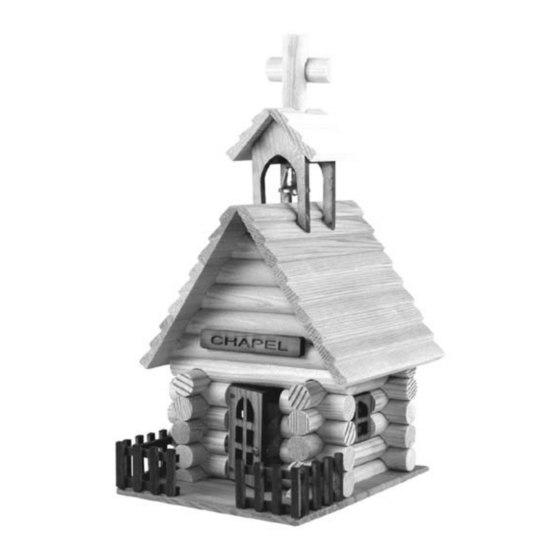
- Page 1 COUNTRY CHAPEL L O G C AB I N T OY S PARTS: steeple pieces (arrow shaped) 16 1 notched logs (3.6 cm) steeple piece (with holes) gables cross pieces [half log (3.6 cm)] “3 ridge” roof pieces (11.1 cm) &...
- Page 2 Step 7 (front & back - row 1) • Glue the notches of: o one 2 notched log (10.5 cm); and o two 1 notched logs (3.6 cm). • Place the logs with notches down across the half logs as shown. Step 8 (sides - row 2) •...
- Page 3 CHAPELLE DE CAMPAGNE L OG C AB I N T OY S MORCEAUX: 2 morceaux de clocher (en pointe) 16 rondins à 1 encoche (3,6 cm) 1 morceau de clocher (troué) 2 pignons 2 traverses (demi-rondins de 3,6 cm) 6 morceaux de toit à 3 rainures (11,1 et demi-rondins à...
- Page 4 Assemblage des rondins Étape 6 (côtés - rangée 1) • Sur une surface plane, agencer deux demi-rondins (10,5 cm), tel qu’illustré. Étape 7 (avant et arrière - rangée 1) • Coller les encoches des rondins, tel que suit: o Un rondin à 2 encoches (10,5 cm) o Deux rondins à...
- Page 5 L O G C AB I N T OY S COUNTRY CHAPEL CHAPELLE DE CAMPAGNE...
Need help?
Do you have a question about the COUNTRY CHAPEL and is the answer not in the manual?
Questions and answers