Advertisement
Available languages
Available languages
Quick Links
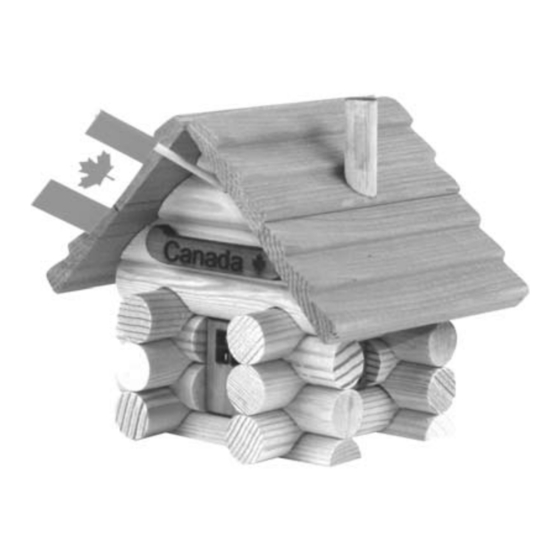
L O G C AB I N
.
W
W
W
L
O
G
PARTS:
2
half logs (7.5 cm)
8
2 notched logs (7.5 cm)
8
1 notched logs (2.8 cm)
2
gables
1
chimney
2
windows
Warning: CHOKING HAZARD – Small Parts. Not for children under 4 years.
Required tools: scissors, damp cloth, straight edge (square), sand paper
(optional), tweezers (optional).
Helpful tips: Read instructions, check all parts, and do a dry run before
gluing. Use only a small amount of glue. Glue one log and place before
gluing the next log. Keep each row of logs even and straight over the row
below (look from above for alignment). Periodically check that the door and
windows fit into the openings. Ensure the good side of the parts face out.
Tweezers may be useful for placing small parts. For the best fit and finish,
lightly sand the notches, the ends of the logs and other parts before gluing.
When finished enjoy your kit natural or paint some or all of it.
Building the Roof Panels
Step 1
•
With the ridges up, evenly glue two of the roof pieces together with the thin
edge of one against the wide edge of the other.
•
Repeat for the other roof panel. Carefully, set the roof panels aside and
clean any excess glue from the work surface.
Making the Flag
Step 2
•
With scissors, snip the sharp ends of the toothpick.
•
With printing out, fold the flag in half. Unfold the flag.
•
Spread glue evenly on the inside of the flag.
•
Ensure hands are clean of glue and place the toothpick in the crease fold.
Ensure the top of the toothpick is even with the top of the flag.
•
Evenly refold the flag over the toothpick, pinching it around the toothpick.
Building the Logs
Step 3 (front & back - row 1)
•
Arrange the two half logs (7.5 cm) on a flat surface as shown.
Step 4 (sides - row 1)
•
Glue the notches of two 2 notched logs (7.5 cm).
•
Place the logs with notches down across the half logs as shown.
Step 5 (front & back - row 2)
•
Glue the notches of:
o one 2 notched log (7.5 cm); and
o two 1 notched logs (2.8 cm).
•
Place the 2 notched log at the back and the 1 notched logs in the front
as shown. Ensure the short ends of the 1 notched logs are towards the
center, creating a doorway.
Step 6 (sides - row 2)
•
Glue the notches of four 1 notched logs (2.8 cm)
•
Place the logs with notches down over the last row as shown. Ensure the
short ends of the 1 notched logs are towards the center, creating the windows.
Step 7 (front & back - row 3)
•
Glue the notches of:
o one 2 notched log (7.5 cm); and
T OY S
.
C
A
B
I
N
T
O
Y
S
C
4
"3 ridge" roof pieces
1
bottle of glue
1
canoe
1
flag (flag & toothpick)
1
door
1
door knob
PROSPECTOR'S
O
M
o the last two 1 notched logs (2.8 cm).
•
Place the logs with notches down over the last row as shown.
Step 8 (sides - row 3)
•
Glue the notches of two 2 notched logs (7.5 cm).
•
Place the logs with notches down over the last row as shown.
Step 9 (front & back - row 4)
•
Glue the notches of the last two 2 notched logs (7.5 cm).
•
Place the logs with notches down over the last row as shown.
Note: At this point, make sure the door and windows fit into the openings
before the Cabin dries.
Step 10 (front & back - row 5)
•
Spread a small amount of glue in the grooves of both gables.
•
Evenly place the gable with the flag hole onto the top row of logs at the
front of the Cabin. Ensure that the log side is facing out and the gable is
straight up.
•
Evenly place the remaining gable onto the top row of logs at the back of the
Cabin. Ensure that the log side is facing out and the gable is straight up.
Step 11
•
Spread a small amount of glue on the edge of the gables.
•
Center the two roof panels evenly over the gables so the thin edges meet
at the top.
•
Allow to dry.
Step 12
•
Glue the door knob into the hole in the door so it sticks out equal distance
front and back.
•
Spread a small amount of glue around the outside edges of the windows
and door and place them into the openings.
•
Insert the flag into the hole in the front gable.
•
Glue the canoe over the doorway.
•
Glue the chimney onto the second ridge from the top of the roof.
CABIN
INSTRUCTIONS
Placing the Roof
The Final Touches
Advertisement

Summary of Contents for LOG CABIN TOYS PROSPECTOR'S CABIN
- Page 1 PROSPECTOR’S CABIN L O G C AB I N T OY S PARTS: half logs (7.5 cm) “3 ridge” roof pieces 2 notched logs (7.5 cm) bottle of glue 1 notched logs (2.8 cm) canoe gables flag (flag & toothpick) chimney door windows...
- Page 2 CABANE DU PROSPECTEUR L OG C AB I N T OY S MORCEAUX: demi-rondins (7,5 cm) morceaux de toit à 3 rainures rondins à 2 encoches (7,5 cm) bouteille de colle rondins à 1 encoche (2,8 cm) canoé pignons drapeau (1 drapeau et 1 cure-dent) cheminée porte fenêtres...
- Page 3 PROSPECTOR’S CABIN LOG C AB I N T OY S CABANE DU PROSPECTEUR...