
Summary of Contents for DOSITEC SISTEMAS Multitec Series
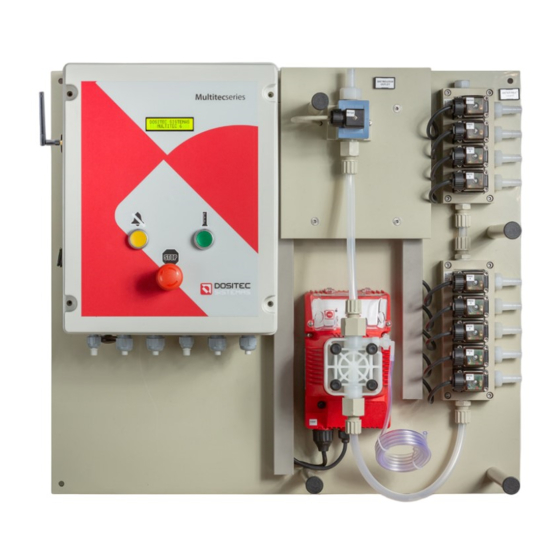
- Page 1 Multitec 6 Electromagnetic Pump 1 Channel User Guide Multitec 6 Electromagnético 1 Canal Manual de usuario MultitecSeries (21150041)
-
Page 2: Table Of Contents
INDICE TABLE OF CONTENTS 1. MEDIDAS DE SEGURIDAD Y EXIGENCIAS ....3 1. SAFETY MEASURES AND REQUIREMENTS ... 3 2. DIMENSIONES ............4 2. DIMENSIONS ............4 3. MONTAJE E INSTALACIÓN ......... 4 3. ASSEMBLY AND INSTALLATION ......4 3.1. Tareas preliminares ..........4 3.1. -
Page 3: Safety Measures And Requirements
1. MEDIDAS DE SEGURIDAD Y EXIGENCIAS 1. SAFETY MEASURES AND REQUIREMENTS Por favor lea estas instrucciones atentamente para un buen Please read these instructions carefully in order to let the funcionamiento del equipo. unit work safely and efficiently. • Tanto estos equipos como sus elementos periféricos •... -
Page 4: Dimensions
DIMENSIONS (in mm) DIMENSIONES (en mm) 3. ASSEMBLY AND INSTALLATION 3. MONTAJE E INSTALACIÓN 3.1 Preliminary tasks 3.1 Tareas preliminares Choose a clear and flat wall near the washer extractors. Busque una pared lisa y plana cerca de las lavadoras. It is highly recommended to use the Dositec’s specific kit of Es altamente recomendable para su instalación usar los materials for installation which is available under request. -
Page 5: Tubing
3.4 Tubing 3.4 Conexión hidráulica 3.4.1 Water tubing 3.4.1 Conexión de agua Make sure that there is enough water supply for the Asegúrese que haya suficiente presión de agua para el unit: 1.5 bar in dynamic range. equipo: 1,5 bar en régimen dinámico. If this is not possible, it is mandatory to install a PRESS Si esto no es posible, es obligatorio instalar un PRESS CONTROL to achieve this condition. -
Page 6: Tubes To Distributor / Washer Extractors
3.4.3. Conexión hacia el distribuidor / lavadoras 3.4.3 Tubes to distributor / washer extractors Conecte el distribuidor al sistema y este a las lavadoras Connect the distributor to the system and it to the utilizando la tubería indicada. washer extractor using the indicated hose. DISTRIBUIDOR DISTRIBUTOR 12mm Tube Tubo de 12mm... -
Page 7: Electric Distributor Connection
3.5.2 Conexión eléctrica distribuidor 3.5.2 Electric distributor connection Distributor Input 7x0,75 Entrada Distribuidor 7x0,75 DISTRIBUTOR DISTRIBUIDOR... -
Page 8: Washer Extractors Signal Connection
3.5.3 Washer extractors signal connection 3.5.3 Conexión señales lavadoras Make sure that the unit is turned off. Asegúrese que el equipo está apagado. Signal Communication Input 4x0,25 Entrada Caja Comunicación Señales 4x0,25 OTHER COMMUNICATION BOARDS (IF EXIST) / OTRAS PLACAS DE IF FORMULA SELECTORS ARE PRESENT: COMUNICACIÓN (SI EXISTEN). -
Page 9: Level Probes' Wiring
3.5.3 Conexion sondas nivel 3.5.3 Level probes’ wiring Selector Input 4x0,25 Entrada Selector 4x0,25 SUCTION PROBES / CAÑAS DE NIVEL... -
Page 10: External Alarm Connection
3.5.3 Conexión Alarma Externa 3.5.3 External Alarm Connection Alarm Input 2x0,55 Entrada Alarma 2x0,55 EXTERNAL ALARM / ALARMA EXTERNA 3.6 Internet Connection 3.6 Conexión a Internet It is possible to connect the equipment to the Internet in these Es posible conectar el equipo a Internet de las siguientes following ways: formas: 3.6.1 Direct connection: Using a UTP cable to the laundry... -
Page 11: Start-Up
4. START-UP 4. PUESTA EN MARCHA After having installed the unit, we can carry out the start-up by Después de haber instalado el equipo, podemos realizar la puesta following these steps: en marcha siguiendo estos pasos: 4.1 Requisitos previos y configuración 4.1 Previous requirement and unit configuration Asegúrese que la lavandería está... -
Page 12: Checking The Dosing
4.6 Checking the dosing 4.6 Comprobación de la dosificación To ensure that the meter works correctly, we can perform Para estar seguros que el contador trabaja correctamente, manual dosings and take a sample. The amount obtained podemos realizar dosificaciones manuales y tomar una muestra. must be the same as the estimated amount that appears La cantidad obtenida debe ser la misma que la estimada que on the screen. - Page 13 Description Marca Descripción / 1161M6P1CV Placa Control Multitec6 con ID Generica Multitec6 Control Board Generic 6153IDPN21643 Magneto IDPN 1P+N 6A curva C Magnetic-thermal breaker 1P+N 6A C-Curve 5753NSYTRV42SF5 Borne Porta fusible Phoenix Phoenix connector with fuse handler 57351000005 Fuente Alimentación Pro Eco 120W 24VDC 5A Power supply Pro Eco 120W 24VDC 5A 11160006 Placa E/S para Controlador MULTITEC Con Marcacion...
- Page 14 Description Marca Descripción / 021713020002 Sensor de caudal 8030 24 Dc colector abierto+Conector Flow meter 8030 24VDC PNP 021713020005 Conector para sensor de Caudal 8030 24 Dc ( 4 pin) Flow meter 8030 24VDC Conector (4 pin) 54808400231 Espiga PVDF 1/2"- D12 hembra + junta VITON PVDF Fitting 1/2"- D12 Female + VITON O-ring 02171432300 Turbina PP+ junta FPM para sensor de caudal tipo S030...
Need help?
Do you have a question about the Multitec Series and is the answer not in the manual?
Questions and answers