Advertisement
Table of Contents
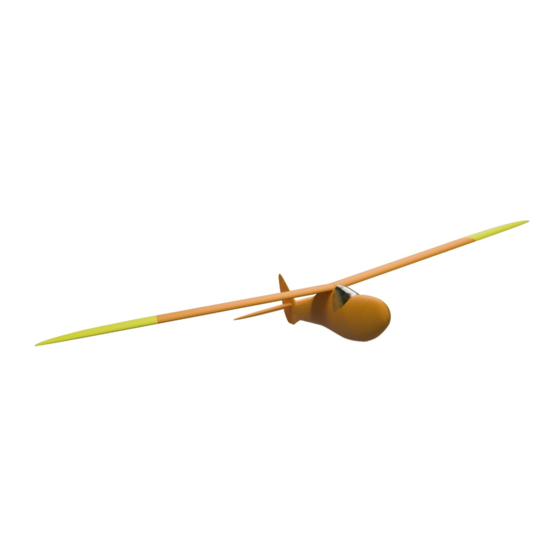
Mini Sinbad 1200
Rev 0.0 – 08.01.2021
3d-printz Original
Take-off-weight: ca. 400g (LW-PLA) ca. 700g (PETG)
Span: ca. 1200 mm
Airfoil: Original Sinbad / RG15
Cg: 45 mm
additional Material:
RC-Components
Bowden
CA medium and thin viscosity
Cutterknife
Sandpaper
4mm Carbonrod
(2x 465mm forFloaterwing, 2x 360mm for Acro Wing,
1x 45mm, 1x 65mm for Wingmount)
3mm Carbonrod 105mm
2mm Carbonrod 230mm bzw. 45mm
some Lead
4 round Magnets 10x4mm
Plasticscrew M6
Screwnut M6
RC Components:
RC Receiver
Battery (f.e. NimH 400mah - AAA for Gliderversion)
2x or 4x Microservos
Trivia:
The Mini Sinbad was developed as an easy-to-fly slope glider. The possibility of flying it
with the slow original airfoil only with rudder or with the faster RG 15 wing extends its field
of application and provides variety. The slow flight characteristics are excellent and with
the faster wing the small vintage glider can also pick up speed properly.
The flight behavior benefits from low weight so LW-PLA is the best choice of material, but it
can also be printed with Standard PLA or PETG.
Advertisement
Table of Contents

Related Manuals for 3d-printz Mini Sinbad 1200


Summary of Contents for 3d-printz Mini Sinbad 1200
- Page 1 Mini Sinbad 1200 Rev 0.0 – 08.01.2021 3d-printz Original Take-off-weight: ca. 400g (LW-PLA) ca. 700g (PETG) Span: ca. 1200 mm Airfoil: Original Sinbad / RG15 CG: 45 mm additional Material: RC-Components Bowden CA medium and thin viscosity Cutterknife Sandpaper 4mm Carbonrod...
- Page 3 Assembling First check whether all parts according to the list above are present and intact. If necessary, sand off residues with sandpaper and also roughen the adhesive surfaces a little. The rudder hinges are still a bit stiff due to production - move them back and forth until they run smoothly, if necessary sand them, but be careful! The best way to assemble the fuselage is to...
- Page 4 Next, connect VertStab to Fus4 - you need a carbon rod with a diameter of 3mm and a length of 105mm. First carefully check the stick for fit, then join Fus4 and VertStab with superglue make sure that the alignment is correct - here you can orientate yourself on the Bowden cable housings.
- Page 5 To assemble the wings, 2 carbon rods with a 4mm diameter are required (465mm for Floaterwing and 360mm for Acrowing). The assembly is explained here using the example of the floater wing, but works in exactly the same way for acrowing. First insert the carbon rod into the Wingjoiner and carefully assemble one wing half without glue.
- Page 6 fix the canopy, which are glued into the recesses provided. The nose can be designed either as a motor or glider nose, with the motospant being used as an intermediate piece in both versions. The part Fus1 should be glued at the very end of assembling, after installing the RC Components when you set your CG, as it can be used as a chamber for trim weights.
Need help?
Do you have a question about the Mini Sinbad 1200 and is the answer not in the manual?
Questions and answers