Table of Contents
Advertisement
Available languages
Available languages
Quick Links
Distributed By Miracle-Ear, Inc.
150 South Fifth Street, Suite 2300
GENIUSLink
™
Minneapolis, MN 55402
www.miracle-ear.com
User Manual
Information in this manual subject to change without notice.
Copyright ©2020 Miracle-Ear, Inc.
La información de este manual está sujeta a cambio sin previo aviso.
Derechos de autor ©2020 Miracle-Ear, Inc.
www.miracle-ear.com
10537362 Rev 6
©2020 Miracle-Ear, Inc.
15807USRB/F
Advertisement
Chapters
Table of Contents

Related Manuals for Miracle-Ear GENIUSLink


Summary of Contents for Miracle-Ear GENIUSLink
- Page 1 User Manual Information in this manual subject to change without notice. Copyright ©2020 Miracle-Ear, Inc. La información de este manual está sujeta a cambio sin previo aviso. Derechos de autor ©2020 Miracle-Ear, Inc. www.miracle-ear.com 10537362 Rev 6 ©2020 Miracle-Ear, Inc.
-
Page 2: Table Of Contents
Content Before you start Included in delivery Compatible hearing aids Components Getting started Charging Wearing GENIUSlink properly Pairing hearing aids with GENIUSlink Remote control functions Turning GENIUSlink on/off... - Page 3 Audio streaming Supported devices Pairing Bluetooth devices Pairing our transmitters Audio streaming functions Several devices connected Making phone calls Phone call functions Maintenance and service Cleaning Unpairing Resetting...
- Page 4 Further information Operating distance Configuration of hearing aids Accessories GENIUSlink App Troubleshooting Important safety information Personal safety Product safety...
- Page 5 Important information Intended use Symbols Transport and storage conditions Technical data of the power supply Disposal information Conformance information Quick reference Button overview LED status indication...
-
Page 7: Before You Start
The Bluetooth word mark and logos are owned by the Bluetooth SIG, Inc., and any use of such marks by Miracle-Ear is under licenses. Other trademarks and trade names are those of their respective owners. -
Page 8: Included In Delivery
Included in delivery Check the package contents. GENIUSlink with neckloop: USB cable for charging: Power supply (for US sockets, no adapter is required. For other sockets, a country-specific adapter set is available.) -
Page 9: Compatible Hearing Aids
Compatible hearing aids GENIUSlink works with our specific wireless hearing aids. Your Hearing Care Specialist will advise you on the compatible models. -
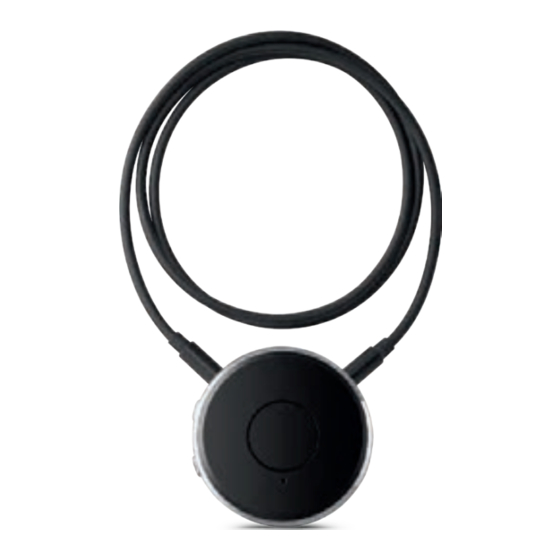
Page 10: Components
Components... - Page 11 Multi-function button LED status indicator (orange, green, blue) Neckloop (is also the antenna) Microphone openings USB port for charging Reset button Port for FM receiver Port for audio devices (standard 3.5 mm audio jack) Volume buttons...
-
Page 12: Getting Started
Getting started Follow the instructions in this chapter to make GENIUSlink ready for operation. Charging... - Page 13 NOTICE Please make sure that the power plug is easily accessible to remove it from power supply if necessary. Battery status while charging steady orange light ➧ Charging. steady green light ➧ Charging is completed.
- Page 14 The orange LED indicates the battery status: Battery status orange LED off ➧ Battery is sufficiently charged. flashing fast for 5 seconds when a button is pressed ➧ Battery is low. Further information: Only use the USB cable and power adapter that shipped with the device.
- Page 15 When charging via computer: GENIUSlink switches off automatically. ¨ Your computer must be turned on and not in sleep or ¨ standby mode. Otherwise, the battery may drain instead of charge. Typically, fully charging takes 2 hours. A special tool is needed to replace the rechargeable battery.
-
Page 16: Wearing Geniuslink Properly
Wearing GENIUSlink properly In order to function correctly, you must wear GENIUSlink with the neckloop around your neck. The neckloop is also the antenna. Unplug one neckloop plug and place the neckloop loosely around your neck Insert both neckloop plugs all the way... -
Page 18: Pairing Hearing Aids With Geniuslink
Pairing hearing aids with GENIUSlink Your hearing aids have to be paired once with GENIUSlink. After that, the connection is automatically established when your hearing aids and GENIUSlink are turned on. Preconditions: Both hearing aids are turned off (the battery compartments are open) and within operating distance. - Page 19 LED turns on . This takes approximately 2 seconds. GENIUSlink searches for hearing aids nearby Turn on the hearing aids while the green LED is flashing : Close the battery compartment. If you are wearing two hearing aids, both aids must be...
- Page 20 Pairing status for hearing aids flashing, then on for 5 seconds, then off ➧ Pairing is finished. An acoustic signal is played. You can now use GENIUSlink. flashing for 10 minutes, then off ➧ Hearing instruments could not be paired. Refer to section...
- Page 21 When pairing is finished, GENIUSlink is ready..for remote control functions. Refer to section “Remote control functions”..for pairing Bluetooth devices as long as the blue LED is flashing . Refer to section “Pairing Bluetooth devices”. If you want to pair Bluetooth devices not now but later on,...
-
Page 22: Remote Control Functions
Remote control functions GENIUSlink is a remote control for your hearing aids. The following functions are available: Function Description Volume Press shortly to adjust step by step. Press and hold until desired volume is reached. Hearing short press program ➧... - Page 23 If you are wearing two hearing aids, both hearing aids are adjusted at the same time. After turning the hearing aids on with GENIUSlink, the previously used volume and hearing program are set. You can quickly turn the hearing aids back on by...
-
Page 24: Turning Geniuslink On/Off
Turning GENIUSlink on/off Turning on: Press until the green LED turns on . This takes approximately 2 seconds. Turning off: Press until the green LED fades off Status indication on for 2 seconds ➧ GENIUSlink is powering up. - Page 25 If the connection can be established immediately, this status indication is skipped. on for 5 seconds ➧ Hearing aids are connected. flashing fast for 10 seconds ➧ Battery is too low to turn on GENIUSlink. fades off ➧ GENIUSlink turns off.
- Page 26 The hearing aids are not automatically turned on or off when GENIUSlink is turned on or off. After turning on, GENIUSlink searches for 10 minutes for hearing aids. If no hearing aids can be detected during that time, GENIUSlink switches off automatically.
-
Page 27: Audio Streaming
Audio streaming Connect the audio device with GENIUSlink - with wire or wirelessly. GENIUSlink wirelessly transmits (streams) the audio signal to your hearing aids. The audio signal is played through your hearing aids. You do not need loudspeakers or headphones. -
Page 28: Supported Devices
Supported devices You can connect the following devices: Bluetooth phones (up to two) Bluetooth audio devices, such as tablet PC, stereo, ... - Page 29 Standard line-in devices (audio devices with 3.5 mm audio jack) Our transmitters (up to two) Enable wireless audio streaming for devices that do not support Bluetooth. FM receiver Enables you to use FM systems even if your hearing aids do not have an audio input. Whenever audio streaming is active - independent of the connected audio source - the blue LED lights up...
- Page 30 The setup depends on the device type: Standard line-in devices and FM receivers must be plugged in. Bluetooth phones and Bluetooth audio devices must be paired once before audio streaming is possible. Refer to section “Pairing Bluetooth devices”. Our transmitters must also be paired once, but the procedure is slightly different.
- Page 31 Further information: FM receivers: The same signal is transmitted to both hearing aids (mono sound). Transmitters: You can also use third-party transmitters. GENIUSlink treats them like other Bluetooth devices. We recommend to use our transmitters.
-
Page 32: Pairing Bluetooth Devices
Pairing Bluetooth devices Every Bluetooth device has to be paired once with GENIUSlink. After that, the connection is automatically established when GENIUSlink is turned on and the Bluetooth device is within operating distance. Bluetooth devices are, for example, Bluetooth phones, TV, tablets or third-party transmitters. - Page 33 Preconditions: Bluetooth device is turned on. GENIUSlink is turned on. Neckloop is plugged into both sides, and GENIUSlink is worn around the neck. Pairing standard Bluetooth devices: Press simultaneously until the blue LED flashes . This takes approximately 5 seconds.
- Page 34 On the Bluetooth device, select “Remote and Streamer” from the list of detected devices. If requested, enter the PIN “0000”. Pairing may take several seconds. The blue LED indicates the pairing status: Pairing status for standard Bluetooth devices flashing, then on for 5 seconds, then off ➧...
- Page 35 ➧ Pairing was not successful. In this case, ensure that the Bluetooth device is within operating distance and try again. Tips: You can also use the GENIUSlink App for pairing. To cancel pairing, press shortly. The blue LED goes off.
-
Page 36: Pairing Our Transmitters
Pairing our transmitters Each transmitter has to be paired once with GENIUSlink. You can use up to two of our transmitters. Preconditions: GENIUSlink is turned on. Neckloop is plugged into both sides, and GENIUSlink is worn around the neck. Transmitter is within operating distance. - Page 37 Pairing has been completed successfully. Streaming starts automatically. You can now use the transmitter. flashing, then off ➧ Pairing was not successful. In this case, ensure that the transmitter is within operating distance and try again. You can also use the GENIUSlink App for pairing.
- Page 38 Further information: If the transmitter is only temporarily (< 5 min) out of operating distance, the transmission of the audio signal is interrupted but automatically picked up again when the transmitter is back within operating distance. If a transmitter is already paired, you cannot pair it again. If you pair a third transmitter, the first paired transmitter is automatically unpaired.
-
Page 39: Audio Streaming Functions
Audio streaming functions For making phone calls, refer to chapter “Making phone calls”. Function Explanation For Bluetooth audio devices: Start Start streaming audio playback on the audio device. For standard line-in devices and FM receivers: Plug the device. For our transmitters: Double-press... - Page 40 Function Explanation Volume Press shortly to adjust step by step. Press and hold until desired volume is reached. Sound mixer short press Press both buttons simultaneously to switch between the following input signals: Audio input and ambient sound Audio input only Stop streaming short press The blue LED goes off.
-
Page 41: Several Devices Connected
For standard line-in devices and FM receivers you can pause / play the audio stream by pressing shortly. When the audio stream is paused, the blue LED goes off. Several devices connected If you connect more than one device to GENIUSlink, the last device connected is played. - Page 42 If you turn on GENIUSlink while more than one device is connected, GENIUSlink selects one of the signals, according to the following priorities: Phone calls Bluetooth audio devices, for example the music player of a smartphone or a tablet PC...
-
Page 43: Making Phone Calls
Making phone calls You can use your hearing aids’ microphones and the microphone of GENIUSlink for phone calls when you are making a call. - Page 44 Preconditions: The phone must support Bluetooth. The phone must be paired with GENIUSlink (refer to section “Pairing Bluetooth devices”).
-
Page 45: Phone Call Functions
Phone call functions Function Description Accept / short press end a call Alternative: Use your phone's accept/end function. Reject a call long press (more than 2 seconds) Alternative: Use your phone's reject function. Volume Press shortly to adjust step by step. Press and hold until desired volume is reached. - Page 46 Sound mixer Press both buttons simultaneously to switch between the following input signals: caller’s voice and ambient sound only caller's voice Hand call double-press over Hands the phone call from GENIUSlink to the phone or from the phone to the GENIUSlink.
- Page 47 ¨ Press shortly to establish the connection ¨ manually. Incoming calls: When someone calls you, your hearing aids play a ring ¨ tone and the blue LED is flashing fast When someone calls you, GENIUSlink cannot be turned ¨ off.
- Page 48 If both phones ring simultaneously, GENIUSlink signals ¨ only the first call. While you are on the phone using the GENIUSlink, ¨ incoming calls of the second phone cannot be signaled. You have to end the call on the first phone in order to answer the call on the second phone.
- Page 49 It is not possible to put a call on hold via GENIUSlink. Use your phone’s functions to put a call on hold. During a phone call, the hearing aids cannot be turned off (standby) and the hearing program cannot be changed.
-
Page 50: Maintenance And Service
Maintenance and service Cleaning NOTICE Do not put your remote control in water! Do not clean your remote control with alcohol or benzine. Clean the remote control and the neckloop as necessary with a dry or slightly damp soft cloth. Use only distilled water to dampen the cloth. -
Page 51: Unpairing
GENIUSlink searches for hearing aids and Bluetooth devices nearby . Turn your hearing aids off and on again to pair them with GENIUSlink. In order to pair other devices, refer to “Pairing Bluetooth devices”. To unpair our transmitters, you have to use the... -
Page 52: Resetting
Resetting In case of a system crash or if GENIUSlink does not respond when you press a button, you can reset the GENIUSlink. The reset does not affect the pairing status. All paired devices remain paired. Use a long thin tool, for example, a wooden or plastic toothpick, and press the reset button. -
Page 53: Further Information
Further information Operating distance GENIUSlink and hearing aids: You must wear GENIUSlink around the neck and you must wear your hearing aids as usual. GENIUSlink and wireless audio devices: The maximum distance is approximately 10 m or 32 ft. -
Page 54: Configuration Of Hearing Aids
Configuration of hearing aids You can use GENIUSlink right out of the box. You only have to pair your hearing aids and the desired Bluetooth devices. However, if you prefer a dedicated hearing program for listening to music (via your Bluetooth HiFi) or when using the... - Page 55 If your Hearing Care Specialist sets up a new hearing program for your hearing aids or changes the configuration of the hearing aids, you have to do the following: Turn GENIUSlink off and then on again. Read more in section “Turning GENIUSlink on/off”. Pair your hearing aids once again.
-
Page 56: Accessories
Accessories Transmitter set: Bluetooth transmitter for devices that do not support Bluetooth. MEComConnect set: Bluetooth transmitter plus lapel microphone that can be given to speakers/teachers for effective speech transmission to the user. Ask your Hearing Care Specialist for additional information about available accessories. -
Page 57: Geniuslink App
GENIUSlink App With the GENIUSlink App you conveniently operate your hearing aids right from your Android smartphone, from your iPhone, or from your tablet. You can control your hearing aids and how they interact with all of your favorite electronic devices. Whether it is watching TV, listening to your favorite song, or talking to a friend on your mobile phone - control is right at your fingertips. - Page 58 Prerequisites for using the app: You must have a GENIUSlink. Wear it as usual and turn it on. Your smartphone or tablet must be within Bluetooth operating distance (about 10 m or 32 ft). Prerequisites for download and installation: Your smartphone or tablet must have access to the Internet.
- Page 59 Download and installation: Search for “GENIUSlink” in the Google Play Store or in the App Store and install the app on your smartphone or tablet. To start the app, it is listed under the name “GENIUSlink” on your smartphone or tablet.
-
Page 60: Troubleshooting
Troubleshooting If an error occurs, make sure that GENIUSlink is worn correctly and that all devices are within operating distance. Refer to sections “Wearing GENIUSlink properly” and “Operating distance”. Problem and possible solutions The device does not work. Ensure that the device is charged and turned on. - Page 61 Problem and possible solutions Hearing aids cannot be paired. Unpair all devices and pair them again. Refer to section “Unpairing devices”. Audio streaming is interrupted. Ensure that the neckloop is not twisted. Ensure that the Bluetooth device is within operating distance.
- Page 62 Problem and possible solutions An external audio source is connected, but not played. For plugged connections: Ensure that the device is fully connected. For wireless connections: The device has not been paired. Refer to section “Pairing Bluetooth devices”. More than one audio device is connected and another connected audio device has a higher priority.
- Page 63 Problem and possible solutions Cannot toggle between transmitters. Only one transmitter has been paired. Pair both transmitters. Ensure that both transmitters are within operating distance. At least one transmitter is a third-party transmitter. Toggling between transmitters works only for our transmitters.
-
Page 64: Important Safety Information
Important safety information Personal safety WARNING Risk of strangulation! Ensure that the neckloop does not get entangled, e. g. in moving mechanical parts of machines. Use only the delivered neckloop. It will automatically detach when entangled. Do not use the device for children under the age of twelve. - Page 65 WARNING Choking hazard! Your device contains small parts which can be swallowed. Keep hearing aids, batteries and accessories out of reach of children and cognitively impaired persons. If parts have been swallowed consult a physician or hospital immediately. WARNING Risk of electrical shock! Do not use obviously damaged devices and return them to point of sale.
- Page 66 WARNING Note that any unauthorized changes to the product may cause damage to the product or cause injury. Use only approved parts and accessories. Ask your Hearing Care Specialist for support. WARNING Risk of electric shock! Connect audio input only to a device conforming to IEC 60065, the IEC-Norm for audio, video and other electronic devices.
- Page 67 WARNING Interference with implantable devices The device can be used with all electronic implants that comply with the ANSI/AAMI/ISO 14117:2012 Electromagnetic compatibility standard for human implants. In case your implant does not comply with the ANSI/AAMI/ISO 14117:2012 standard, consult the manufacturer of your implantable device for information about the risk of disturbance.
- Page 68 WARNING This device may interfere with measuring and electronic equipment. Do not use your device on airplanes or areas where sensitive or life-supporting electronic equipment is used. WARNING Risk of explosion! Do not use your remote control in explosive atmospheres (e. g. in mining areas).
- Page 69 WARNING Risk of explosion when the rechargeable battery is handled wrong. Do not short circuit, pierce, crush or disassemble the rechargeable battery. Prior to returning the battery for recycling, tape the electrodes to prevent short circuit, which may cause the battery to explode. Do not place it in oven or fire.
- Page 70 Radiofrequency radiation exposure Information The radiated output power of the device is far below the FCC radio frequency exposure limits. Nevertheless, the device shall be used in such a manner that the potential for human contact during normal operation is minimized.
- Page 71 NOTICE Protect your devices from high humidity. NOTICE Do not dry your devices in the microwave oven. NOTICE Different types of strong radiation, e. g. during X-ray or MRI head examinations, may damage devices. Do not use the devices during these or similar procedures.
- Page 72 In some countries restrictions for the usage of wireless equipment exist. Refer to local authorities for further information. NOTICE Your hearing aids are designed to comply with international standards on electromagnetic compatibility but interference with nearby electronic devices could occur. In this case, move away from the source of interference.
- Page 73 NOTICE For hearing aids with wireless connectivity: When the telecoil program is active, the remote control may cause a pulsing noise. Use the remote control with a distance greater than 10 cm (4 inches). NOTICE Your remote control is programmed to exclusively communicate with your hearing aids.
-
Page 74: Important Information
Important information Intended use The remote control is intended to operate hearing aids. Use the remote control only as described in this user guide. -
Page 75: Symbols
Symbols Symbols used in this document Points out a situation that could lead to serious, moderate, or minor injuries. Indicates possible property damage. Advice and tips on how to handle your device better. - Page 76 Symbols on device or packaging Read and follow the instructions in the user guide. CE compliance label, confirms compliance with certain European Directives. Refer to section “Conformance information”. EMC and radio communications compliance label Australia. Refer to section “Conformance information”. Do not dispose of the device with household waste.
- Page 77 Symbols on device or packaging The device is designed to connect specifically to iPhone and iPad. Refer to section “Conformance information.”...
-
Page 78: Transport And Storage Conditions
Transport and storage conditions During extended periods of transport and storage, please observe the following conditions: Storage Transport Temperature 10 to 40 °C -20 to 60 °C Relative humidity 10 to 80 % 5 to 90 % For other parts, such as batteries, other conditions may apply. WARNING Risk of injury, fire or explosion during shipment. -
Page 79: Technical Data Of The Power Supply
Technical data of the power supply Golden Profit GPE006H-050100-Z Input voltage: 100-240 V AC Input current: 0.5 A Input frequency: 50-60 Hz Output voltage: 5 V DC Output current: Disposal information Within the European Union, the marked equipment is covered by “Directive 2002/96/EC of the European Parliament and of the Council of 27 January 2003 on waste electrical and electronic equipment.”... - Page 80 Amended by “Directive 2003/108/EC” (WEEE). NOTICE Recycle hearing aids, accessories and packaging according to national regulations. NOTICE To avoid environmental pollution, do not throw batteries into household trash. Recycle or dispose of batteries according to national regulations or return them to your Hearing Care Specialist.
-
Page 81: Conformance Information
Conformance information The CE mark indicates conformity with the following European directives: 93/42/EEC concerning medical devices, 99/5/EC (R&TTE) concerning radio and telecommunications terminal equipment, and 2011/65/EU RoHS concerning the restriction of hazardous substances. Wireless functionality Operating frequency: f = 3.28 MHz FCC and ISED compliance information can be found on the back of the device. - Page 82 Australian Communications and Media Authority (ACMA). Devices with the FCC marking comply with the standards of the FCC regarding electromagnetic interference. This Class B digital apparatus complies with Canadian ICES-003. This device complies with Part 15 of the FCC Rules and with ISED's licence-exempt RSSs.
- Page 83 This equipment has been tested and found to comply with the limits for a Class B digital device, pursuant to Part 15 of the FCC Rules. These limits are designed to provide reasonable protection against harmful interference in a residential installation. This equipment generates, uses and can radiate radio frequency energy and, if not installed and used in accordance with the instructions, may cause harmful interference to radio communications.
- Page 84 Reorient or relocate the receiving antenna. Increase the separation between the equipment and receiver. Connect the equipment to an outlet on a circuit different from that to which the receiver is connected. Consult the dealer or an experienced radio/TV technician for help.
- Page 85 respectively, and has been certified by the developer to meet Apple performance standards. Apple is not responsible for the operation of this device or its compliance with safety and regulatory standards. Please note that the use of this accessory with iPhone or iPad may affect wireless performance.
-
Page 86: Quick Reference
Quick reference Button overview Button Description Adjust volume Press shortly to adjust step by step. Press and hold until desired volume is reached. Only during audio streaming or phone calls Switch between the following input signals: short press Audio input/caller's voice and ambient sound Audio input/caller's voice only... - Page 87 Button Description Turn your hearing aids on/off (standby). long press (2 seconds) During audio streaming: Stop streaming No audio streaming: short press Switch to next hearing program When hearing aids are turned off: Turn hearing aids on Incoming call: Accept call During phone call: End call During Bluetooth pairing: Cancel pairing...
- Page 88 Button Description No active phone call: Turn GENIUSlink on/off During phone call: Reject call long press During phone call: Hand call over Only for our transmitters: Switch to the double-press transmitter or toggle between transmitters Pair standard Bluetooth device Pair one of our transmitters...
-
Page 89: Led Status Indication
...when a button is pressed: Battery is low. ➧ ... after turning on: Battery is too low to turn on GENIUSlink. Flashing fast for 1 second ➧ An error has occurred. Examples: Hearing aids are not in operating distance or the neckloop is open. - Page 90 Orange LED Steady orange light ➧ Charging. Blue LED Blue LED off ➧ No audio streaming and no phone call is active. Steady blue light ➧ Audio streaming is active. ➧ Phone call is active. Flashing fast ➧ Incoming phone call...
- Page 91 On for 5 seconds after flashing ➧ Bluetooth device is connected. Green LED Green LED off ➧ No button is currently pressed, no charging in progress or GENIUSlink is turned off. Steady green light (when charging) ➧ Charging is completed.
- Page 92 Switch hearing program or adjust volume. On for 2 seconds after pressing buttons ➧ Turn hearing aids on/off (standby). On for 2 seconds after turning on ➧ GENIUSlink is turned on. On as long as is pressed ➧ Adjust volume. Flashing ➧...
- Page 93 Green LED Fades off ➧ GENIUSlink turns off. On for 5 seconds, then off ➧ Pairing with hearing aids is finished. Several LEDs Flashing orange and blue ➧ All Bluetooth phones are unpaired. Flashing green and blue ➧ Searching for our transmitters nearby.
- Page 95 GENIUSLink ™ Manual del operador www.miracle-ear.com...
- Page 96 Contenidos Antes de empezar Incluido en la entrega Audífonos compatibles Componentes Primeros pasos Carga Cómo llevar GENIUSlink correctamente Emparejamiento de audífonos con GENIUSlink Funciones del telemando Encendido y apagado de GENIUSlink...
- Page 97 Transmisión de audio Dispositivos compatibles Emparejamiento de dispositivos Bluetooth Emparejamiento de nuestros transmisores Funciones de transmisión de audio Varios dispositivos conectados Cómo realizar llamadas telefónicas Funciones de llamada telefónica Mantenimiento y servicio técnico Limpieza Desemparejamiento Restablecimiento...
- Page 98 Información adicional Distancia operativa Configuración de los audífonos Accesorios GENIUSlink App Solución de problemas Información importante de seguridad Seguridad personal Seguridad del producto...
- Page 99 Información importante Uso previsto Símbolos Condiciones de transporte y almacenamiento Datos técnicos de la fuente de alimentación Información sobre la eliminación Información de conformidad Referencia rápida Vista general de los botones Indicación de estado LED...
-
Page 101: Antes De Empezar
La marca del término Bluetooth y sus logotipos son propiedad de Bluetooth SIG, Inc. y el uso de dichas marcas por parte de Miracle-Ear se realiza bajo licencia. Las demás marcas registradas y nombres comerciales pertenecen a sus respectivos propietarios. -
Page 102: Incluido En La Entrega
Incluido en la entrega Compruebe el contenido del paquete. GENIUSlink con collar: Cable USB para carga: Fuente de alimentación (para enchufes en los Estados Unidos, no se requiere adaptador) Para otros enchufes, está disponible un juego de adaptadores específicos para... -
Page 103: Audífonos Compatibles
Audífonos compatibles GENIUSlink funciona con nuestros audífonos inalámbricos específicos. Su especialista en audición le informará sobre los modelos compatibles. -
Page 104: Componentes
Componentes... - Page 105 Botón multifunción Indicador de estado LED (naranja, verde, azul) Collar (también funciona como antena) Orificios del micrófono Puerto USB para carga Botón de restablecimiento Puerto para receptor FM Puerto para dispositivos de audio (conector de audio estándar de 3,5 mm) Botones de volumen...
-
Page 106: Primeros Pasos
Primeros pasos Siga las instrucciones de este capítulo para preparar GENIUSlink para el funcionamiento. Carga... - Page 107 AVISO Asegúrese de que se pueda acceder fácilmente al conector de alimentación para poder retirarlo de la fuente de alimentación, si es necesario. Estado de la pila durante la carga Luz naranja fija ➧ Cargando. Luz verde fija ➧ La carga ha finalizado.
- Page 108 El LED naranja indica el estado de la pila: Estado de la pila LED naranja apagado ➧ La pila está suficientemente cargada. Parpadea rápidamente durante 5 segundos cuando se pulsa un botón ➧ La pila tiene poca carga. Información adicional: Utilice únicamente el cable USB y el adaptador de corriente incluidos con el dispositivo.
- Page 109 Al realizar la carga mediante un ordenador: GENIUSlink se apaga automáticamente. ¨ El ordenador debe estar encendido y no debe estar en ¨ modo de suspensión ni de hibernación. De lo contrario, la pila podría descargarse en lugar de cargarse.
-
Page 110: Cómo Llevar Geniuslink Correctamente
Cómo llevar GENIUSlink correctamente Para que funcione correctamente, debe llevar GENIUSlink con el collar colgado del cuello. El collar también funciona como antena. Desenchufe un conector del collar y colóquese el collar sin apretar alrededor del cuello Inserte los dos conectores del collar hasta que hagan... -
Page 112: Emparejamiento De Audífonos Con Geniuslink
Emparejamiento de audífonos con GENIUSlink Los audífonos se deben emparejar con GENIUSlink una sola vez. Después, la conexión se establece automáticamente cuando los audífonos y GENIUSlink se encienden. Requisitos: Los dos audífonos están apagados (los compartimentos de la pila están abiertos) y dentro del radio de alcance. - Page 113 Emparejamiento: Pulse hasta que el LED verde se encienda Esto tarda aproximadamente 2 segundos. GENIUSlink busca audífonos cercanos Encienda los audífonos mientras el LED verde esté parpadeando : Cierre el compartimento de la pila. Si utiliza dos audífonos, los dos deben estar encendidos.
- Page 114 Parpadeando, luego encendido durante 5 segundos y luego apagado ➧ El emparejamiento ha finalizado. Se emite una señal acústica. Ahora puede utilizar GENIUSlink. Parpadeando durante 10 minutos y luego apagado ➧ Los audífonos no se han podido emparejar. Consulte la...
- Page 115 Cuando el emparejamiento haya finalizado, GENIUSlink estará listo ..para las funciones del telemando. Consulte la sección “Funciones del telemando”..para emparejar dispositivos Bluetooth mientras el LED azul esté parpadeando . Consulte la sección “Emparejamiento de dispositivos Bluetooth”.
-
Page 116: Funciones Del Telemando
Funciones del telemando GENIUSlink es un telemando para sus audífonos. Están disponibles las funciones siguientes: Función Descripción Volumen o bien Pulse brevemente para realizar un ajuste gradual. Pulse y mantenga pulsado el botón hasta alcanzar el volumen deseado. Programa Pulsación breve de ➧... - Page 117 Enciende o apaga los audífonos. (espera) Información adicional: Si lleva dos audífonos, ambos se ajustan a la vez. Después de encender los audífonos con GENIUSlink, se restablecen el volumen y el programa de audición utilizados anteriormente. Puede volver a encender los audífonos rápidamente...
-
Page 118: Encendido Y Apagado De Geniuslink
Encendido y apagado de GENIUSlink Conexión: Pulse hasta que el LED verde se encienda Esto tarda aproximadamente 2 segundos. Desconexión: Pulse hasta que el LED verde se apague gradualmente Indicación de estado Encendido durante 2 segundos ➧ GENIUSlink se está encendiendo. - Page 119 Si la conexión se puede establecer inmediatamente, esta indicación de estado se omite. Encendido durante 5 segundos ➧ Los audífonos están conectados. Parpadea rápidamente durante 10 segundos ➧ La pila no tiene suficiente carga para encender GENIUSlink. Se desvanece ➧ GENIUSlink se apaga.
- Page 120 10 minutos. Si no se detectan audífonos durante ese periodo, GENIUSlink se apaga automáticamente. En este caso: Asegúrese de que los audífonos estén encendidos y vuelva a intentarlo. Para comprobar si GENIUSlink está encendido, pulse . Si el LED verde se enciende, GENIUSlink está encendido.
-
Page 121: Transmisión De Audio
Transmisión de audio Conecte el dispositivo de audio con GENIUSlink, mediante cable o inalámbricamente. GENIUSlink transmite inalámbricamente la señal de audio a los audífonos. La señal de audio se reproduce a través de los audífonos. No se necesitan altavoces ni auriculares. -
Page 122: Dispositivos Compatibles
Dispositivos compatibles Puede conectar los siguientes dispositivos: Teléfonos Bluetooth (dos como máximo) Dispositivos de audio Bluetooth, como una tablet, un equipo estéreo ... Dispositivos de entrada de línea estándar (dispositivos de audio con conector de audio de 3,5 mm) - Page 123 Nuestros transmisores (dos como máximo) Active la transmisión de audio inalámbrica para los dispositivos que no sean compatibles con Bluetooth. Receptor FM Permite utilizar sus sistemas FM aunque los audífonos no tengan entrada de audio. Siempre que la transmisión de audio esté activa, independientemente de la fuente de audio conectada, el LED azul estará...
- Page 124 La configuración depende del tipo de dispositivo. Los dispositivos de entrada de línea estándar y los receptores FM solo se enchufan. Los teléfonos Bluetooth y los dispositivos de audio Bluetooth se deben emparejar una vez para que se pueda transmitir audio. Consulte la sección “Emparejamiento de dispositivos Bluetooth”.
- Page 125 Información adicional: Receptores FM: Se transmite la misma señal a los dos audífonos (sonido mono). Transmisores: También se pueden utilizar transmisores de terceros. GENIUSlink los trata igual que los demás dispositivos Bluetooth. Se recomienda usar nuestros transmisores.
-
Page 126: Emparejamiento De Dispositivos Bluetooth
Emparejamiento de dispositivos Bluetooth Cada dispositivo Bluetooth se debe emparejar con GENIUSlink una sola vez. Después, la conexión se establece automáticamente cuando GENIUSlink se enciende y el dispositivo Bluetooth queda dentro del radio de alcance. Los dispositivos Bluetooth son, por ejemplo, teléfonos, televisores, tablets o transmisores de terceros con Bluetooth. - Page 127 Requisitos: El dispositivo Bluetooth está encendido. GENIUSlink está encendido. El collar está conectado por ambos lados y se lleva GENIUSlink colgado del cuello. Emparejamiento de dispositivos Bluetooth estándar: Pulse simultáneamente hasta que el LED azul parpadee . Esto tarda aproximadamente 5 segundos.
- Page 128 En el dispositivo Bluetooth, seleccione “Remoto y streamer” en la lista de dispositivos detectados. Si se le solicita, introduzca el PIN “0000”. El emparejamiento puede tardar varios segundos. El LED azul indica el estado de emparejamiento: Estado de emparejamiento de dispositivos Bluetooth estándar Parpadeando, luego encendido durante 5 segundos y luego apagado ➧...
- Page 129 El emparejamiento no se ha podido realizar. En este caso, asegúrese de que el dispositivo Bluetooth esté dentro del radio de alcance y vuelva a intentarlo. Consejos: También se puede utilizar GENIUSlink App para el emparejamiento. Para cancelar el emparejamiento, pulse brevemente.
-
Page 130: Emparejamiento De Nuestros Transmisores
Emparejamiento de nuestros transmisores Cada transmisor se debe emparejar con GENIUSlink una sola vez. Puede utilizar un máximo de dos de nuestros transmisores. Requisitos: GENIUSlink está encendido. El collar está conectado por ambos lados y se lleva GENIUSlink colgado del cuello. - Page 131 Emparejamiento de nuestros transmisores: Encienda el transmisor. Pulse simultáneamente hasta que los LED azul y verde parpadeen . Esto tarda aproximadamente 5 segundos. GENIUSlink busca transmisores cercanos.
- Page 132 El emparejamiento puede tardar varios segundos. El LED azul indica el estado de emparejamiento: Estado de emparejamiento de nuestros transmisores Parpadeando y luego encendido ➧ El emparejamiento se ha realizado correctamente. La transmisión se inicia automáticamente. Ahora puede utilizar el transmisor.
- Page 133 También se puede utilizar GENIUSlink App para el emparejamiento. Información adicional: Si el transmisor solo está temporalmente (< 5 min) fuera del radio de alcance, la transmisión de la señal de audio se interrumpe, pero se reanuda automáticamente cuando el transmisor vuelve a estar dentro del radio de alcance.
-
Page 134: Funciones De Transmisión De Audio
Funciones de transmisión de audio Para realizar llamadas telefónicas, consulte el capítulo “Cómo realizar llamadas telefónicas”. Función Explicación Iniciar la En los dispositivos de audio Bluetooth: Inicie la reproducción de audio en el transmisión dispositivo de audio. En los dispositivos con entrada de línea estándar y los receptores FM: Enchufe el dispositivo. - Page 135 Función Explicación Volumen o bien Pulse brevemente para realizar un ajuste gradual. Pulse y mantenga pulsado el botón hasta alcanzar el volumen deseado. Mezclador de Pulsación breve de sonido Pulse los dos botones simultáneamente para cambiar entre las siguientes señales de entrada: Entrada de audio y sonido ambiente Solo entrada de audio...
- Page 136 Función Explicación Detener la Pulsación breve de transmisión El LED azul se apaga. Cambiar Pulsación doble de entre Solo para nuestros transmisores. transmisores En los dispositivos con entrada de línea estándar y los receptores FM, puede pausar / reproducir la transmisión de audio pulsando brevemente.
-
Page 137: Varios Dispositivos Conectados
Varios dispositivos conectados Si conecta más de un dispositivo a GENIUSlink, se reproduce la señal del último dispositivo. Si enciende GENIUSlink mientras hay más de un dispositivo conectado, GENIUSlink selecciona una de las señales según las prioridades siguientes: Llamadas telefónicas Dispositivos de audio Bluetooth, por ejemplo, el reproductor de música de un smartphone o una tablet... -
Page 138: Cómo Realizar Llamadas Telefónicas
Cómo realizar llamadas telefónicas Puede utilizar los altavoces de los audífonos y el micrófono de GENIUSlink para llamadas telefónicas cuando realice una llamada. - Page 139 Requisitos: El teléfono debe ser compatible con Bluetooth. El teléfono debe estar emparejado con GENIUSlink (consulte la sección “Emparejamiento de dispositivos Bluetooth”).
-
Page 140: Funciones De Llamada Telefónica
Funciones de llamada telefónica Función Descripción Aceptar / Pulsación breve de finalizar una Alternativa: llamada Utilice la función de aceptar/finalizar del teléfono. Rechazar una Pulsación larga de (más de 2 segundos) llamada Alternativa: Utilice la función de rechazar llamada del teléfono. - Page 141 Función Descripción Volumen o bien Pulse brevemente para realizar un ajuste gradual. Pulse y mantenga pulsado el botón hasta alcanzar el volumen deseado. Mezclador de sonido Pulse los dos botones simultáneamente para cambiar entre las siguientes señales de entrada: voz del interlocutor y sonido ambiente solo voz del interlocutor...
- Page 142 Función Descripción Transferir la Pulsación doble de llamada Transfiere la llamada telefónica de GENIUSlink al teléfono o del teléfono a GENIUSlink.
- Page 143 ¨ audio. Pulse brevemente para establecer la conexión ¨ manualmente. Llamadas entrantes: Cuando alguien le llame, los audífonos emitirán un tono de ¨ llamada y el LED azul parpadeará rápidamente Cuando alguien le llama, GENIUSlink no se puede apagar. ¨...
- Page 144 Rechazo de llamadas: Esta función no es compatible con todos los teléfonos. Uso de dos teléfonos: Si los dos teléfonos suenan a la vez, GENIUSlink solo ¨ emite la señal de la primera llamada. Mientras esté al teléfono utilizando GENIUSlink, no ¨...
- Page 145 No es posible poner una llamada en espera mediante GENIUSlink. Para poner una llamada en espera, utilice las funciones del teléfono. Durante una llamada telefónica, los audífonos no se pueden apagar (en espera) y no se puede cambiar el programa de audición.
-
Page 146: Mantenimiento Y Servicio Técnico
Mantenimiento y servicio técnico Limpieza AVISO No sumerja el telemando en agua. No limpie el telemando con alcohol ni con bencina. Limpie el telemando y el collar cuando sea necesario con un paño suave seco o un poco húmedo. Utilice solo agua destilada para humedecer el paño. Evite el uso de productos de limpieza. -
Page 147: Desemparejamiento
LED azul y naranja empiece a parpadear . Esto tarda aproximadamente 10 segundos. GENIUSlink desempareja los audífonos y todos los dispositivos Bluetooth excepto los nuestros transmisores. GENIUSlink busca audífonos y dispositivos Bluetooth cercanos . Apague los audífonos y vuelva a encenderlos para emparejarlos con GENIUSlink. -
Page 148: Restablecimiento
Para desemparejar nuestros transmisores, debe utilizar GENIUSlink App. Restablecimiento En caso de fallo del sistema o si GENIUSlink no responde al pulsar un botón, puede restablecer GENIUSlink. El restablecimiento no afecta al estado de emparejamiento. Todos los dispositivos emparejados permanecen emparejados. -
Page 149: Información Adicional
Información adicional Distancia operativa GENIUSlink y audífonos: Debe llevar GENIUSlink colgado del cuello y debe llevar los audífonos del modo habitual. GENIUSlink y dispositivos de audio inalámbricos: La distancia máxima es de aproximadamente 10 m o 32 ft. -
Page 150: Configuración De Los Audífonos
Configuración de los audífonos Puede utilizar GENIUSlink tal como se suministra. Solo tiene que emparejar los audífonos y los dispositivos Bluetooth deseados. No obstante, si prefiere un programa de audición específico para escuchar música (por medio de su equipo HiFi Bluetooth) o si utiliza el receptor FM: Solicite a su especialista en audición que configure un... - Page 151 Apague GENIUSlink y vuelva a encenderlo. Obtenga más información en la sección “Encendido y apagado de GENIUSlink”. Vuelva a emparejar los audífonos. Obtenga más información en la sección “Emparejamiento de los audífonos con GENIUSlink”. Ahora GENIUSlink dispone de la configuración actualizada de los audífonos.
-
Page 152: Accesorios
Accesorios Transmisor: Transmisor Bluetooth para los dispositivos que no son compatibles con Bluetooth. MEComConnect: Transmisor Bluetooth más micrófono de solapa que puede facilitarse a oradores/profesores para lograr una transmisión eficaz del discurso al usuario. Consulte a su especialista en audición para obtener información adicional sobre los accesorios disponibles. -
Page 153: Geniuslink App
GENIUSlink App Con GENIUSlink App puede controlar cómodamente los audífonos desde un smartphone Android , iPhone o desde una tablet. No solo podrá controlar los audífonos, sino también cómo interactúan con todos sus dispositivos electrónicos favoritos. Ya se trate de ver la TV, escuchar música o hablar con un amigo por el teléfono móvil, el control está... - Page 154 Requisitos para usar la aplicación: Debe disponer de un dispositivo GENIUSlink. Póngaselo de la forma habitual y enciéndalo. El smartphone o la tablet deben estar dentro del alcance de Bluetooth (aprox. 10 m o 32 ft). Requisitos para la descarga y la instalación: Es necesario que el smartphone o la tablet tengan acceso a Internet.
- Page 155 Descarga e instalación: Busque “GENIUSlink” en Google Play Store o en App Store e instale la aplicación en el smartphone o la tablet. La aplicación aparece con el nombre “GENIUSlink” en el smartphone o la tablet.
-
Page 156: Solución De Problemas
Solución de problemas Si surge un problema, asegúrese de llevar GENIUSlink correctamente y de que todos los dispositivos estén dentro del radio de acción. Consulte las secciones “Cómo llevar GENIUSlink correctamente” y “Distancia operativa”. Problema y posibles soluciones El dispositivo no funciona. - Page 157 Problema y posibles soluciones Los audífonos no se han podido emparejar. Desempareje todos los dispositivos y vuelva a emparejarlos. Consulte la sección “Desemparejamiento de dispositivos”. La transmisión de audio se interrumpe. Asegúrese de que el collar no esté torcido. Asegúrese de que el dispositivo Bluetooth esté dentro del radio de acción.
- Page 158 Problema y posibles soluciones Hay una fuente de audio externa conectada, pero no se reproduce. Para las conexiones con cable: Asegúrese de que el dispositivo esté totalmente conectado. Para las conexiones inalámbricas: El dispositivo no se ha emparejado. Consulte la sección “Emparejamiento de dispositivos Bluetooth”.
- Page 159 Problema y posibles soluciones No se pueden alternar transmisores. Solo se ha emparejado un transmisor. Empareje los dos transmisores. Asegúrese de que los dos transmisores estén dentro del radio de acción. Al menos un transmisor es de terceros. Solo se pueden alternar transmisores con nuestros transmisores.
-
Page 160: Información Importante De Seguridad
Información importante de seguridad Seguridad personal ADVERTENCIA Peligro de estrangulación. Asegúrese de que el collar no se quede enganchado, p. ej. en las piezas mecánicas móviles de los equipos. Use solo el collar suministrado. Se soltará automáticamente si se engancha. No use el collar para niños menores de doce años. - Page 161 ADVERTENCIA Peligro de asfixia. El dispositivo contiene piezas pequeñas que se pueden tragar. Mantenga los audífonos, pilas y accesorios fuera del alcance de los niños y personas con deficiencias mentales. En caso de ingestión de alguna pieza, consulte con un médico o acuda a un hospital inmediatamente.
- Page 162 ADVERTENCIA Riesgo de descarga eléctrica. Si el aparato está claramente dañado, no lo use y devuélvalo al punto de venta. ADVERTENCIA Tenga en cuenta que cualquier cambio no autorizado en el producto puede provocar daños materiales o personales. Utilice solo piezas y accesorios autorizados. Solicite la asistencia de su especialista en audición.
- Page 163 ADVERTENCIA Peligro de descarga eléctrica. Conecte la entrada de audio solo a dispositivos que cumplan IEC 60065 (norma IEC para dispositivos de audio, vídeo y otros dispositivos electrónicos).
- Page 164 ADVERTENCIA Interferencia con dispositivos implantables El dispositivo se puede utilizar con todos los implantes electrónicos que cumplen el estándar de compatibilidad electromagnética ANSI/AAMI/ISO 14117:2012, de implantes para humanos. En caso de que el implante no cumpla el estándar ANSI/AAMI/ISO 14117:2012, solicite información sobre los riesgos de perturbaciones al fabricante del dispositivo implantable.
- Page 165 ADVERTENCIA El dispositivo puede interferir con los dispositivos de medición y electrónicos. No utilice el dispositivo en aviones o zonas donde se utilicen equipos electrónicos de soporte vital o equipos electrónicos sensibles. ADVERTENCIA Peligro de explosión. No use el telemando en atmósferas explosivas (p.
- Page 166 ADVERTENCIA Peligro de explosión si la batería recargable se manipula inadecuadamente. No cortocircuite la batería recargable, no la perfore, no la aplaste ni la desmonte. Antes de devolver la batería para reciclarla, envuelva los electrodos con cinta adhesiva para evitar cortocircuitos que podrían provocar la explosión de la batería.
- Page 167 Información sobre la exposición a radiación por radiofrecuencia La potencia radiada del dispositivo está muy por debajo de los límites de exposición a la radiación de radiofrecuencia establecidos por la FCC. No obstante, el dispositivo debe utilizarse minimizando las posibilidades de contacto con personas durante el funcionamiento normal.
- Page 168 AVISO Proteja los dispositivos de la humedad elevada. AVISO No seque los dispositivos en un horno microondas. AVISO Distintos tipos de radiaciones intensas, p. ej. las que se aplican durante los exámenes de rayos X o MRI de la cabeza, pueden dañar los dispositivos. No use los dispositivos durante estos o similares procedimientos.
- Page 169 En algunos países existen restricciones al uso de equipos inalámbricos. Para más información, consulte a las autorida- des locales. AVISO Los audífonos están diseñados para cumplir con los estándares internacionales en materia de compatibilidad electromagnética, pero pueden ocurrir interferencias con los dispositivos electrónicos cercanos.
- Page 170 AVISO Para los equipos con conectividad inalámbrica: cuando el programa de bobina telefónica está activo, el telemando puede provocar un sonido pulsante. Utilice el telemando a una distancia mayor de 10 cm (4 pulgadas). AVISO Su telemando está programado para comunicarse exclusivamente con sus audífonos.
-
Page 171: Información Importante
Información importante Uso previsto Este telemando tiene como función el control de los audífonos. Utilícelo solo del modo descrito en este manual del operador. -
Page 172: Símbolos
Símbolos Símbolos utilizados en este documento Indica una situación que podría provocar lesiones leves, moderadas o graves. Indica posibles daños materiales. Consejos y sugerencias para manejar mejor el dispositivo. - Page 173 Símbolos en el dispositivo o el embalaje Lea y siga las instrucciones del manual del operador. La etiqueta conforme a CE certifica la conformidad con determinadas directivas europeas. Consulte la sección “Información de conformidad”. Etiqueta conforme a los requisitos de CEM y de comunicaciones por radio de Australia.
- Page 174 Símbolos en el dispositivo o el embalaje El dispositivo está diseñado para conectarse específicamente a iPhone y iPad. Consulte la sección “Información de conformidad”.
-
Page 175: Condiciones De Transporte Y Almacenamiento
Condiciones de transporte y almacenamiento Durante largos períodos de transporte y almacenamiento, tenga en cuenta las condiciones siguientes: Almacenamiento Transporte Temperatura de 10 a 40 °C de -20 a 60 °C Humedad de 10 a 80 % de 5 a 90 % relativa Para otras piezas, como las pilas, pueden aplicarse otras condiciones. -
Page 176: Datos Técnicos De La Fuente De Alimentación
ADVERTENCIA Riesgo de lesiones, fuego o explosión durante el transporte. Transporte de pilas de litio según la normativa local. Datos técnicos de la fuente de alimentación Golden Profit GPE006H-050100-Z Tensión de entrada: 100-240 V CA Corriente de entrada: 0,5 A Frecuencia de entrada: 50-60 Hz Tensión de salida:... -
Page 177: Información Sobre La Eliminación
Golden Profit GPE006H-050100-Z Corriente de salida: Información sobre la eliminación En la Unión Europea, el equipo marcado está cubierto por la “Directiva 2002/96/CE del Parlamento Europeo y del Consejo de 27 de enero de 2003 sobre residuos de aparatos eléctricos y electrónicos”. Enmendada por la “Directiva 2003/108/CE”... -
Page 178: Información De Conformidad
AVISO Para evitar la contaminación medioambiental, no tire las pilas en la basura doméstica. Recicle o elimine las pilas según las disposiciones legales del país o devuélvalas al especialista en audición. Información de conformidad La marca CE indica la conformidad con las siguientes directivas europeas: 93/42/EEC sobre dispositivos médicos, 99/5/CE (R&TTE) sobre equipos terminales de radio y telecomunicaciones y 2011/65/UE RoHS sobre la restricción... - Page 179 Funcionalidad inalámbrica Frecuencia de funcionamiento: f = 3,28 MHz La información sobre conformidad con FCC e ISED se encuentra en la parte trasera del dispositivo. La marca de conformidad ACMA indica la conformidad con las normativas sobre interferencias magnéticas establecidas por la Autoridad Australiana de Comunicaciones y Medios de Comunicación (ACMA).
- Page 180 Este aparato digital de Clase B cumple con ICES-003 de Canadá. Este dispositivo cumple con el párrafo 15 de las normas FCC y con los RSS con exención de licencia de ISED. Su funcionamiento está sujeto a las dos condiciones siguientes: Este dispositivo no debe provocar interferencias dañinas y este dispositivo debe aceptar cualquier interferencia...
- Page 181 una instalación residencial. Este equipo genera, utiliza y puede radiar energía de radiofrecuencia y, si no se instala y utiliza cumpliendo las instrucciones, puede provocar interferencias dañinas en las comunicaciones por radio. Sin embargo, no se garantiza que no se produzcan interferencias en una instalación en particular.
- Page 182 Aviso de precaución de la FCC: Los cambios o las modificaciones que no hayan sido autorizados expresamente por la parte responsable de la conformidad pueden invalidar el derecho del usuario a utilizar el equipo. Fabricado para iPhone, iPad “Fabricado para iPhone” y “Fabricado para iPad” significa que el dispositivo se ha diseñado para conectarse específicamente a iPhone o iPad, respectivamente, y el desarrollador ha certificado que cumple los estándares...
-
Page 183: Referencia Rápida
Referencia rápida Vista general de los botones Botón Descripción Ajustar el volumen Pulse brevemente para o bien realizar un ajuste gradual. Pulse y mantenga pulsado el botón hasta alcanzar el volumen deseado. Pulsación breve Solo durante la transmisión de audio o las llamadas telefónicas Cambiar entre las señales de entrada siguientes: Entrada de audio/voz del interlocutor y... - Page 184 Botón Descripción Pulsación larga Encender y apagar (en espera) los audífonos. (2 segundos) Pulsación breve Durante la transmisión de audio: Detener la transmisión Sin transmisión de audio: cambiar al siguiente programa de audición Cuando los audífonos estén apagados: encender los audífonos Llamada entrante: aceptar la llamada Durante una llamada telefónica: finalizar la llamada...
- Page 185 Botón Descripción Pulsación larga Sin una llamada telefónica activa: Encender/apagar GENIUSlink Durante una llamada telefónica: Rechazar la llamada Doble pulsación Durante una llamada telefónica: Transferir la llamada Solo para nuestros transmisores: Cambiar al transmisor o alternar transmisores Emparejar un dispositivo Bluetooth estándar...
-
Page 186: Indicación De Estado Led
LED naranja apagado ➧ La pila está suficientemente cargada. Parpadeo rápido durante 5 segundos ..cuando se pulsa un botón: ➧ La pila tiene poca carga..después del encendido: ➧ La pila no tiene suficiente carga para encender GENIUSlink. - Page 187 LED naranja Parpadeo rápido durante 1 segundo ➧ Se ha producido un error. Ejemplos: Los audífonos no están dentro del radio de acción o el collar está abierto. Luz naranja fija ➧ Cargando. LED azul LED azul apagado ➧ No hay ninguna transmisión de audio o llamada telefónica activa.
- Page 188 LED azul Luz azul fija ➧ La transmisión de audio está activa. ➧ Hay una llamada telefónica activa. Parpadeo rápido ➧ Llamada telefónica entrante. Parpadeando ➧ Emparejando con dispositivos Bluetooth estándar ➧ Estableciendo conexión con nuestros transmisores Encendido durante 5 segundos después de parpadear ➧...
- Page 189 LED verde LED verde apagado ➧ No hay ningún botón pulsado, no se está cargando el dispositivo o GENIUSlink está apagado. Luz verde fija (durante la carga) ➧ La carga ha finalizado. Encendido durante 1 segundo después de pulsar botones ➧...
- Page 190 LED verde Encendido durante 2 segundos después de encender el dispositivo ➧ GENIUSlink está encendido. Encendido mientras el botón esté pulsado ➧ Ajustar el volumen. Parpadeando ➧ Estableciendo conexión con los audífonos. Se desvanece ➧ GENIUSlink se apaga. Encendido durante 5 segundos y luego apagado ➧...
- Page 191 Varios LED Parpadeo en naranja y azul ➧ Todos los teléfonos Bluetooth están desemparejados. Parpadeo en verde y azul ➧ Buscando nuestros transmisores cercanos. ➧ Buscando audífonos y dispositivos Bluetooth cercanos simultáneamente.
Need help?
Do you have a question about the GENIUSLink and is the answer not in the manual?
Questions and answers