
Related Manuals for Syscall Nttworks SB-700


Summary of Contents for Syscall Nttworks SB-700
- Page 1 User Manual Direct Pager SB-700 User Manual Please read the user manual carefully before start using the device.
- Page 2 Safety Information Please use the device only with the power AC adapter (5V/1A) ◆ provided by manufacturer. - Using the device with unauthorized accessories may cause a fire, electric shock, and product malfunction. - Please do not use high-speed charger (9V), it causes the damage of charging circuit and this will be not in warranty.
-
Page 3: Table Of Contents
Table of Contents Getting started 1. Components & Specification 2. Buttons & Charging the Battery 3. Display 4. About SB-700 Functions 5. Bell Setting 5-1. Bell Registration 5-2. Channel/Group Number Setting 5-3. Clear Bell Registration 5-4. Delete the Registered Bell 5-5. -
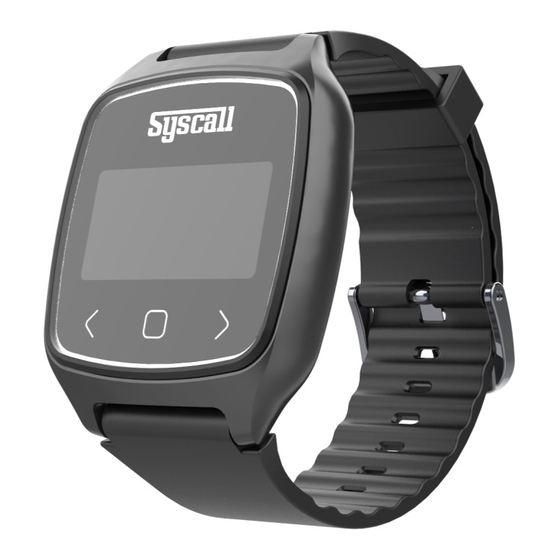
Page 4: Components & Specification
1. Components & Specification Components Power Adapter Pager User Manual and Charging Cable (DC5V 1A, Micro USB) Specification Features Frequency FSK/433.42MHz 1. Watch-type portable pager Power AC 100~240V/DC 5V/1A 2. The first water-resistance pager Battery 3.7V / 320mAh (Li-polymer) 3. Longer-lasting battery Dimension W45 x L56 x H11(mm) 4. -
Page 5: Display
Charging the Battery Open the micro USB cover at the left side of the pager. Connect the USB cable to the power adaptor. Insert the Micro-USB jack into the pager. Battery Life: Approx. 26Hours/ 20Hours (100-call) Caution · Please use the device only with the power AC adapter (5V/1A) provided by manufacturer. ·... -
Page 6: About Sb-700
4. About SB-700 There are four setup menus in SB-700, and each setup menu contains sub-setup menus as below. Bell Setting Sound Setting Display Setting Tools Function Default Scope Description Bell Registration Up to 10 digits New bell registration and re-registration Pn/Gn Setting 1/0,0~0 1/0~99... -
Page 7: Functions
5. Bell Setting 5-1. Bell Registration New bell registration and re-registration under different Bell ID. 1. Password Field 2.Enter Password 0000 3.Go to Settings 0 0 0 0 0 0 0 0 Touch and hold ‘ ’ button Tap ‘ ’... -
Page 8: Channel/Group Number Setting
5-2. Channel/Group Number Setting Set Pn/Gn when it works with a multi-transmitter. 1. Password Field 2.Enter Password 0000 3.Go to Settings 0 0 0 0 0 0 0 0 Touch and hold ‘ ’ button Tap ‘ ’ button 3 times Tap ‘... -
Page 9: Clear Bell Registration
5-3. Clear Bell Registration Register a clear bell for each registered bell. 1. Password Field 2.Enter Password 0000 3.Go to Settings 0 0 0 0 0 0 0 0 Touch and hold ‘ ’ button Tap ‘ ’ button 3 times Tap ‘... -
Page 10: Delete The Registered Bell
5-4. Delete the Registered Bell A Bell registered in SB-700 can be deleted. 1. Password Field 2.Enter Password 0000 3.Go to Settings 0 0 0 0 0 0 0 0 Touch and hold ‘ ’ button Tap ‘ ’ button 3 times Tap ‘... -
Page 11: Button Bell Setting
5-5. 3 Button Bell Setting 3 button bell may be used for Call/Bill/Clr/3bell image respectively. 1. Password Field 2.Enter Password 0000 3.Go to Settings 0 0 0 0 0 0 0 0 Touch and hold ‘ ’ button Tap ‘ ’... -
Page 12: Sound Setting
6.Sound Setting You can choose the type of alarm. 1. Password Field 2.Enter Password 0000 3.Go to Settings 0 0 0 0 0 0 0 0 Touch and hold ‘ ’ button Tap ‘ ’ button 3 times Tap ‘ ’... -
Page 13: Display Setting
7.Display Setting 7-1. Time Setting 1. Password Field 2.Enter Password 0000 3.Go to Settings 0 0 0 0 0 0 0 0 Touch and hold ‘ ’ button Tap ‘ ’ button 3 times Tap ‘ ’ button once for 1sec 4.Shift the Menu 5.Select Display Setting 6.Select Time Setting... -
Page 14: Display Type Setting
7-2. Display Type Setting Set the display type (430/440/350/A10). 1. Password Field 2.Enter Password 0000 3.Go to Settings 0 0 0 0 0 0 0 0 Touch and hold ‘ ’ button Tap ‘ ’ button 3 times Tap ‘ ’... -
Page 15: Delay Time/ Alarm Time/ Clear Bell Sound Setting
7-3. Delay Time/ Alarm Time/ Clear Bell Sound Setting · Delay Time Setting: To prevent from receiving a duplicated signal when using it with a repeater. · Alarm Time Setting: Set the alarm time when getting the signal. · Clear Bell Sound Setting: Clear bell alarm ON/OFF 1. -
Page 16: Tools
8.Tools 8-1. Self-Test Mode Self-test of button keys, sound, RF and screen. 1. Password Field 2.Enter Password 0000 3.Go to Settings 0 0 0 0 0 0 0 0 Touch and hold ‘ ’ button Tap ‘ ’ button 3 times Tap ‘... -
Page 17: Device Info & User Id Setting
4. Select Tools 5.Select Device Info 6.Check Device Info Device Info Device Info Ver: 0.01e Bell:020 ID: SYSCALL Firmware Version User ID No. of registered bell Tap ‘ ’ for User ID setting Tap ‘ ’ 3 times then ‘... -
Page 18: Initialization
6.Receiving Mode Setting Receiving Mode Receiving Mode The pager which is ‘Receiving Mode’ Precessing… has to be set first. *Multiple pagers can receive copy data Tap ‘ ’ button then data copy is ready 7.Sending Mode Setting 8.Start Data Copy 9.Data Copy Completed Sending Mode Sending Mode... - Page 20 ■ SYSCALL France - www.syscallglobal.fr 0033 (0)1 84 17 61 81 - contact@syscall.fr 242 boulevard de Stalingrad 94500 Champigny sur Marne, France Manufacturer ■ NTTWORKS CO., LTD 413-9 NTTWORKS Bldg, Galhyun-Dong, Eunpyong-Gu Seoul, Korea...
Need help?
Do you have a question about the Nttworks SB-700 and is the answer not in the manual?
Questions and answers