Table of Contents
Advertisement
Advertisement
Table of Contents

Related Manuals for Airphx CID 75k


Summary of Contents for Airphx CID 75k
- Page 1 CID 75k User & Installation Guide Rev 1.7 ● February 22, 2021 AIRPHX 1 | Page...
-
Page 2: Pre-Installation Check List
Pre-Installation Check List Please check the shipping box that your AIRPHX CID 75k arrived in for damage. If any damage is found, please contact your AIRPHX representative prior to installation 855-424-7749 (855-4 AIRPHX). Included in the box o CID 75k... -
Page 3: Table Of Contents
7 Day Timer Mode: ....................7 7 Day Timer switch settings: ................7 Modes of Operation cont...................8 Standby Mode: .......................8 Conditions that can cause the CID 75k to go into standby: ........8 Operations & Controls ..................9 On/Off Switch: ......................9 Active Indicator: .....................9 7 Day Timer Switch: ....................9... - Page 4 10 Installation Procedure ..................13 Step by Step Procedure: ..................13 LCD Display: ......................13 11 Installation Procedure Fig 1 ................14 12 Installation Procedure Fig 2 ................15 13 Filter Replacement and Reset Procedure ............16 Filter Location ...................... 16 14 Filter Replacement and Reset Procedure cont.
-
Page 5: Notice
The AIRPHX CID 75k should never be exposed to liquids. If using cleaning products or liquids near or around the unit, please turn the CID 75k off prior to cleaning. -
Page 6: Notice Cont
To protect against injury, all repairs to the CID 75k must be performed by qualified service personnel. Please contact your AIRPHX representative with any service request. Do not open the CID 75k for any reason. Doing so may put you at risk of injury and will void the warranty. -
Page 7: Modes Of Operation
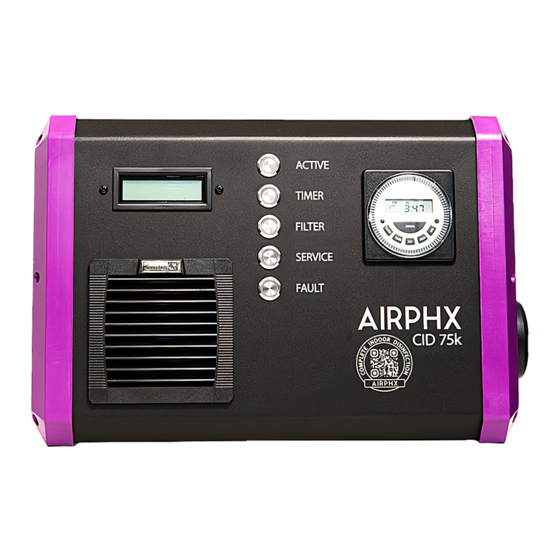
Modes of Operation The CID 75k has three modes of operation. Run Mode: In this mode of operation the CID 75k will run continuously. The Active LED will illuminate green. Run Mode switch settings: The power switch, located on the left side of the unit, is in the ON position (Switch Indicator will illuminate red). -
Page 8: Modes Of Operation Cont
In this situation, the Service LED will illuminate red indicating it is time to service the unit. 3. The CID 75k 7 Day Timer is enabled, and an off-schedule program is running. 4. The fault monitoring circuit has detected a fault with the CID 75k. In that case, the Fault LED will illuminate red, and a fault message will be displayed on the LED screen located on the front of the unit. -
Page 9: Operations & Controls
Active LED will not be illuminated. Filter Indicator/Switch: The Filter Indicator will illuminate green when the CID 75k is first turned on and remain green for 30 days of operation. At 30 days of operation, the Filter Indicator will illuminate red as a reminder to check the unit’s intake filter and change if dirty. -
Page 10: Operations & Controls Cont
Operations & Controls cont. Service Indicator/Switch: The Service Indicator will illuminate green when the CID 75k is first turned on and remain green for 1 year of operation. At the end of a year of operation, the Service Indicator will illuminate red as a reminder to change the unit’s plasma chamber. -
Page 11: Installation Overview
The CID 75k mounts to a wall utilizing a small two-piece Vesa mount (provided). The mount comes preinstalled on the CID 75k. To install the wall mount section of the Vesa mount, you must first remove the wall mount section from the back of the unit. -
Page 12: Installation Overview Cont
Punch or Scratch Awl Top of Mount Wall Mount Section CID 75k Mount Section Preinstalled on the CID 75k Phillips Locking Screws Phillips Screw Note: The wall mount for your unit may vary from the Drilling Threaded one shown here. -
Page 13: Installation Procedure
8. Once the mount is secured to the wall, align the section of the mount on the back of the CID 75k so that it slides down from the top onto the section of the mount that is mounted on the wall as shown in Fig 2. The CID 75k will slide down onto the wall mounted section from the top. -
Page 14: Installation Procedure Fig 1
11 Installation Procedure Fig 1 Wall Mount Locking Screws Fig 1. 14 | Page... -
Page 15: Installation Procedure Fig 2
12 Installation Procedure Fig 2 CID 75k Section of the Vesa Mount Wall Threaded Anchors Wall Section of the Vesa Mount Fig 2. 15 | Page... -
Page 16: Filter Replacement And Reset Procedure
13 Filter Replacement and Reset Procedure Filter Location 1. Turn the CID 75k off. 2. Locate the intake filter housing on the front of the unit. The front grill must be removed to gain access to the filter media. 3. Pull on the top outer edges of the grill carefully to remove it as shown in Fig 4. -
Page 17: Filter Replacement And Reset Procedure Cont
14 Filter Replacement and Reset Procedure cont. Fig 1A. 17 | Page... -
Page 18: Filter Replacement And Reset Procedure Cont
15 Filter Replacement and Reset Procedure cont. Fig 1B. 18 | Page... -
Page 19: Plasma Chamber Replacement And Reset Procedure
16 Plasma Chamber Replacement and Reset Procedure 1. Turn the power switch off on the CID 75k. 2. Carefully remove the replacement plasma chamber from the box it was shipped Note: The plasma chamber contains a glass element and is very fragile. If the shipping box or plasma chamber looks damaged, please contact your AIRPHX representative for a replacement. -
Page 20: Plasma Chamber Replacement Process Cont
17 Plasma Chamber Replacement Process cont. Plasma Chamber Exhaust Grill Fig 1C. Exhaust Grill Screws Fig 1D. 20 | Page... -
Page 21: Plasma Chamber Replacement Process Cont
18 Plasma Chamber Replacement Process cont. Contacts Plasma Chamber Fig 1E. 21 | Page... -
Page 22: Plasma Chamber Replacement Process Cont
19 Plasma Chamber Replacement Process cont. Fig 1F. 22 | Page... - Page 23 A number of frequently asked questions about the CID 75k may be found at www.airphx.com/FAQs. Some questions concerning operations are set forth below. Q – I have plugged the CID 75k into a 120-volt outlet, but the unit will not turn on. What should I do? A –...
-
Page 24: A Cont
Q – What is standby? A – Standby is when the CID 75k stops and the turbine is shut off. The unit is silent and appears to be off, but the unit is in fact powered on and waiting for a condition to clear in order to resume operation. -
Page 25: Warranty
BY FAX WITHIN 30 DAYS AFTER THE DISCOVERY OF THE ALLEGED DEFECT AND MAKE THE PRODUCT AVAILABLE FOR INSPECTION BY AN AIRPHX REPRESENTATIVE. FAILURE TO TIMELY AND PROPERLY NOTIFY AIRPHX IN WRITING OR BY FAX WILL RESULT IN NULLIFICATION OF THIS WARRANTY. - Page 26 3. Except in Canada, AIRPHX does not pay labor outside of the United States. 4. Warranties outside the United States and Canada may vary. Please contact your local Dealer for details. This limited warranty shall not apply to: 1. Cosmetic items.
-
Page 27: Disclaimer
AIRPHX representative. Service must be obtained by calling AIRPHX at 1 (855) 4 AIRPHX / 1 (855) 424-7749. THESE SHALL BE THE SOLE AND EXCLUSIVE REMEDIES OF THE BUYER FOR ANY BREACH OF WARRANTY.
Need help?
Do you have a question about the CID 75k and is the answer not in the manual?
Questions and answers