Advertisement
Quick Links
Advertisement

Related Manuals for Gannet Pro


Summary of Contents for Gannet Pro
- Page 1 Gannet Pro / Pro+ User Manual V1.1 2021.01...
-
Page 2: Using This Manual
Gannet Pro / Pro+ Battery Safety Guidelines It is strongly recommended that you watch our tutorial videos on our Official Gannet Tutorials YouTube page and read the quick-start guide before you take your first flight. All the information you need for your... - Page 3 South Africa, in contravention of any regulations applicable to the operation of the drone in the relevant country outside of South Africa. LIABILITY 4.1. We, Gannet, the manufacturer and distributor of this drone, disclaim all liability from the operation of the drone resulting in – 4.2. Collision with other aircraft.
- Page 4 Propeller safety The Gannet Pro’s propeller is very hard and very sharp. The material of their composition is carbon fibre. This material makes the propeller has a high strength and improves the flight of the quad copter.
- Page 5 Stable and reliable waterproof kit GANNET PRO & PRO + are equipped with a high-stability waterproof seals through out the quad copters frame to prevent rain, dust, water and the like from entering the interior of the aircraft, effectively solving the problem...
-
Page 6: Product Profile
Product Profile The Gannet Pro & Pro+ is an extremely robust fishing and search & rescue drone, fully Waterproof design with high lift capacity. Fishing Drones combine the technology of avionics, electronics and robotics to create a flying machine. When flying a drone, you are a pilot with all the responsibilities that go with that. -
Page 7: Battery Safety
• NEVER charge a hot battery, always let it cool down first, • Always use the supplied charger by Gannet • NEVER exceed a 1C charge Amperage best to charge the battery at 5-5.5A it is slower but safer •... - Page 8 Quick Start Guide Drone: Installing the Propellers • Always ensure that the correct propellers is installed on the correct motors, they are match marked with either no markings as for Front Right and Back Left or with circles as for the Front Left and Back Right motors.
- Page 9 On startup: • ALWAYS switch on the remote first, failure to do so can result in a fly away, on power up of the drone a rapidly flashing orange indicator light on the drone will indicate that the remote is not on. In this instance power the drone off, power the remote on and after waiting at least 3 seconds power the drone on again.
- Page 10 Take off and flight • Always stand well clear of the drone, carbon fibre propellers can be very dangerous and must be avoided, never try to stop spinning propellers by hand! • Arm the drone by pushing inwards and down with both controller sticks, •...
- Page 11 General warnings and care • Familiarize yourself with your local drone laws and abide by them at all times. • Do not fly near known sources of high interference, this includes Cell phone towers, railroad lines and power lines, never calibrate the drones compass near such a source of interference, this includes cell phones and smart watches •...
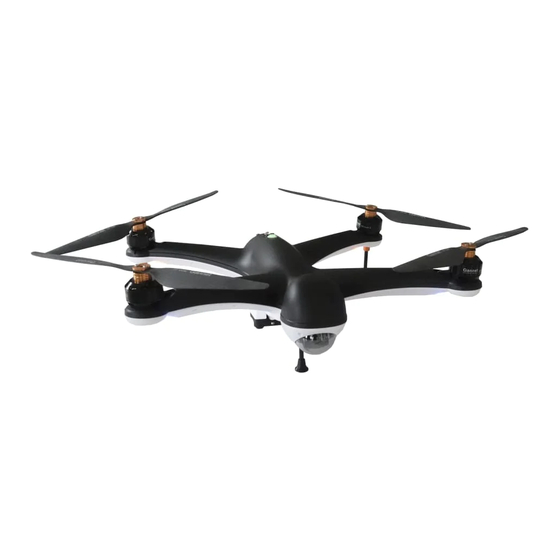
- Page 12 Drone Components [ 1 ] Carbon Fibre Propeller [ 6 ] Waterproof Brushless Motor [ 2 ] On/Off Button [ 7 ] Rubber Foot [ 3 ] Flight Indication Lights [ 8 ] LED Status Indicator [ 4 ] Payload Release [ 9 ] Rear Hatch [ 5 ] Landing Gear [ 10 ] Rear Hatch Thumb Screw...
- Page 13 Drone Indication Lights Flight Modes GPS Mode One Green Flash Atti Mode One Yellow Flash One Yellow/One Green Flash RTH Mode GPS Status Good GPS signal No Red Light Satisfactory GPS signal One Red Flash Two Red Flashes Poor GPS signal No GPS connection, or no Three Red Flashes GPS signal...
-
Page 15: Remote Control Components
Remote Control Components [ 1 ] On/Off Button [ 8 ] Flight Mode Switch [ 2 ] LCD Display [ 9 ] Flight Control Switch [ 3 ] Power Indicator [ 10 ] Lanyard Clip [ 4 ] Left Stick [ 11 ] Antenna [ 5 ] Right Stick [ 12 ] Cell Phone Support... - Page 16 Propellers The Gannet Pro / Pro+ has two pairs of propellers - two clockwise propellers and two counter-clockwise propellers. The hub of each motor is marked with a circle to indicate the propeller used for that motor. Propellers cannot be attached to the wrong motor by accident.
-
Page 17: Preparing For Flight
Preparing for Flight Before every flight, it is important to prepare your drone properly. This section is presented in two sections: 1. Preparation before your first flight (or when the drone is more than 200km from its last flight location) 2. - Page 18 Compass Calibration Process Compass Calibration is performed with the drone outdoors and away from any sources of magnetic interference such as metal structures, radio masts or mobile phones. 1. Place the drone on a horizontal surface. Remove propellers and accessories. Power on the controller then the drone.
- Page 19 Drones are fun to fly, but they are not toys. Be a responsible pilot and prepare for your flight properly to fly safely and get the most out of your Gannet Pro / Pro+, follow this checklist before every flight.
- Page 20 Batteries The Gannet Pro / Pro+ has two batteries required for operation. One battery powers the drone, the other powers the drone remote controller. It is important to charge the batteries before use and install them correctly. DO NOT charge the remote control with a charger over 5.5V.
- Page 21 The batteries used in the Gannet Pro / Pro+ is a LiHV battery. LiPo Batteries should not be left unattended with charging. Place the LiPo battery on a concrete floor or a metal tray when charging.
- Page 22 Checking Battery Voltage Gannet supplies a battery checker with the Gannet Pro / Pro+. The battery checker will check the voltage of the battery and the voltage of each cell in the battery. Plug the balancer cable of the battery into the battery tester. The tester will BEEP, and then show the total voltage of the battery, followed by the voltage of each cell.
- Page 26 AC/DC Smart Balance Charger 1. Mode Switch 6. Balance Interface 2. Decrease 7. LCD Screen 3. Increase 8. AC Input 4. Start/Confirm 9. DC Input (for connection to a car charging port) 5. Main Output Connection Instructions 1. The charger can be connected to an AC outlet (100~240V AC) or to a suitable high-current DC source 11~18V such as a car charging port or cigarette lighter adapter.
- Page 27 Gannet Charger is built-in switching power supply. It can be powered up with 12V car battery or 100-240V AC input, suitable for use with LiPo / LiFe / LiHV / Li-lon / NiMH / NiCd / Pb battery.
- Page 28 Balancing Individual Cells Battery Discharging During the process of discharging, Gannet Charger can monitor and balance each cell of the battery individually. Error message will be indicated and process will be ended automatically if the voltage of any single one cell is abnormal.
- Page 29 Terminal Voltage Control (TVC) The charger allows user to set the charge/dischareg and voltage. Capacity Limit The charging capacity is always calculated as the charging current multiplied by time. if the charging capacity exceeds the limit, the process will be terminated automatically when you set the maximum value.
- Page 31 Charging During charge process, a specific quantity of electrical energy is fed into the battery. The charge quantity is calculated by multiplying charge current by charge time. The maximum permissible charge current varies depending on the battery type or its performance, and can be found in the information by the battery manufacturer.
- Page 34 2) Connecting The Battery 3).Balance Socket Gannet Charger comes with the built in switching power supply. You can connect the AC power cord directly to the main AC socket (100-240V AC) or attaching directly to 12V car batteries. It is critically important that you use a fully charged 13.8V car battery.
- Page 35 BATT/PROGRAM Select Press “STOP” and “-“to go through all the programs and press “START/ENTER to enter LiPo BATT program. Mode Select Press “+” and “-” to go through all the modes (balance charge mode,storage mode, discharge mode and fast charge mode). Battery Setting Press START, the present value will start to blink.
- Page 37 Operation Instructions 1. Standby After the charger is powered on, it will enter standby mode. Connect the battery and the balance port. The charger will automatically detect the connected battery type. 2. Charging Current selection After entering the main interface, you can press the “INC” and “DEC”...
- Page 38 Payload Release System 1. Tension Adjustment Wheel 2. Tension Adjustment Indicator 3. Easy Release Arm (for baits over 800g) 4. Release balls Operation Instructions 1. Put the release switch into the on position. 2. Load bait, sinker and 2 additional 7 ounce sinkers. 3.
-
Page 39: Flight Modes
RTH Mode : The Gannet Pro / Pro+ has an Auto Return Home function if the GPS successfully recorded the home point before takeoff. If the remote controller and the aircraft loose communication with each other, the drone will automatically return to the take off point and land.
Need help?
Do you have a question about the Pro and is the answer not in the manual?
Questions and answers